Hi Bluefire. sorry it took so long. Here is how i set things up according to what i saw in your suggestion. I think i missed something?? thanks for taking time to look at my screen shots as well.
I have my windows 10 BIOS intel virtualization technology checked (should this be enabled??)
ESXi virtulization 0.png
I have the «Virtualize Intel VT-x/EPT or AMD-V/RVI» box checked/enabled for my ESXi 7.
ESXi virtulization 1.png
I have Hyper-v for windows 10 unchecked.
ESXi virtulization 2.png
If the Windows 10/11 host has Hyper-V enabled, nested virtualisation will not work with Workstation Pro. That is the meaning of the «Virtualized Intel VT-x/EPT is not supported on this platform».
Make sure you have Hyper-V removed from the host so that nested virtualisation will work ???.
https://kb.vmware.com/s/article/2146361
Is this what you are reffering to?
Process to turn off virtualization-based Security:
Below steps can be followed to turn off virtualization-based Security for Windows 10 Home & Pro:
For Microsoft Windows 10 Pro & above:
- Edit group policy (gpedit)
- Go to Local Computer Policy > Computer Configuration > Administrative Templates > System
- Double Click on Device Guard on the right hand side to open.
- Double Click on «Turn On Virtualization Security» to open a new window
- It would be «Not Configured», Select «Disable» and click «Ok»
- Close the Group Policy Editor.
- Restart the system
Also make sure that Memory Integrity is OFF
Windows Security -> Device Security -> Core Isolation details
“Memory Integrity is a feature inside a broader set of protections called Core Isolation. It uses hardware virtualisation to protect sensitive processes from infection. These features are a subset of virtualisation-based security features that Microsoft has offered to enterprise users since Windows 10 shipped.Mar 9, 2020”
https://nakedsecurity.sophos.com/2020/03/09/microsoft-turn-off-memory-integrity-if-its-causing-probl…
Also make sure that Memory Integrity is OFF
Windows Security -> Device Security -> Core Isolation details
This is the current state of my Memory Intefrity
ESXi virtulization 3.png
If your Windows host is a member of an AD domain, items such as Memory Integrity/VBS can also be enforced via domain policy. If that is the case you need to contact your domain admin.
When Hyper-V is detected, you will see these lines in the vmware.log
<timestamp> In(05) vmx IOPL_Init: Hyper-V detected by CPUID
<timestamp> In(05) vmx Monitor Mode: ULM
Once Hyper-V is no longer detected, vmware.log Monitor Mode should show as CPL0, and nested virtualisation should work (with the Virtualize Intel VT-x in the VM processor settings enabled).
With the above settings, I get this when I power on my ESXi.
ESXi virtulization 5.png
When Hyper-V is detected, you will see these lines in the vmware.log
<timestamp> In(05) vmx IOPL_Init: Hyper-V detected by CPUID
<timestamp> In(05) vmx Monitor Mode: ULM
In my ESXi log, I see
2022-01-18T16:34:11.659Z In(05) vmx IOPL_Init: Hyper-V detected by CPUID
2022-01-18T16:34:11.777Z In(05) vmx Monitor Mode: ULM
Once Hyper-V is no longer detected, vmware.log Monitor Mode should show as CPL0, and nested virtualisation should work (with the Virtualize Intel VT-x in the VM processor settings enabled) ???
thanks for your suggestions and advice

Hello Everybody,
Have you ever installed and used VMware virtual machine to work? If you have already used it, then it is inevitable that a frequent error occurs during the installation of VMware Workstation as below:
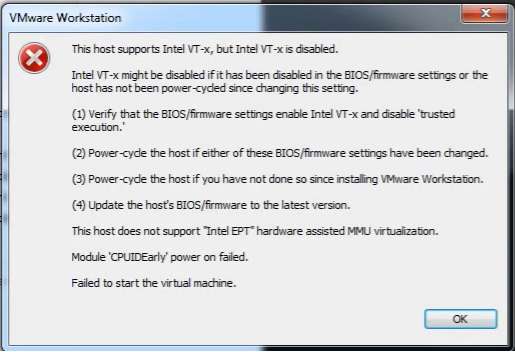
Error «This host supports Intel VT-x» in VMware Workstation
The specific error contents are as follows:
This host supports Intel VT-x, but Intel VT-x is disabled.
Intel VT-x might be disabled if it has been disabled in the BIOS / firmware settings or the host has not been power-cycled since changing this setting.
(1) Verify that the BIOS / firmware settings enable Intel VT-x and disable ‘trusted execution.’
(2) Power-cycle the host if either of these BIOS / firmware settings have been changed.
(3) Power-cycle the host if you have not done so since installing VMware Player.
(4) Update the host’s BIOS / firmware to the latest version.
This host does not support «Intel EPT» hardware assisted MMU virtualization.
This host does not support virtualizing real mode. The Intel «VMX Unrestricted Guest» feature is necessary to run this virtual machine on an Intel processor.
Module ‘CPUIDEarly’ power on failed.Failed to start the virtual machine
Normally by default, the VT-x function (which supports running virtual machines) is turned off or disabled by the manufacturer. When you install the VMware program and launch it, the computer will report the error as above.
Today, QTit will give you a quick guide to help you fix this common error.
How to do:
Fix error «this host supports intel vt-x but intel vt-x is disabled»
Step 1: Restart your computer, access BIOS SETUP. Access to BIOS SETUP is different for each computer. You can see the access shortcuts on each model as below:
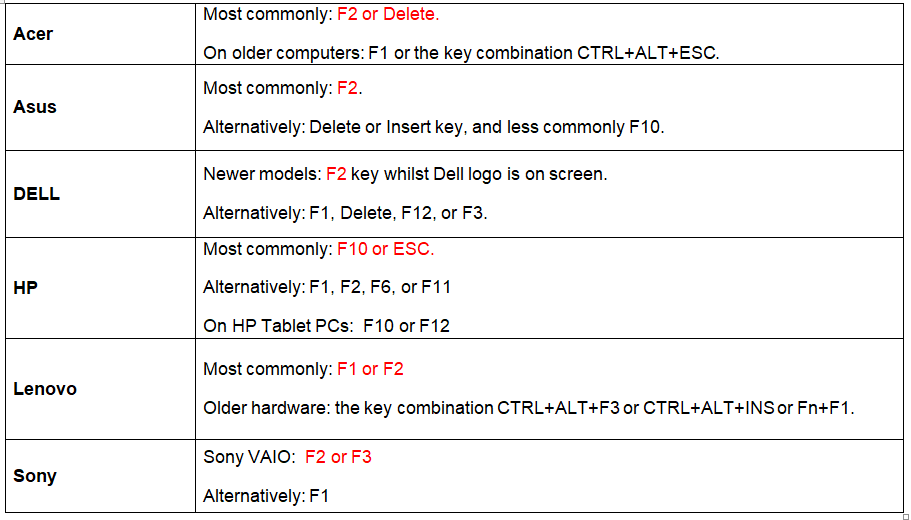
Keyboard shortcut to access BIOS SETUP
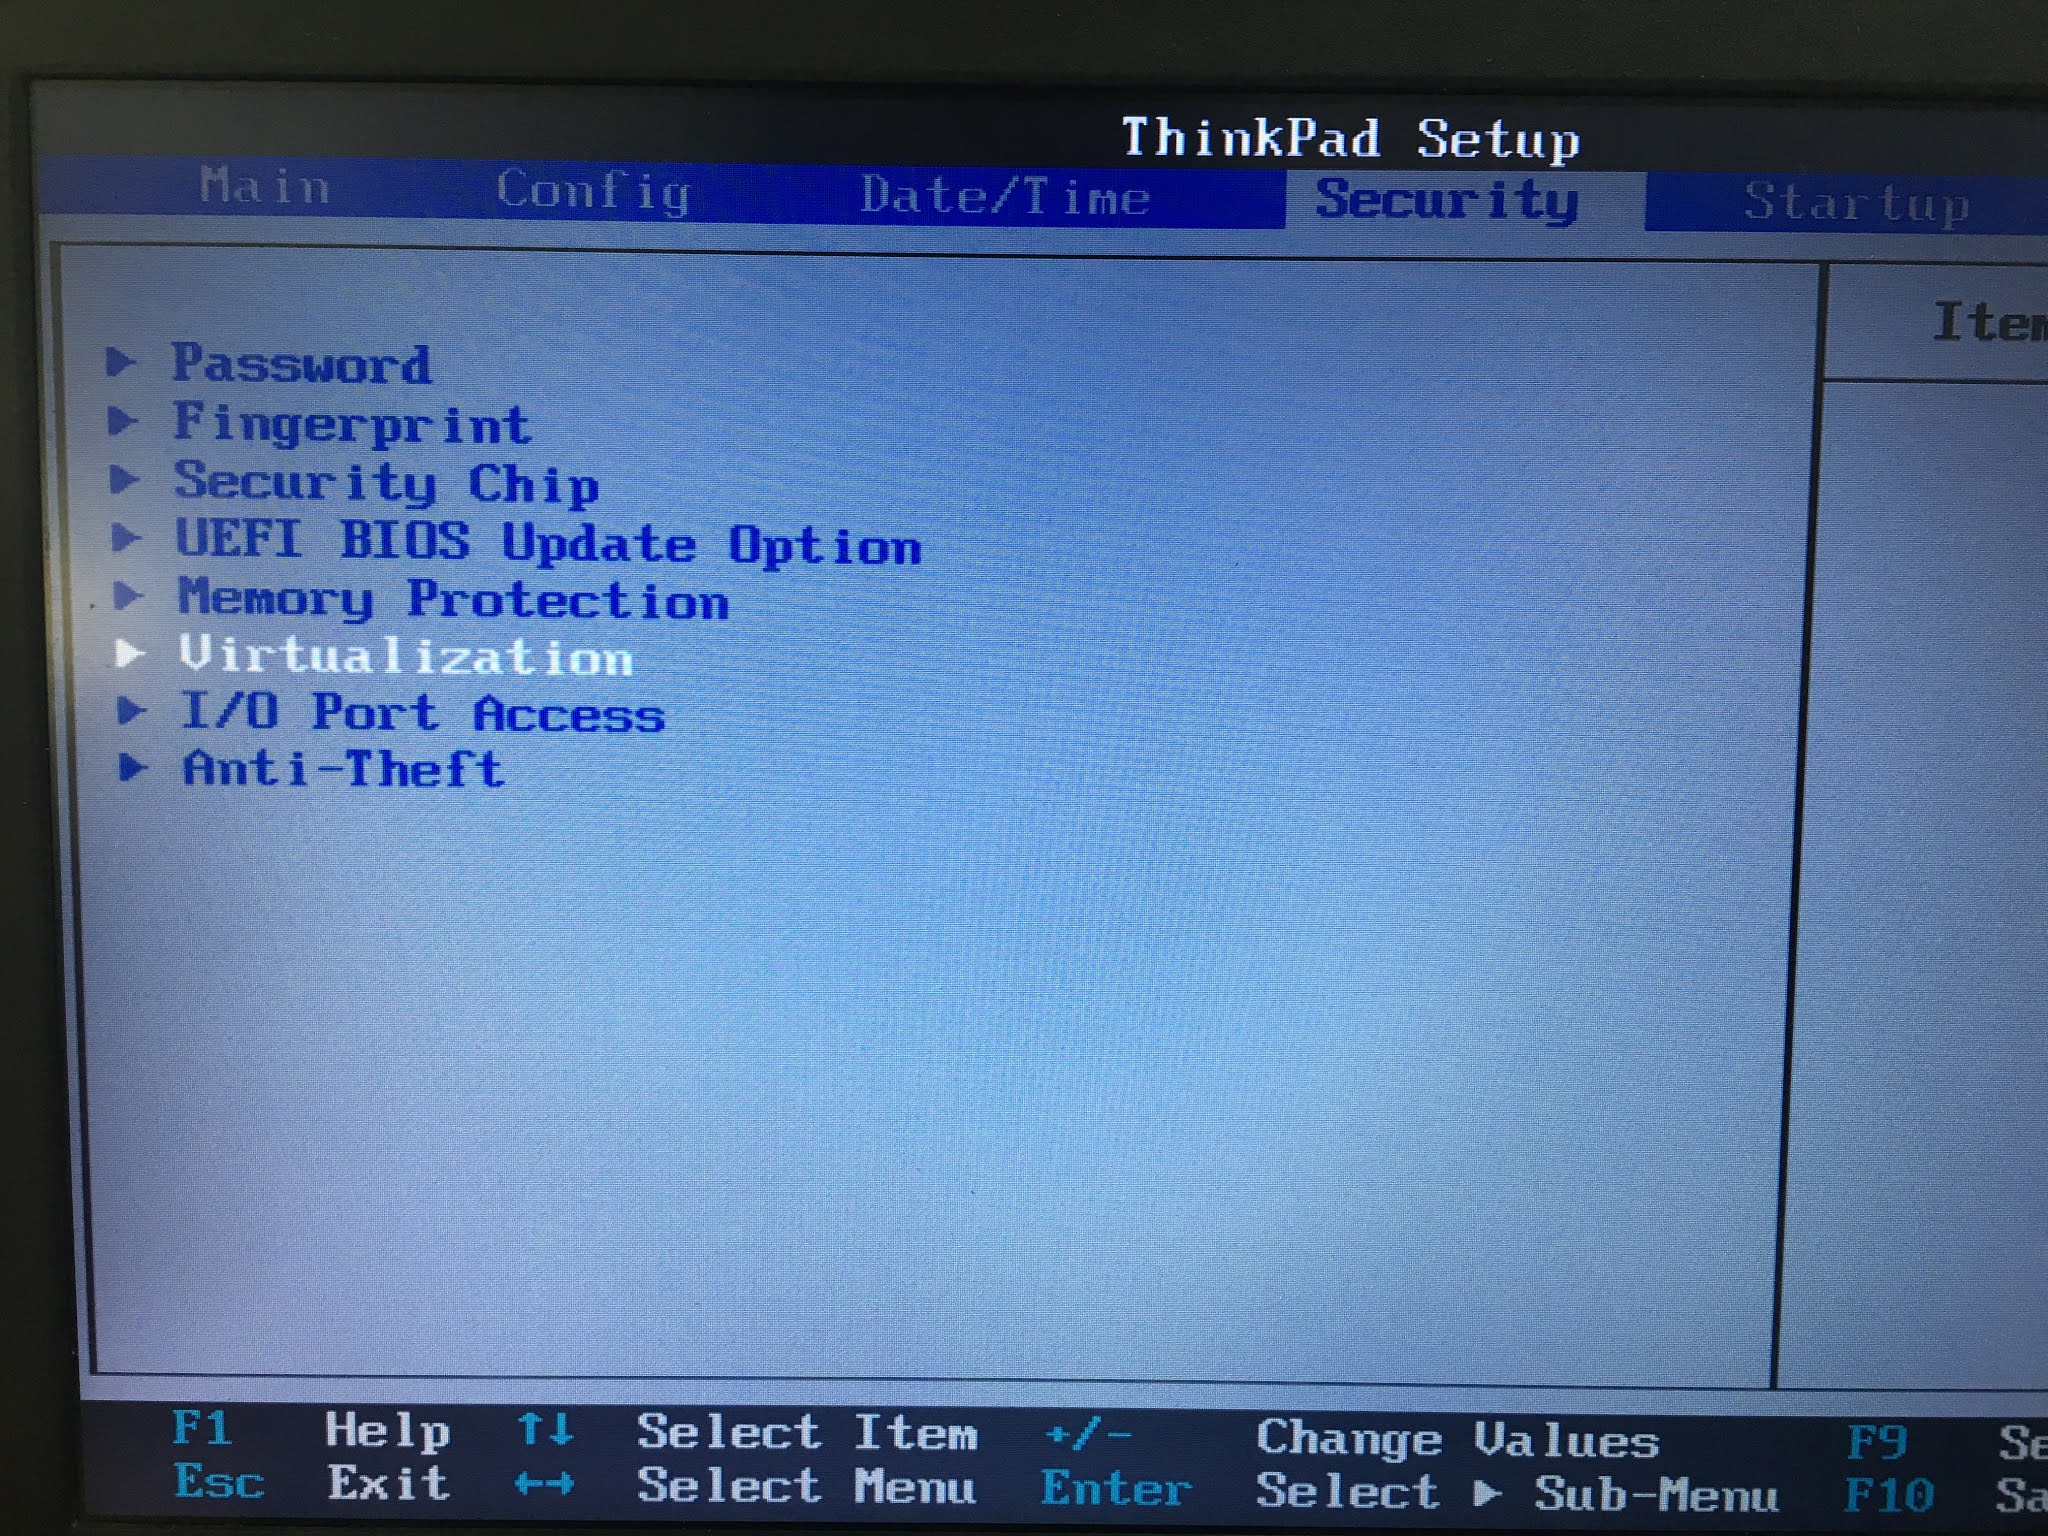
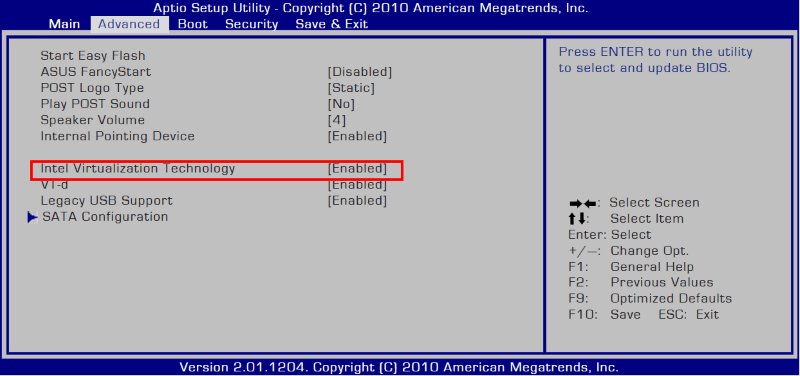
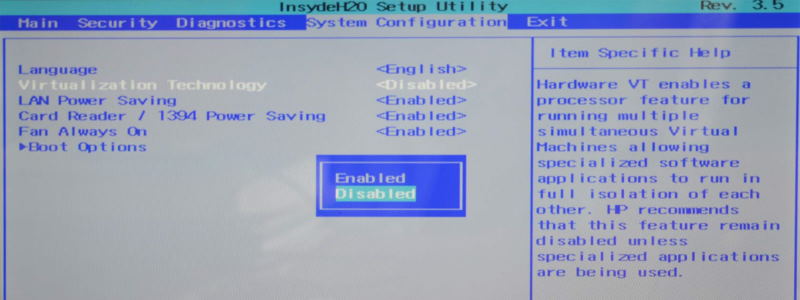
Step 2: Access to the Virtualization function (usually located on the Security or Virtualization Support tab)
Virtualization function
Step 3: Find 2 items with similar content:
+ Intel (R) Virtualization Technology
+ Intel (R) VT-d Feature
You will now see that the functions are in Disabled mode. Please Enabled them.
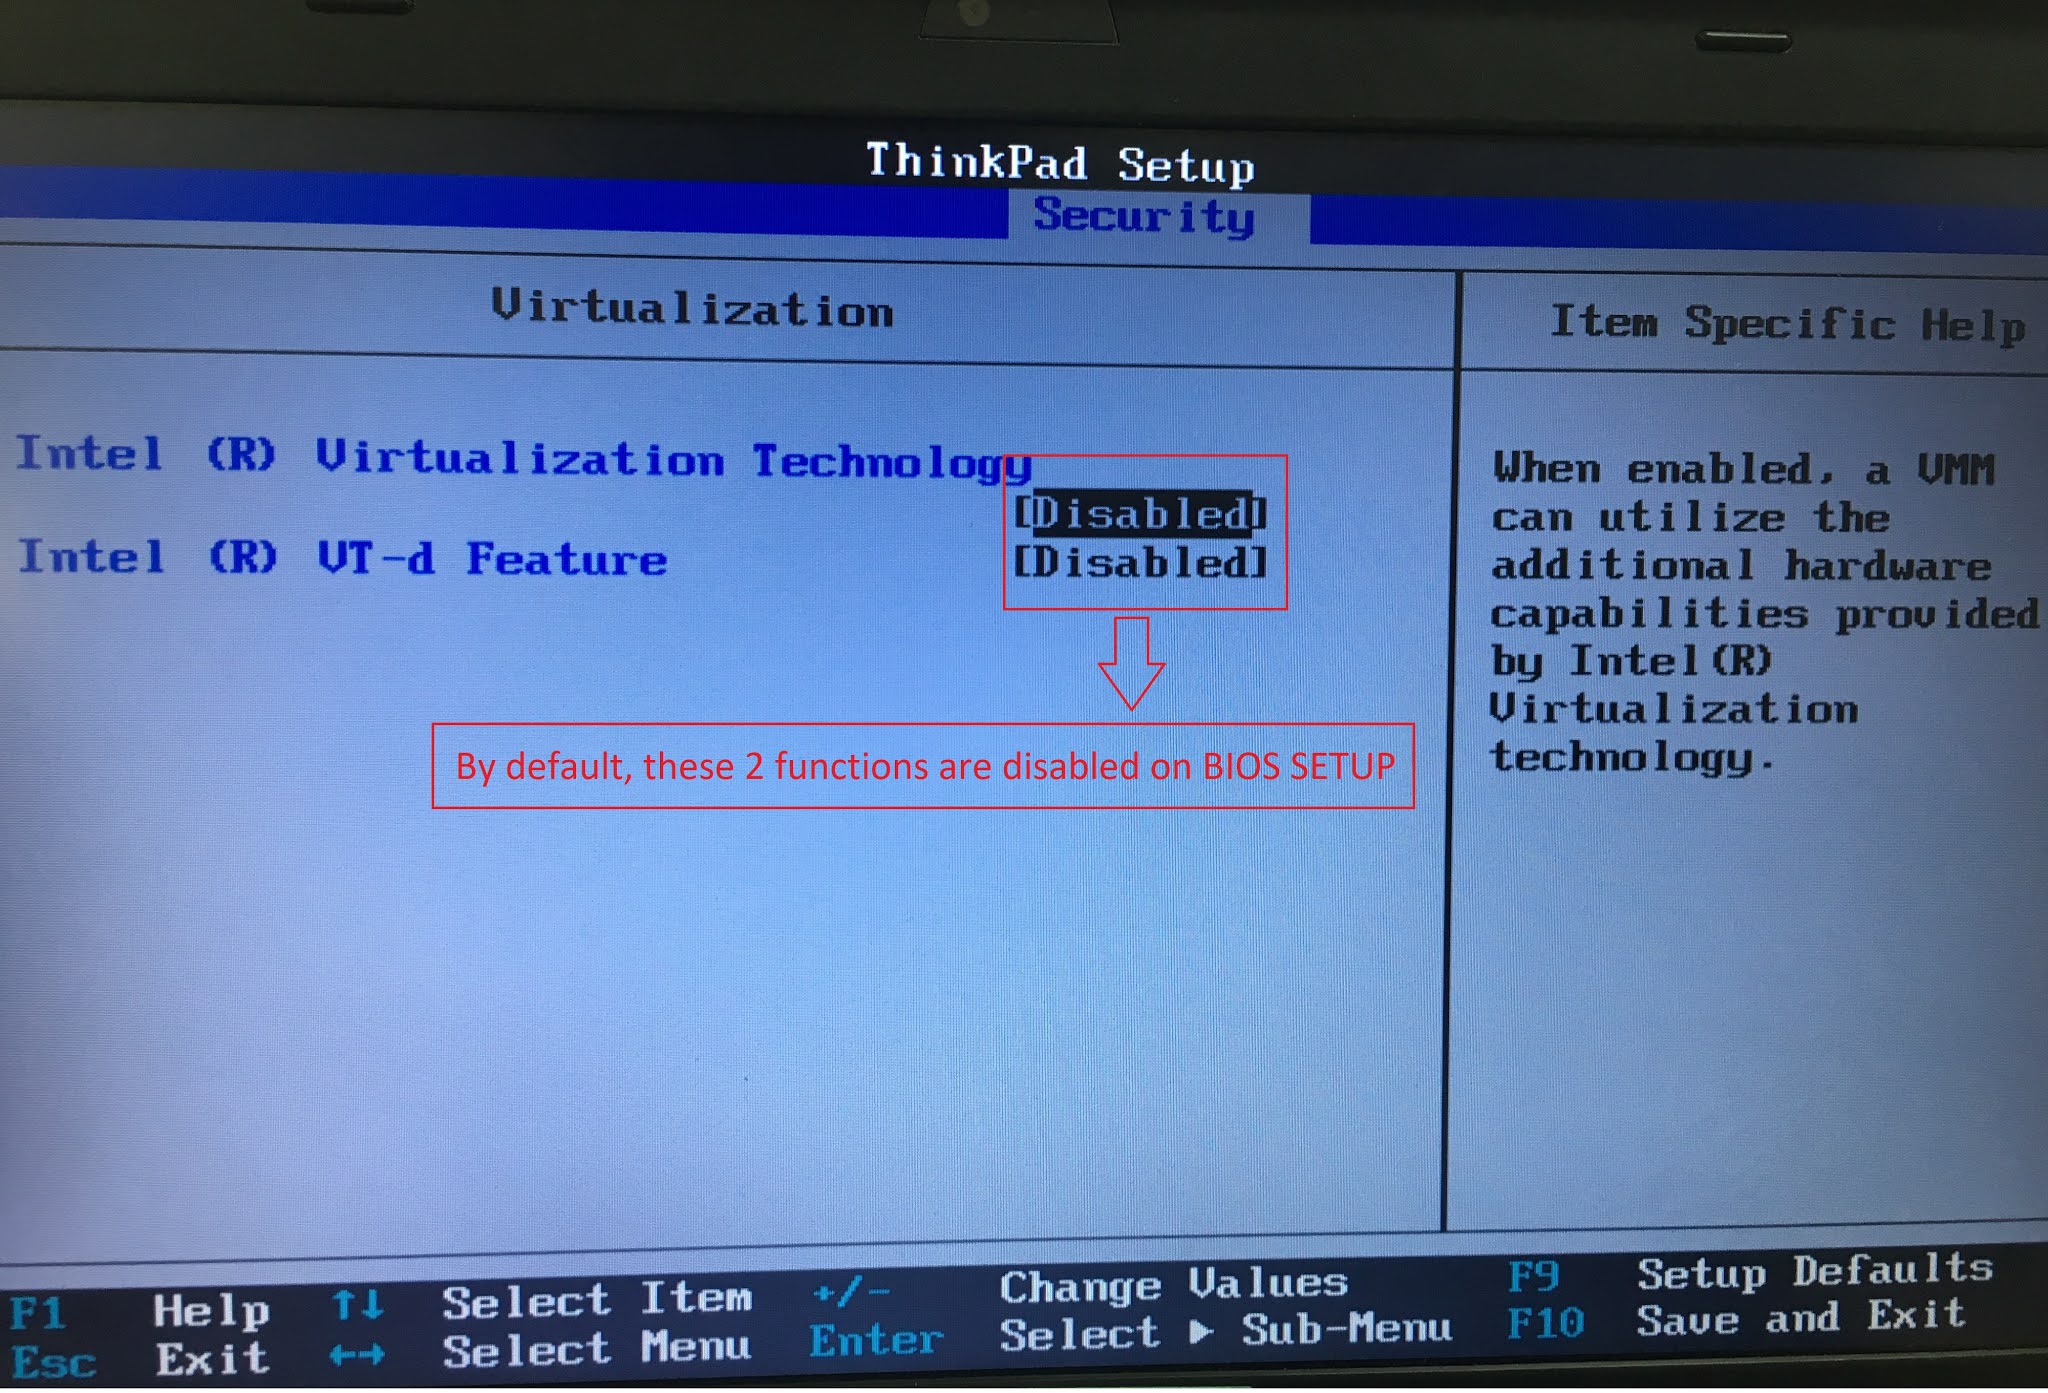
By default, the Virtualization function is disabled by the manufacturer
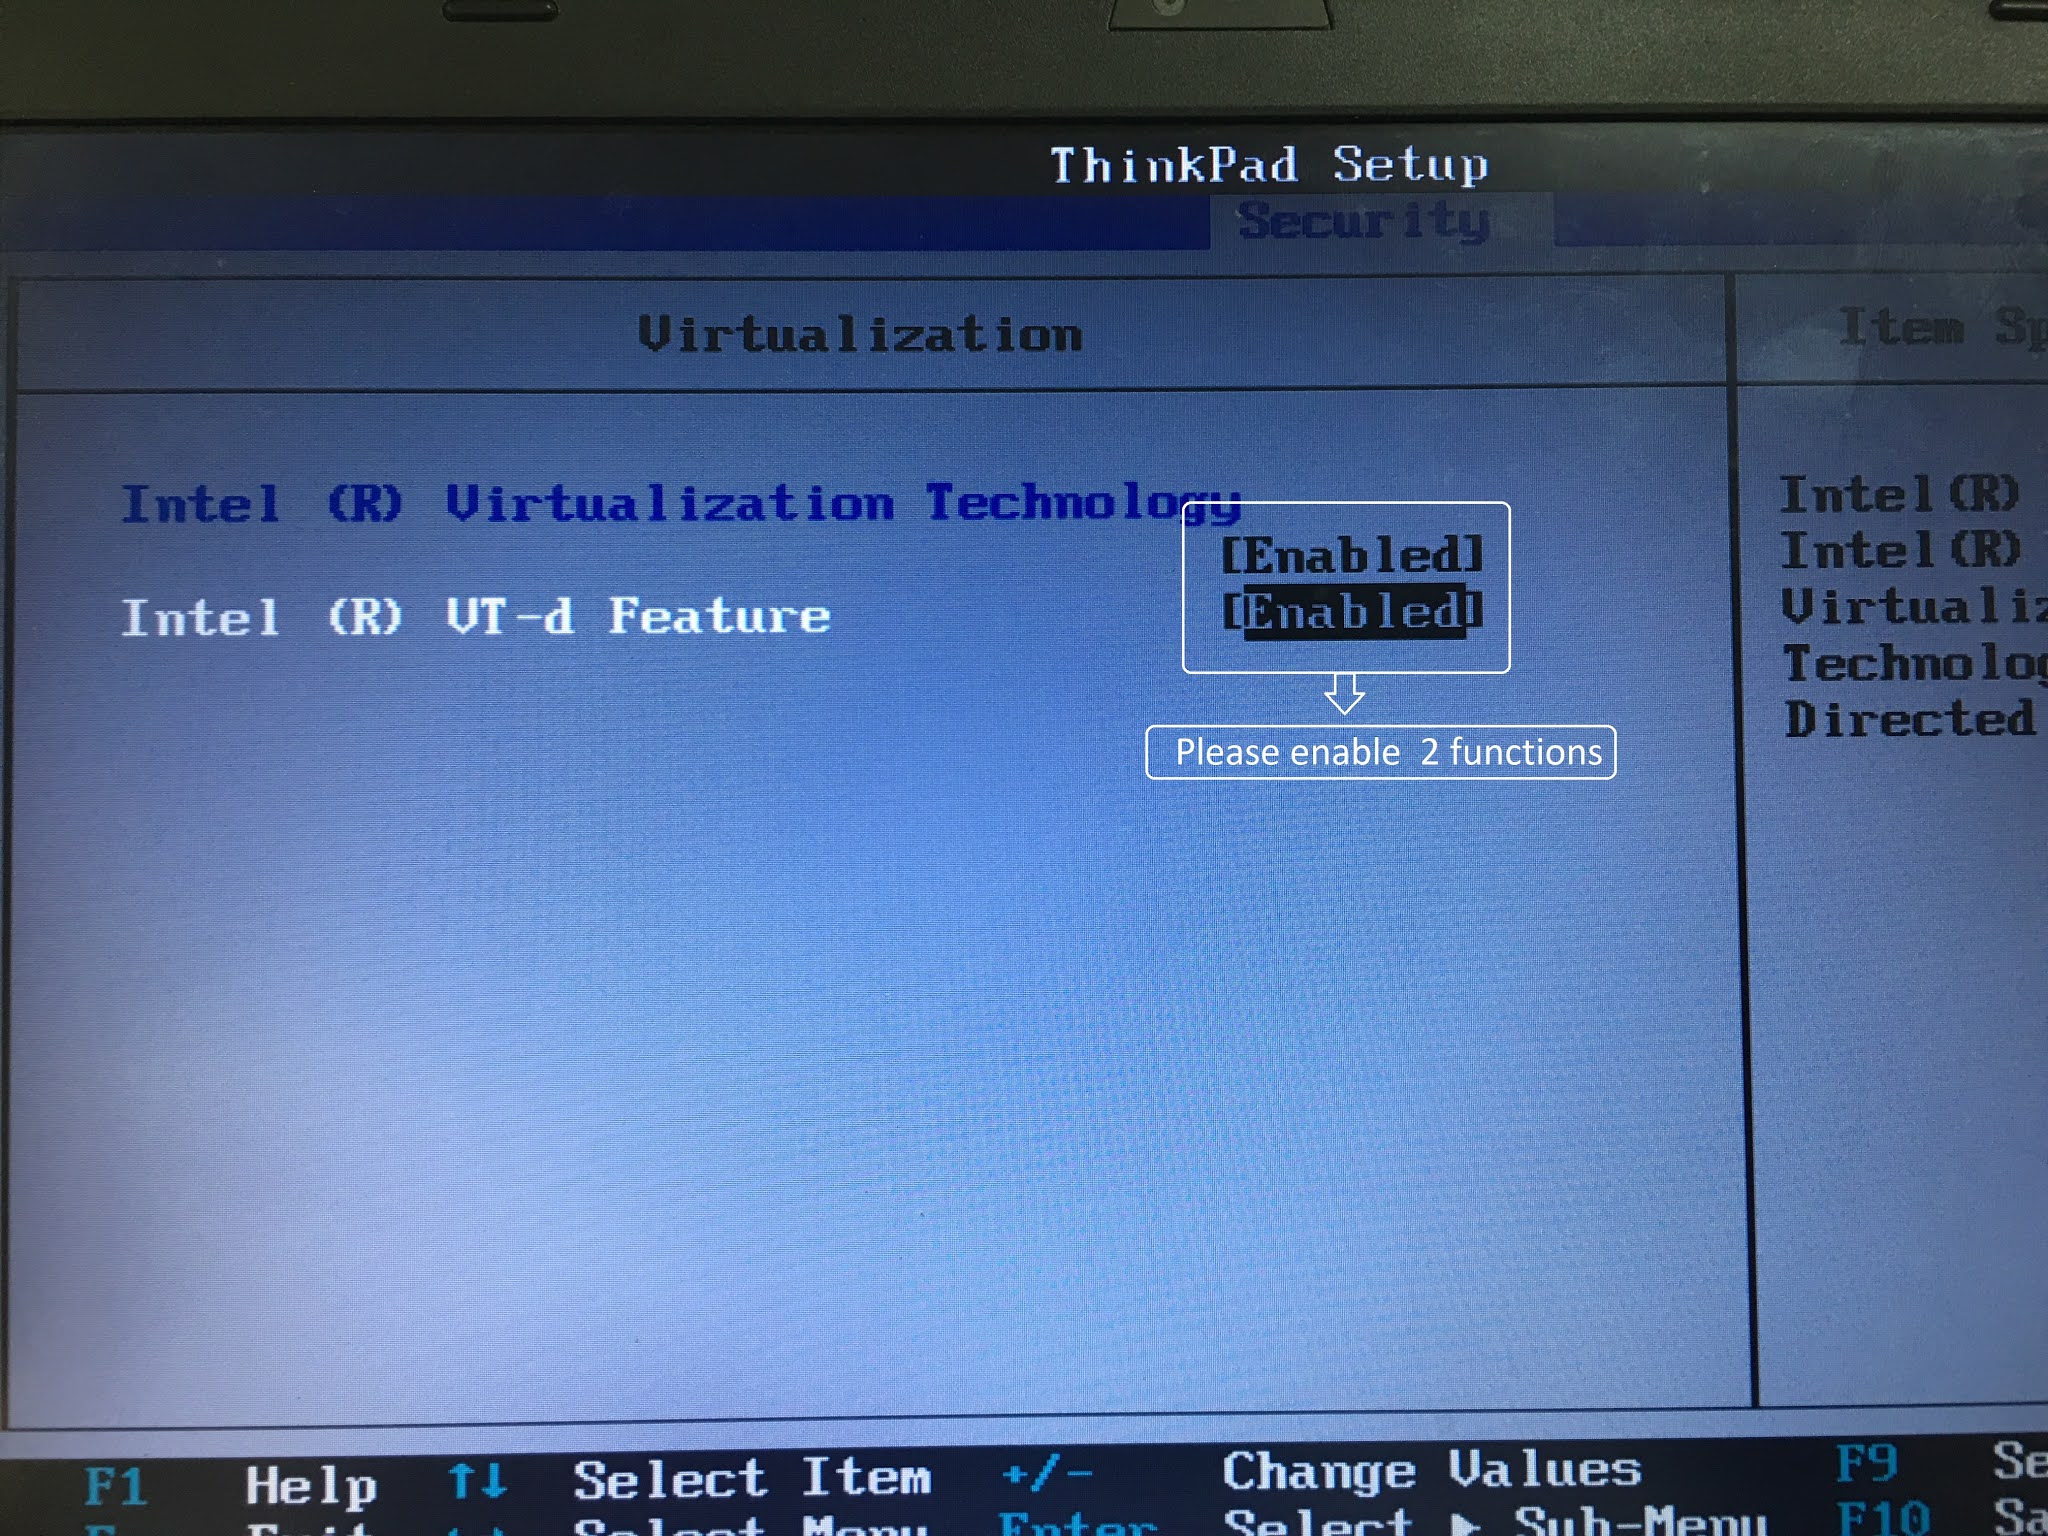
Select Enabled mode to enable Virtualization function in BIOS SETUP
After customization is complete, press F10 to save your settings. Now try again on VMware to see if the error is gone!
Conclusion:
Simple, right? With a few basic steps you can fix the error and and enable virtualization technology in windows 10.
In addition, if you have any problems with your computer, please contact us directly through the QTitHow fanpage. We will try to help and answer you as soon as possible. Thank you!
Tags: this host supports intel vt-x but intel vt-x is disabled, this host supports intel vt-x, how to enable virtualization in bios windows 10, how to enable virtualization in windows 10, how to enable vt in windows 10, how to enable vt on windows 10, how to enable virtualization technology in windows 10
Maybe you are interested?
- Fixed «Japanese file name are corrupted when unzip or READ the Zip/RAR file»
- How lucky! Fixed Breadcrumbs issue detected for Blogger in Google Search Console
- Rescue Excel file with Error: “Excel cannot open the file because the file format or file extension is not valid”
- Solved 100% PowerPoint Found a Problem with Content
- 3 Easy Steps to Fix status_invalid_image_hash in Microsoft Edge
- Fixed Name Conflict In Excel
- Fixed Error MSVCP140.dll Is Missing
Share
Содержание
- ИТ База знаний
- Полезно
- Навигация
- Серверные решения
- Телефония
- Корпоративные сети
- Что делать? This host supports Intel VT-x
- Интенсив по Виртуализации VMware vSphere 7
- Полезно?
- Почему?
- Intel vt x error in vmware
- Quick Guide to fix Error «This host supports Intel VT-x» in VMware Workstation
ИТ База знаний
Курс по Asterisk
Полезно
— Узнать IP — адрес компьютера в интернете
— Онлайн генератор устойчивых паролей
— Онлайн калькулятор подсетей
— Калькулятор инсталляции IP — АТС Asterisk
— Руководство администратора FreePBX на русском языке
— Руководство администратора Cisco UCM/CME на русском языке
— Руководство администратора по Linux/Unix
Навигация
Серверные решения
Телефония
FreePBX и Asterisk
Настройка программных телефонов
Корпоративные сети
Протоколы и стандарты
Привет, друг! Если ты читаешь эту статью, то скорее всего столкнулся с ошибкой VT-x/AMD-V hardware acceleration is not available on your system когда пробовал создать виртуальную машину в Virtual Box, или такой ошибкой при работе с VMWare: This host supports Intel VT-x, but Intel VT-x is disabled или чем-то похожим при работе с другой средой виртуализации. Продолжай читать и ты обязательно найдёшь причину!

Вместе и с нуля пройдем все этапы проектирования, администрирования, резервирования и масштабирования БД с использованием PostgreSQL, MS SQL и MySQL

Для начала, позволь вкратце объяснить, что такое VT-x и AMD-V.
VT-x – это технология, разработанная компанией Intel в 2005 году, которая позволила процеcсорам (CPU) данного производителя поддерживать аппаратную виртуализацию. Грубо говоря, появилась возможность имея один компьютер, создать другой внутри него и даже с другой операционной системой!
AMD-V — это технология аппаратной виртуализации от компании AMD. Первые процессоры от производителя AMD появились на рынке годом позже, в 2006 году.
Итак, теперь вот тебе топ 3 причин, по которым ты мог встретить вышеупомянутые ошибки:
- Процессор твоего «комплюктера» попросту не поддерживает технологии виртуализации VT-x/AMD-V.
Возможно ты являешься обладателем очень старого или наоборот крайне специфичного девайса, CPU которого просто не умеет в виртуализацию. В таком случае, ты не сможешь устранить те ошибки и запустить виртуалку в любой среде виртуализации. Но не огорчайся, есть масса способов покрутить виртуалки, например, воспользоваться услугами VDS/VPS хостера!
Hyper-V это проприетарная технология виртуализации от Microsoft, которая по умолчанию вырубает поддержку VT-x/AMD-V, чтобы избежать конфликтов. Короче придётся выбирать между Hyper-V и другой конфликтующей средой виртуализации.
- Технология VT-x или AMD-V просто выключены и их нужно включить.
По умолчанию, поддержка виртуализации выключена в BIOS и чтобы победить ошибки из начала статьи и, наконец запустить заветную виртуалку, тебе нужно просто зайти в BIOS и включить VT-x/AMD-V!
В зависимости от производителя твоего компьютера, может быть несколько вариантов перехода в BIOS. Обычно, тебе нужно просто перезагрузить компьютер и дождаться на экране надписи: Press to enter BIOS, а вот какая-то кнопка может быть разной.
Вот тебе несколько примеров для разных производителей:
- Asus, Lenovo, DELL
- Как правило просят нажать F2
- Перейти на вкладку Advanced, выбрать Virtualization Technology и нажать Enter
- Сменить состояние строки с Disabled на Enabled после чего нажать F10, чтобы сохранить изменения и перезагрузить компьютер
- Acer, HP
- Как правило просят нажать F2 ну или F1 или же CTRL+ALT+ESC или F10
- Нажать на правую стрелку и перейти на вкладку System Configuration, выбрать Virtualization Technology и нажать Enter
- Сменить состояние строки с Disabled на Enabled после чего нажать F10, чтобы сохранить изменения и перезагрузить компьютер
- Компьютеры с процессорами AMD
- Как правило просят нажать F2
- Выбрать вкладку Advanced затем CPU Configuration, после чего выбрать SVM Mode и нажать Enter
- Сменить состояние строки с Disabled на Enabled после чего нажать F10, чтобы сохранить изменения и перезагрузить компьютер


Интенсив по Виртуализации VMware vSphere 7
Самое важное про виртуализацию и VMware vSphere 7 в 2-х часовом онлайн-интенсиве от тренера с 30-летним стажем. Для тех, кто начинает знакомство с виртуализацией и хочет быстро погрузиться в предметную область и решения на базе VMware
Полезно?
Почему?
😪 Мы тщательно прорабатываем каждый фидбек и отвечаем по итогам анализа. Напишите, пожалуйста, как мы сможем улучшить эту статью.
😍 Полезные IT – статьи от экспертов раз в неделю у вас в почте. Укажите свою дату рождения и мы не забудем поздравить вас.
Источник
Intel vt x error in vmware
I just upgraded to Workstation 16 Pro as it said it would work with Hyper-V, and I want to run docker desktop.
However I am getting the error: «Error «Virtualized Intel VT-x/EPT is not supported on this platform». Every time I search it I get the result of «disable hyper-v», but I just spent a bunch of money to be able to run this with hyper v.
The thing I am trying to run is Cisco Modeling Labs (CML): a VM that spins up VMs of routers/switches/etc.

- Mark as New
- Bookmark
- Subscribe
- Mute
- Subscribe to RSS Feed
- Permalink
- Report Inappropriate Content
As you’re mentioning Hyper-V, your host OS must be windows.
Not all versions of Windows however are supported for this to work and this might be what you are running into.
AFAIK, this only works on Windows 10 and the minimum version of Windows 10 is 20H1 build 19041.264 or newer.
edit: Wait.. oh dear. I now realize that I might to be misreading it.
The above requirements are for being able to run a guest OS in VMware Workstation while Hyper-V is enabled at the host OS.
This does NOT allow you to run a guest OS in your VM itself. The only way to run a nested VM is to disable the Hyper-V role on the host OS where you run VMware Workstation. In that scenario nested VMs work fine and you can even run Hyper-V in your guest OS.
Hope this helps,
—
Wil
- Mark as New
- Bookmark
- Subscribe
- Mute
- Subscribe to RSS Feed
- Permalink
- Report Inappropriate Content
moderator: Moved the thread to VMware Workstation Pro discussions. Your question is indeed about nested virtualization, but the discussion area where it was posted was specific for vSphere. You’re likely to get better answers here.
- Mark as New
- Bookmark
- Subscribe
- Mute
- Subscribe to RSS Feed
- Permalink
- Report Inappropriate Content
Unfortunately, Hyper-V API does not allow for nested virtualisation – the only way to use that is to disable Hyper-V on the host and let Workstation use its own virt.
- Mark as New
- Bookmark
- Subscribe
- Mute
- Subscribe to RSS Feed
- Permalink
- Report Inappropriate Content
This host supports Intel VT-x, but Intel VT-x is disabled.
Intel VT-x might be disabled if it has been disabled in the BIOS/firmware settings or the host has not been power-cycled since changing this setting.
(1) Verify that the BIOS/firmware settings enable Intel VT-x and disable ‘trusted execution.’
(2) Power-cycle the host if either of these BIOS/firmware settings have been changed.
(3) Power-cycle the host if you have not done so since installing VMware Workstation.
(4) Update the host’s BIOS/firmware to the latest version.
This host does not support «Intel EPT» hardware assisted MMU virtualization.
VMware Workstation does not support the user level monitor on this host.
Module ‘MonitorMode’ power on failed.
Failed to start the virtual machine.
i enabled the v tech in my bios, but it still say the same thing, before it was not enabled, it was still saying the same thing as well
how can i overcome and win,
- Mark as New
- Bookmark
- Subscribe
- Mute
- Subscribe to RSS Feed
- Permalink
- Report Inappropriate Content
This problem starts in case you update your existing windows 10 version to 20H1, 21H2 or later version.
For me it was working with old Windows 10 Version. Windows 10 was automatically updated and problems starts for me and I was unable to work with VMware Workstation Pro 16. Even I replace workstation version with 12 & 14 but same issue. The higher version of Windows 10 is coming with Hyper-V which can’t allow to work VMware workstation together.
After a lots of struggle I was able to resolve this issue with below changes:-
1. Go to windows services with type services.msc in RUN
2. Stop all Hyper-V services.
3. Go to control panel —- program and features—Turn windows feature ON/OFF—Untick Hyper-V—Ok- —to remove from Windows 10.
4. Run below PowerShell command for VMware Nested Virtualization issues:-
If u want use vmware : use this command in powershell and reboot system:
To disable Hyper-V use this command:- bcdedit /set hypervisorlaunchtype off
( If u want use hyper-v: use this command : bcdedit /set hypervisorlaunchtype auto)
5. Hyper-v and Vmware still don’t work together so make below changes in windows Registry:-
To disable Device Guard or Credential Guard :—
Disable the group policy setting that was used to enable Credential Guard.
- On the host operating system, click Start > Run, type gpedit.msc, and click Ok. The Local group Policy Editor opens.
- Go to Local Computer Policy > Computer Configuration > Administrative Templates > System > Device Guard > Turn on Virtualization Based Security.
- Select Disabled .
Restart desktop and try to check .
I hope this can work for all of you as this working for me now.
Источник
Quick Guide to fix Error «This host supports Intel VT-x» in VMware Workstation
Hello Everybody,
Have you ever installed and used VMware virtual machine to work? If you have already used it, then it is inevitable that a frequent error occurs during the installation of VMware Workstation as below:
The specific error contents are as follows:
This host supports Intel VT-x, but Intel VT-x is disabled.
Intel VT-x might be disabled if it has been disabled in the BIOS / firmware settings or the host has not been power-cycled since changing this setting.
(1) Verify that the BIOS / firmware settings enable Intel VT-x and disable ‘trusted execution.’
(2) Power-cycle the host if either of these BIOS / firmware settings have been changed.
(3) Power-cycle the host if you have not done so since installing VMware Player.
(4) Update the host’s BIOS / firmware to the latest version.
This host does not support «Intel EPT» hardware assisted MMU virtualization.
This host does not support virtualizing real mode. The Intel «VMX Unrestricted Guest» feature is necessary to run this virtual machine on an Intel processor.
Module ‘CPUIDEarly’ power on failed.Failed to start the virtual machine
Reason:
Normally by default, the VT-x function (which supports running virtual machines) is turned off or disabled by the manufacturer. When you install the VMware program and launch it, the computer will report the error as above.
Today, QTit will give you a quick guide to help you fix this common error.
Keyboard shortcut to access BIOS SETUP
Step 2: Access to the Virtualization function (usually located on the Security or Virtualization Support tab)
Step 3: Find 2 items with similar content:
+ Intel (R) Virtualization Technology
+ Intel (R) VT-d Feature
You will now see that the functions are in Disabled mode. Please Enabled them.
By default, the Virtualization function is disabled by the manufacturer
Select Enabled mode to enable Virtualization function in BIOS SETUP
After customization is complete, press F10 to save your settings. Now try again on VMware to see if the error is gone!
Simple, right? With a few basic steps you can fix the error and and enable virtualization technology in windows 10.
In addition, if you have any problems with your computer, please contact us directly through the QTitHow fanpage. We will try to help and answer you as soon as possible. Thank you!
Tags: this host supports intel vt-x but intel vt-x is disabled, this host supports intel vt-x, how to enable virtualization in bios windows 10, how to enable virtualization in windows 10, how to enable vt in windows 10, how to enable vt on windows 10, how to enable virtualization technology in windows 10
Источник
VMware Workstation is a professional virtualization solution that allows you to do a lot of things and is able to manage many virtual machines at the same time (if the resources of the host PC allow it).
However, in rare cases (and especially when you edit manually some settings in the vmx files), VMware Workstation can become unstable and arrive in a state where you will not be able to access or close some virtual machines.
Again, this is very rare, but here is how to solve ou avoid these problems.
- Take ownership error
- Freeze of a virtual machine
- Conflict detected : Panda USB vaccine
- Conflict detected : Disk Management
- The device was unable to connect to its ideal host controller
- This VMware USB Device can perform faster
- This host supports Intel VT-x, but VT-x is disabled
1. Take ownership error
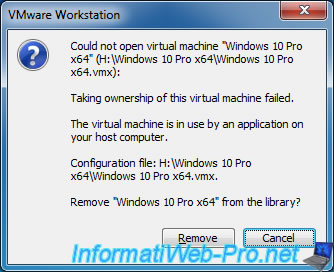
At some moments, you may not have access to a virtual machine (even if it’s down and not password protected).

When you want to access it from VMware Workstation, a «This virtual machine appears to be in use» warning is displayed.
VMware Workstation offers you to obtain the rights on it by clicking on : Take Ownership.
Plain Text
If this virtual machine is not in use, press the "Take Ownership" button to obtain ownership of it. Otherwise, press the "Cancel" button to avoid damaging it.
This warning can occur in 2 cases :
- you have opened 2 windows of VMware Workstation and you are trying to open the same virtual machine from the 2 windows. In this case, click : Cancel.
- VMware Workstation has become unstable or a bug is temporarily blocking you from accessing it. In this case, click : Take Ownership.
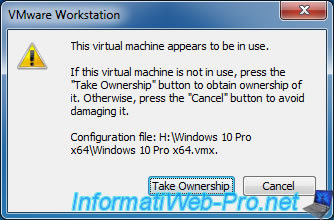
Most of the time, it will fail and this message will appear :
Plain Text
Could not open virtual machine ... .vmx

Taking ownership of this virtual machine failed.

The virtual machine is in use by an application on your host computer.

Configuration file: ... .vmx
Click Cancel.
Note that in older versions of VMware Workstation, the icon displayed was an error icon and the «Remove» button did not exist.
With these older versions, you had to click OK.
.jpg)
Since VMware Workstation can’t open this virtual machine, a red icon appears on it.
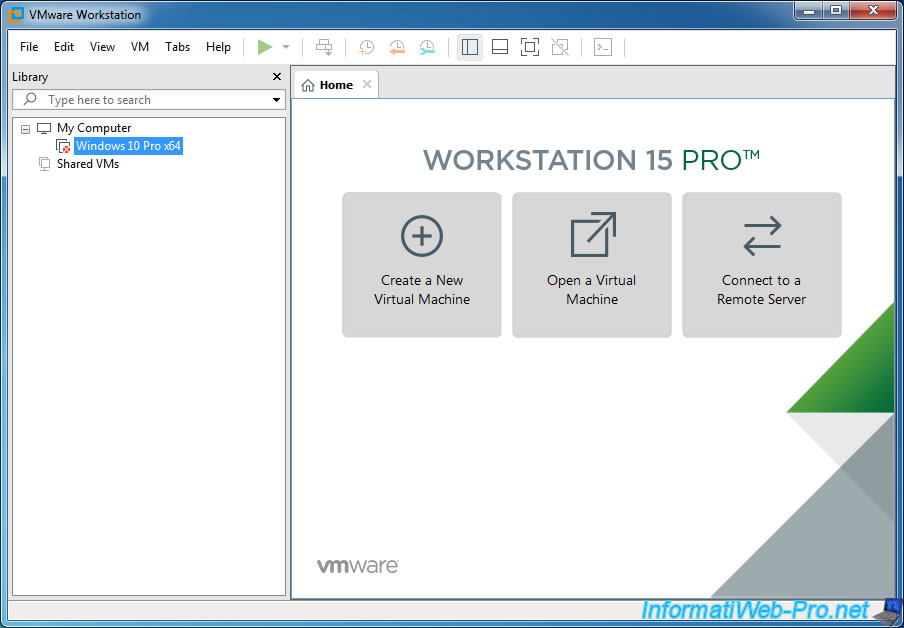
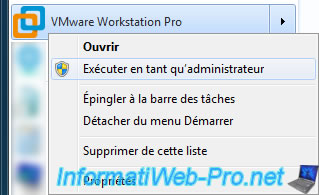
To solve this problem, close all open VMware Workstation windows and open VMware Workstation again, but as an administrator.
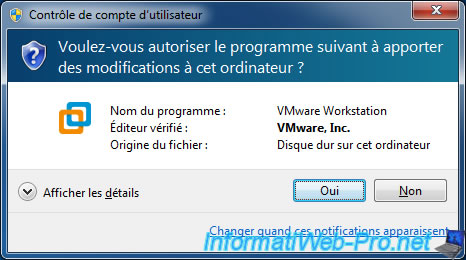
Click Yes.
Now, you will have access to your virtual machine.
From now, you will be able to access it again normally (without having to restart VMware Workstation every time as administrator).
2. Freeze of a virtual machine
When you run too many virtual machines at the same time or you have mismanaged the amount of RAM allocated to them, your virtual machines may fail.
If it’s not too late, try pausing them to prevent the guest OS from being damaged. Then, restore the virtual machines one by one by stopping them correctly before «booting» the next virtual machine.
If it’s too late, you may not be able to force the virtual machine to shutdown from VMware Workstation.
Indeed, in this case, we wanted to shut down Windows properly by sending the Windows shutdown ACPI signal from VMware Workstation (via the «Shut Down Guest» option).
The problem is that the virtual machine never stopped, and because the virtual machine was shut down, no more options were available for this virtual machine.
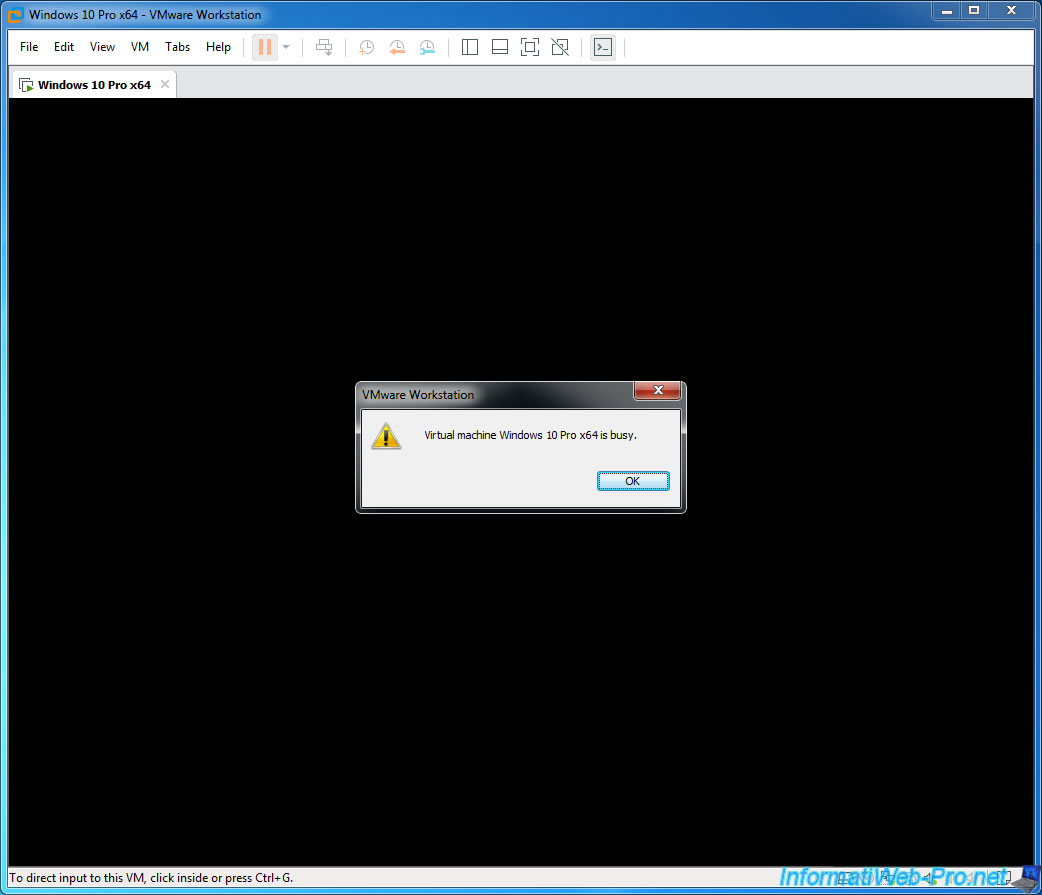
Even when you want to close VMware Workstation to force the virtual machine to shut down, it will not work because VMware Workstation will display this warning : Virtual machine is busy.
In this case, you will only have 2 possibilities :
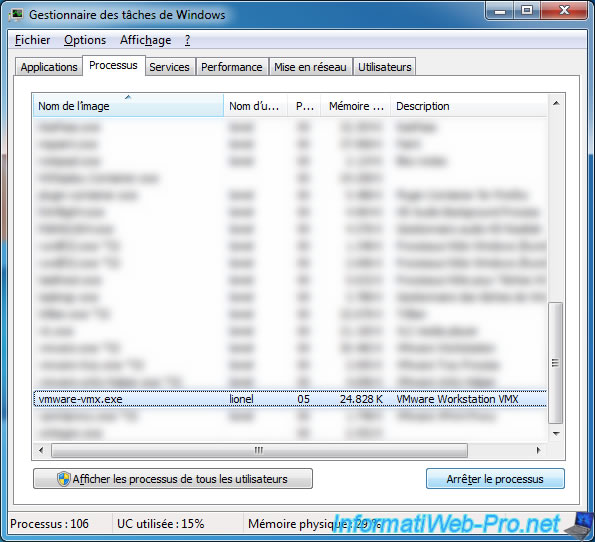
- shut down your computer : except that shutting down your computer will take a long time, because of this problem. Even if in the end after a few minutes, even 10 minutes, the host PC will finally turn off properly.
- stop other virtual machines that you can still shut down properly, then kill the «vmware-vmx.exe» process that allows the virtual machine to run on the host PC.
The only problem is that you can’t know which instance of the «vmware-vmx.exe» process corresponds to which virtual machine.
For security, you will have to shut down all possible virtual machines before killing this process or processes. Otherwise, you risk cutting off a virtual machine that was still running correctly.
Confirm the action.
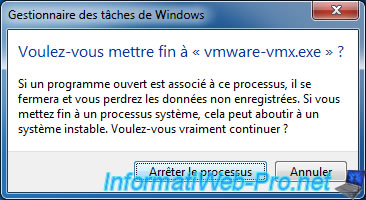
Like magic, the virtual machine will be considered shut down by VMware Workstation.
Nevertheless, don’t forget that the sudden shutdown of the «vmware-vmx.exe» process only allows you to recover your hand on the management of the host PC.
Indeed, by killing the «vmware-vmx.exe» process, the host PC will become unstable because of the information left in its RAM.
This may result in a slower shutdown of your host PC when you shut down Windows this time.
Once the host PC is shutdown and then power on again (and not with an automatic restart from Windows), the RAM will be correct again.
This solution therefore only allows you to save what you were doing, rather than losing important changes because of a virtual machine that would have become unstable.
3. Conflict detected : Panda USB vaccine
On our InformatiWeb.net website, we talked about the Panda USB Vaccine program that automatically vaccinate USB keys that you connect to your computer to prevent a virus on a USB key infect your physical PC.
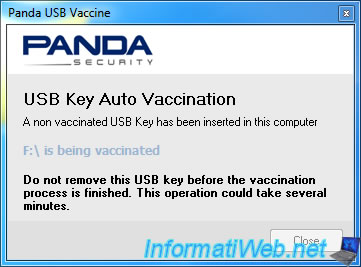
The problem is that from the moment you use VMware Workstation, you will not be able to use the automatic vaccination of USB keys with Panda USB Vaccine.
When at least 1 virtual machine is running with VMware Workstation, if you plug an USB key on your physical PC, VMware Workstation and the currently powered virtual machine will be freezers.
Which is very problematic.
To avoid this conflict, we recommend that you no longer use Panda USB Vaccine on your PC where VMware Workstation is installed.
Update : this problem no longer occurs on Windows 10 v2004.
4. Conflict detected : Disk Management
As you probably know, on Windows, you can manage disks (and their partitions) by right-clicking on Computer (or This PC), then clicking on : Disk Management.
The problem is that when virtual machines run on VMware Workstation on your PC, there is a good chance that your PC (including VMware Workstation and the «Computer Management» console) will start blocking (freezing).
Update : this problem no longer occurs on Windows 10 v2004.
It’s pretty annoying, but be aware that this bug only occurs if virtual machines are running when you want to manage physical PC disks.
If no virtual machine is currently running, disk management will be possible without any problem.
PS : if you konw other conflicts that occur each time in the same way, don’t hesitate to point them out in comments for us to add them in this tutorial.
5. The device was unable to connect to its ideal host controller
Depending on the guest OS you are virtualizing, VMware Workstation selects the most suitable version for the USB controller of your virtual machine.
However, this can be problematic in some cases.
For example : you can’t plug an USB 3.0 key into an USB 3.0 port on the host PC and pass it to a virtual machine using a USB 2.0 or lower controller.

If VMware Workstation displays the «New USB Device Detected» window, select the virtual machine to which you wish to connect the USB key (or any other USB support).
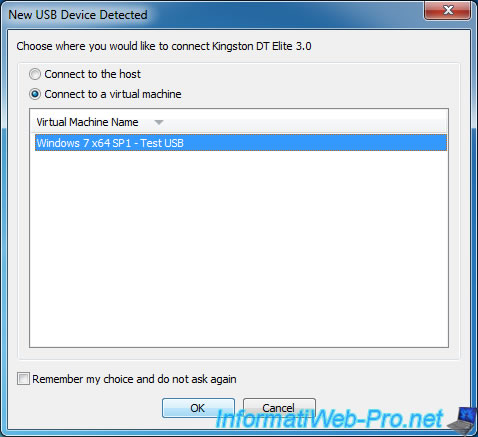
As mentioned above, you will not be able to plug an USB 3 key into an USB 3 port on the host PC and pass it to a virtual machine using version 2.0 or lower of the USB controller.
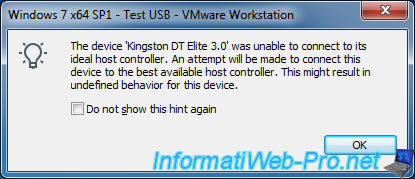
In this case, an error will be displayed :
Plain Text
The device '[Name of the USB 3.0 key]' was unable to connect to its ideal host controller. An attempt will be made to connect this device to the best available host controller. This might result in undefined behavior for this device.
Click OK.
Due to the previous error, an error will also be displayed in the guest OS :
Plain Text
USB Device Not Recognized
One of the USB devices attached to this computer has malfunctioned, and Windows does not recognize it.
For assistance in solving this problem, click this message.

If you click on this message, you will see a window appear with an «USB Root Hub» and an «Unknown Device» (which corresponds to your USB key).
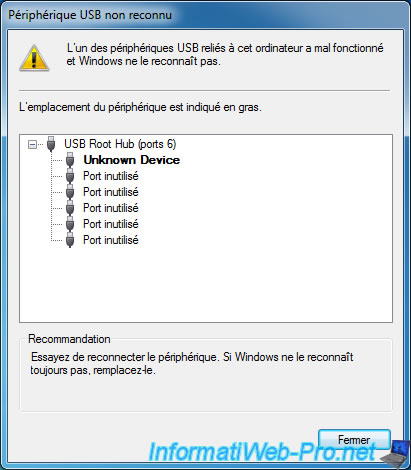
In the device manager, you will see the same problem.
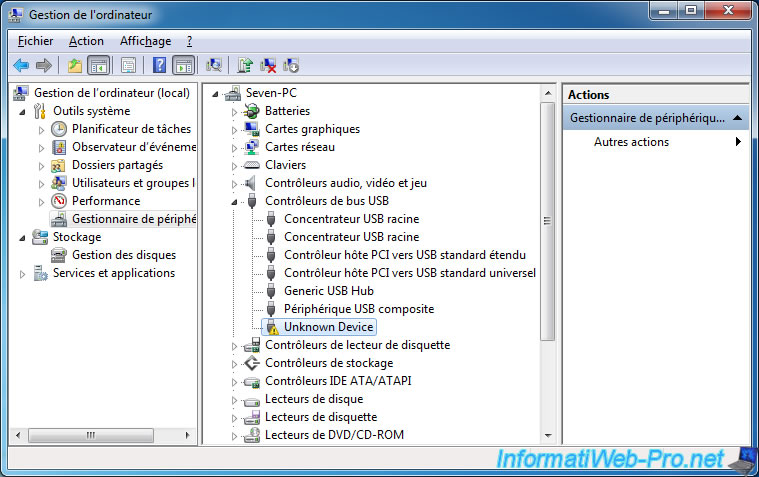
To solve this problem, simply plug your USB key into a USB 2.0 port on your host PC.
Or change the version of the virtual machine’s USB controller to USB 3.0 if you want to connect it to a USB 3.0 port on your host PC.
6. This VMware USB Device can perform faster
If you plug an USB 3.0 key or any other USB storage medium (such as an external hard drive) to an USB 2.0 port on your host PC, this message will be displayed on the host PC where VMware Workstation is installed.
Plain Text
This device can perform faster.
This VMware USB Device can perform faster if you connect it to a Hi-Speed USB 3.0 port.
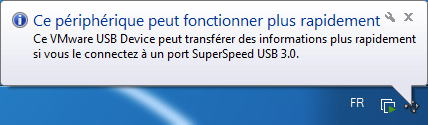
When you pass this USB 3.0 key to your virtual machine, a similar message will appear :
Plain Text
This USB Mass Storage Device can transfer information faster ...

However, the USB key will be accessible from the guest OS.
As you can check in the device manager.
7. This host supports Intel VT-x, but VT-x is disabled
When you launch one of your virtual machines, one of these messages appears :
Plain Text
Binary translation is incompatible with long mode on this platform.
Disabling long mode. Without long mode support, the virtual machine will not able to run 64-bit code. For more details see https://vmware.com/info?id=152.
![]()
Plain Text
This virtual machine is configured for 64-bit guest operating systems.
However, 64-bit operation is not possible.

This host supports Intel VT-x, but VT-x is disabled.

Intel VT-x might be disabled if it has been disabled in the BIOS/firmware settings or the host has not been power-cycled since changing this setting.

(1) Verify that the BIOS/firmware settings enable Intel VT-x and disable 'trusted execution.'

(2) Power-cycle the host if either of these BIOS/firmware settings have been changed.

(3) Power-cycle the host if you have not done so since installing VMware Workstation.

(4) Update the host's BIOS/firmware to the latest version.

For more detailed information, see https://vmware.com/info?id=152.
Depending on your version of VMware Workstation Pro, the error message may be a bit longer and include this :
Plain Text
VMware Workstation does not support the user level monitor on this host.

Module 'MonitorMode' power on failed.

Failed to start the virtual machine.
These errors occur when processor virtualization is not supported by your processor (CPU), motherboard BIOS, or not enabled by default in your motherboard BIOS.
If your processor supports processor virtualization (Intel VT-x or AMD-V), you just need to enable it in your motherboard BIOS.
Important : if you have just installed VMware Workstation and the «This host supports Intel VT-x, but VT-x is disabled» error message appears, restart your computer at least once.
If this error message persists, then processor virtualization is not enabled and/or supported by the BIOS of your motherboard.
При установки 64-х битной операционной системы Windows в программе VMware Workstation вылетела ошибка:
This host supports intel vt-x but intel vt-x is disabled

Данная ошибка говорит о то, что на компьютере не включен параметр Virtualization Technology (Виртуализация) – что бы его включить, надо:
- перезагрузить компьютер
- войти в BIOS
- найти параметр Virtualization Technology
- перевести его в Enable
- сохранить настройки и перезагрузится
- проверяем и радуемся что теперь виртуальная машина заработала
таким нехитрым способом мы включили Virtualization Technology и победили ошибку supports intel vt-x
Some users cannot turn on VMware Workstation Pro because of VMware does not support the user level monitor of this host error. This error occurs due to a compatibility issue. It is not possible to run VMware Workstation Pro on a Hyper-V-enabled Windows host because of some features like VBS (Virtualization-based Security). Therefore, you cannot run VMware on a Hyper-V-enabled Windows host. If you get this error message while turning on VMware, the solutions provided in this post may help you resolve the issue.

If you are running VMware Workstation Pro on a Hyper-V-enabled Windows host, you may see the following error messages in addition to the “VMware does not support the user level monitor of this host” error message.
This host does not support Intel VT-x.
This host does not support “Intel EPT” hardware assisted MMU virtualization.
This host appears to be running in a virtual machine with VHV disabled. Ensure that VHV is enabled in the virtual machine configuration file.
VMware Workstation and Device/Credential Guard are not compatible.
In all the above cases, the VMware Workstation Pro does not start. The following solutions may help you resolve the issue;
- Disable Hyper-V
- Stop all Hyper-V-related services
- Disable Virtualization-based Security (VBS)
Let’s see all these fixes in detail.
1] Disable Hyper-V
As described above in this article, VMware Workstation Pro is not compatible with a Hyper-V-enabled Windows host. Therefore, if you have enabled Hyper-V on your Windows host machine, you will not be able to run VMware Workstation Pro on it. To fix this issue, you have to turn off Hyper-V in Windows Optional Features. The following steps will help you with that:

- Open the Control Panel.
- Select Category in the View by mode.
- Go to “Programs > Programs and features.”
- Click Turn Windows features on or off on the left side.
- Clear the Windows Hypervisor Platform and Virtual Machine Platform checkboxes. If you see the Hyper-V checkbox instead of these two checkboxes, disable it.
- Click OK and restart your computer.
Check if the issue persists. If yes, try the next fix.
2] Stop all Hyper-V-related services
If VMware still refuses to start and shows you the same error message, there might be some Hyper-V-related services running on your system. Check this in the Windows Services Manager and stop the running Hyper-V services. Follow the steps written below:

- Open the Run command box.
- Type services.msc and click OK.
- In the Services Manager app, scroll down and locate all Hyper-V services.
- Stop all the Hyper-V services one by one. For this, right-click on them and select Stop.
The services set to Automatic start automatically on system startup. If the startup type of any Hyper-V service is set to Automatic, change it to Manual so that the service could not start by itself when you start your system. For this, right-click on the Hyper-V service, the status of which is Automatic and select Properties. Under the General tab, select Manual in the Startup type drop-down. Click Apply and then Click OK.
After performing the above steps, restart your computer.
3] Disable Virtualization-based Security (VBS)
One possible cause of the problem is VBS technology. If Virtualization-based Security is enabled on your Windows host machine, you will not be able to run VMware Workstation Pro. To check if VBS is enabled on your system or not, follow the steps mentioned below:

- Click on Windows Search and type System Information.
- Select System Information from the search results.
- In the System Information, select System Summary from the left side.
- Scroll down on the right side and see the status of the Virtualization-based Security.
If the VBS technology is running, you have to disable it. To do this go through the following instructions:
")
- Open the Run command box and type gpedit.msc. Click OK. This will open the Local Group Policy Editor.
- Expand the Computer Configuration branch on the left side.
- Go to “Administrative Templates > System > Device Guard.”
- Double-click on the Virtualization Based Technology on the right side.
- Select Disabled.
- Restart your system.
Read: Failed to lock the file, Module Disk power on failed on VMWare.
If you have the Home edition, you do not have the Local Group Policy Editor. Hence, you can disable Virtualization-based Security (VBS) via the Registry Editor. Windows Registry is the hierarchical database of Windows OS. Any mistake while modifying the Registry can cause serious errors in your system. Therefore, before you begin, we recommend you create a System Restore Point and back up your Registry.
Open the Run command box and type regedit. Click OK and click Yes in the UAC prompt. This action will open the Registry Editor.
Copy the following path, paste it into the address bar of your Registry Editor, and hit Enter.
ComputerHKEY_LOCAL_MACHINESYSTEMCurrentControlSetControlDeviceGuard

Make sure that the DeviceGuard subkey is selected on the left side. Check if the EnableVirtualizationBasedSecurity Value is available on the right side. If not, create it manually by following the steps written below:
- Right-click on the empty space on the right side.
- Go to “New > DWORD (32-bit) Value.”
- Right-click on the newly created Value and select Rename.
- Name it EnableVirtualizationBasedSecurity.
Right-click on the EnableVirtualizationBasedSecurity Value and select Modify. Its Value Data should show 0. If not, enter 0 in its Value Data and click OK.
Now, copy the following path, paste it into the address bar of the Registry Editor, and press Enter.
ComputerHKEY_LOCAL_MACHINESYSTEMCurrentControlSetControlLsa

Make sure that the Lsa subkey is selected on the left side. Now, check if the LsaCfgFlags Value exists on the right side. If not, create a DWORD (32-bit) Value manually by following the steps explained above and rename this Value as LsaCfgFlags.
The Value Data of LsaCfgFlags should show 0. Right-click on it and select Modify to check what its Value Data shows. If 0 is not there, change its Value Data to 0 and click OK. Close the Registry Editor and restart your computer.
This should work.
Read: How to add TPM to VMware Player Virtual Machine in Windows 11.
Does VMware support Nested Virtualization?
Nested Virtualization is the process of running a Virtual Machine inside another Virtual Machine. The Outer Guest is the Virtual Machine that runs on physical hardware and the Inner Guest is the Virtual Machine that runs inside another Virtual Machine. Similarly, the Host Hypervisor is the hypervisor that runs on physical hardware and the Guest Hypervisor is the hypervisor that runs inside a Virtual Machine.
The Type 1 Hypervisors are not supported as the Guest Operating Systems under any VMware product. ESXi is also not supported as a Guest Operating System under the production environments. However, if you want to run ESXi or ESX as nested virtualization, you need to obtain additional licenses for the nested ESXi/ESX.
VMware products require hardware-assisted virtualization for 64-bit guests on Intel and AMD hardware. This means you can enable Nested Virtualization only if your CPU supports hardware-assisted virtualization. The hardware-assisted virtualization is called VT-x for Intel and AMD-V for AMD. You will see these options in your BIOS if your processor supports these technologies. Enter into your BIOS and look for the Intel Virtualization Technology option if you have an Intel CPU and AMD-V or SVM Mode if you have an AMD CPU. If you see these options in your BIOS, enable them.
How do I enable Nested Virtualization in VMware VM?
You can enable Nested Virtualization in your VMware VM by enabling the Virtualize Intel VT-x/EPT or AMD-V/RVI option in your Virtual Machine settings. But for this, your CPU should support hardware-assisted virtualization. You can enable the hardware-assisted virtualization on your system by entering into BIOS. We have already talked about how to check if your CPU supports hardware-assisted virtualization.
I hope this helps.
Read next: VMware Bridged network not working or detecting in Windows.