В данном гайде речь пойдёт о том, как играть на серверах в игре Майнкрафт. Думаю у новичков возникают подобные вопросы, сейчас всё подробно разберём, поехали!
Поиск сервера
Для начала необходимо найти какой-либо сервер, на котором предстоит играть. Тут нет ничего сложного, просто введите в яндексе фразу «сервера майнкрафт» и поисковая система выдаст вам десятки нужных адресов — в основном это мониторинги серверов. Выбираем первую ссылку и ищем нужный сервер по вашим требованиям. Как правило, можно отсортировать сервера по версиям, тематикам и наличию модов.

На странице сервера копируем его адрес, он понадобиться нам в дальнейшем.

Заходим на сервер
После того, как мы определились с местом где будем играть необходимо зайти в игру и в главном меню нажать на пункт «Сетевая игра«.

Далее нажимаем на «Добавить«.

Вставляем скопированный нами адрес сервера из мониторинга в строку «Адрес сервера» и нажимаем «Готово«.

Теперь мы видим, что добавленный сервер появился в виде строчки. Чтобы зайти на него кликните по нему два раза ЛКМ или выделите одним нажатием ЛКМ и нажмите «Подключиться«.

Регистрация на сервере
Для игры на любом сервере необходимо пройти процедуру регистрации. В этом нет ничего сложного. В последнее время сервера требуют ввода капчи — просто откройте чат клавишей T и введите цифры из картинки, как например это сделал я. Внимание, у вас будут свои цифры, я лишь показал пример!

Теперь можно приступать в процедуре регистрации, для этого вводим команду /register [пароль] [пароль]
Например, /register 12345 12345
Не забывайте читать чат сервера, там написаны подсказки что вам нужно делать и какие команды вводить.

Процедура регистрации успешно пройдена и мы можем начинать играть на сервере!


Небольшое дополнение!
После того, как вы вышли с сервера и снова решили зайти на него, необходимо авторизироваться. Введите команду /login [пароль] [пароль], где пароль — это пароль, который был указан вами при регистрации. На некоторых серверах это может не потребоваться, если система запомнит сессию.
Понравился материал? Поделись с друзьями!
![]()
Download Article
The easiest ways to find Minecraft Villages
![]()
Download Article
- Finding Villages Organically
- Using a Cheat Code
- Using an Online Tool
- Q&A
- Tips
- Warnings
|
|
|
|
|
Are you trying to find a village in Minecraft? Villages are an important aspect of Minecraft, especially if you are playing in Survival mode, as they contain NPCs called Villagers that you can trade with. There are farms to get food and chests with loot. Not to mention that there are also tons of houses to stay in. Many players establish a village as a home base and live in the village. This wikiHow article teaches you how to find a village in Minecraft with and without cheating.
Things You Should Know
- Minecraft villages are generated randomly in Desert, Savanna, Taiga, and Plains biomes.
- If you have cheats turned on, you can open the chat and type «/locate structure village» to display the coordinates of the nearest village.
- You can also use an online tool to find the village coordinates for your world seed.
-

1
Know where to look for villages. Villages spawn in Desert, Savanna, Taiga (including cold variants of Taiga), and Plains (including icy plains) biomes. If you find yourself in a Jungle, Mushroom, Tundra, or other biomes not supported for villages, don’t waste your time looking.
- Minecraft worlds are randomly generated, and every player’s world is different. They also tend to be sparsely scattered throughout the world.
- Villages are often made of wood planks and cobblestone, and tend to stand out from their surrounding areas.
-
2
Prepare for a long journey. It can take hours to find a village, so stock up on basic tools, a bed, food, and weapons before you set out. It’s best to travel during the day and camp during the nights, so consider digging yourself a hold and sealing it most of the way to keep out mobs.
- You’ll need to leave at least one block open to avoid suffocating.
Advertisement
-
3
Tame a mount for transportation. If you happen to have a saddle, you can use it to get a mount and speed up your exploration. Find a horse and interact with it several times with an empty hand until it doesn’t throw you off, then sneak up to the tamed horse and select it with the saddle to make it controllable while you ride it.[1]
-
4
Find a viewpoint. Navigate to the tallest hill that you can find in a biome in which villages spawn. This will allow you to take in the surrounding areas, making it easier to spot man-made structures.
-
5
Look for torches at night. You’ll be able to see fire much more clearly at night than during the day. While fire at night may be lava, there’s a good chance that the fire is coming from torches—and torches typically mean villages.
- Be extremely careful while doing this if you’re playing survival mode on anything other than «peaceful» difficulty. It’s best not to investigate the torches until the following day due to mobs.


Advertisement
-
1
Open Minecraft and select a world. Click or tap the Minecraft icon and click Play. Click a world you want to play or start a new game.
- Alternatively, you can select a server or multiplayer game, but you may not be able to enable cheats.
-
2
Open the Pause menu. If you are playing on a computer, press the «Esc» key. If you are playing on mobile, tap the Pause icon at the top of the screen. If you are playing on a game console, press the «Start,» «menu» or «Options» button.
- If you already have cheats enabled in your world, skip ahead to the «Open the ‘Chat’ icon» step.
-
3
Select Settings. This option is in the Pause menu.[2]
-
4
Scroll down to the «World Options» section. It’s near the bottom of the menu on the right side of the screen.
-
5
Select the dark-grey «Activate Cheats» switch. This switch will turn light-grey, signifying that cheats are now enabled.
- If you don’t see this option, select Game in the menu to the left below «World.»
- Warning: Activating cheats will disable achievements and trophies for the rest of your game.
-
6
Select Continue when prompted. Doing so returns you to the menu.
-
7
Resume your game. Click or tap the x in the top-right corner of the screen, then tap Resume Game at the top of the Pause menu.
-
8
Open the chat. If you are using a desktop computer, press «T». If you are playing on mobile, click or tap the pause icon at the top of the screen. If you are playing on a game console, press the right button on the D-pad to bring up the chat.
-
9
Enter the «locate» command. Tap the text field, type in /locate structure village, and then click or tap → on the far-right side of the text field.
-
10
Check the coordinates. You should see a message that says «The nearest Village is at block [x-coordinate], (y?), [z-coordinate]» at the bottom of the screen.
- For example, you might see something like «The nearest Village is at block -65, (y?), 342» here.
-
11
Type in the «teleport» command. Re-open the «Chat» box, then type in /tp [username] [x-coordinate] [y-coordinate] [z-coordinate], replacing the bracketed information with your username and the coordinates of the village. You will need to guess the y coordinate.
- For a player named «hippo» in the above example, you’d enter /tp hippo -65 [guess] 342. Names are case-sensitive.
- You will usually need to guess the y-coordinate, which determines the village’s altitude.
-
12
Click or tap →. It’s on the far right side of the text box. This will teleport you to your entered coordinates; as long as the y-coordinate isn’t so high that the fall kills you or such that it places you inside of a wall, you will land in, above, or below the village.
- If you’re underground, dig up to get to the village.
- If you spawn inside of a wall in Survival mode, you’ll quickly suffocate; to prevent this, you can attempt to mine your way out.


Advertisement
-
1
Open Minecraft and select a world. Click or tap the Minecraft icon and click Play. Click a world you want to play or start a new game.
-
2
Select a world. Your saved worlds are listed below «Worlds.» Click or tap the work you want to play.
-
3
Open the Pause menu. If you are playing on mobile or desktop, click or tap the Pause icon at the top of the screen. If you are playing on a game console, press the «Start» or «Options» button.
-
4
Note the world’s seed number. Scroll down and write down the number under «Seed.»
- If you don’t see this option, select Game in the menu to the left below «World.»
-
5
-
6
Enter your world’s seed number. In the «Seed» text field near the top of the «Village Finder» window. The tool will start to display village coordinates as you type.
-
7
Select your Minecraft version. Use the drop-down menu next to «Version» to select which version you are using. Most players will be using the latest version of Minecraft Bedrock.
-
8
Zoom out if necessary. If you don’t see any yellow dots on the map grid, click and drag the slider at the bottom of the window to the left.[3]
-
9
Find a village’s location. Select one of the yellow dots on the map, then look at the coordinates that appear below the bottom-left corner of the map. Note these coordinates so that you know where to look when going to the village later.
-
10
Make a map and equip it. You are usually given a map when you start a new game. If you no longer have a map, you can make one out of a compass and 8 sheets of paper.
-
11
Navigate to the village. With the map equipped, walk toward the village. Once the x- and z-coordinates intersect, you should be standing near the village.[4]
- The ChunkBase Village Finder is not 100 percent accurate, so you may find yourself near (but not in) a village. Search around the area for the village if you can’t find it immediately.
- Ignore the y-coordinate for now, since you’ll know whether you need to travel up or down once you reach the village’s x- and z-coordinate intersection.


Advertisement
Add New Question
-
Question
How do I find an underwater temple?

Use a boat and night vision. Make sure you are in a deep ocean biometric; that’s the only one in which they spawn.
-
Question
How do I find a witch hut?
Try to find a Swamp. That’s the only place to find a witch hut. Be prepared to spend a long time searching for one. Witch huts are rare.
-
Question
Do villages only spawn in those three/four, or do any spawn in a winter biome?
As of the 1.10 update, villages can spawn in taiga, ice spikes, and tundra biomes, but the houses will be built with spruce rather than oak wood.

See more answers
Ask a Question
200 characters left
Include your email address to get a message when this question is answered.
Submit
Advertisement
-
Spawning next to a village in Minecraft PE can be accomplished by creating a world using a preset.
-
Try to find a seed that spawns you next to a village. It’s easier that way.
Thanks for submitting a tip for review!
Advertisement
-
The ChunkBase Village Finder isn’t always accurate, and sometimes classifies random wells in the middle of the desert as villages (especially on console editions).
Advertisement
About This Article
Article SummaryX
1. Select a world that has cheats enabled.
2. Open the console.
3. Type «locate village» and press Enter.
4. Make note of the coordinates.
5. Re-open the console.
6. Type «teleport» [player name] followed by the coordinates.
7. Press Enter.
Did this summary help you?
Thanks to all authors for creating a page that has been read 1,539,178 times.
Did this article help you?
Всем привет, недавно я понял как запустить Minecraft, помогли детские курсы программирования.
И мне пришла идея управлять им из Алисы, но на данный момент я освоил только заполнение блоками, если кто знает больше то пишите в комментариях.
Вот что у меня получилось, смотрите на видео
Для повторения этого видео вам понадобится:
- Сервер Minecraft с включенным параметром RCON
- Сайт с поддержкой PHP, желательно на том же хостинге
- Приложения яндекса с Алисой, Колонка, или Яндекс браузер
Сервер Minecraft
Я использовал этот Docker контейнер на виртуалке, там же разместил виртуальный сервер с php.
Прметр docker-compose.yml
version: '3'
services:
  minecraft:
    image: itzg/minecraft-server
    ports:
      - "25565:25565"
      - "127.0.0.1:28016:28016"
    volumes:
      - "./data:/data"
    environment:
      EULA: "TRUE"
      ENABLE_RCON: "true"
      RCON_PASSWORD: "testing"
      RCON_PORT: 28016
      # enable env variable replacement
      REPLACE_ENV_VARIABLES: "TRUE"
      # define an optional prefix for your env variables you want to replace
      ENV_VARIABLE_PREFIX: "CFG_"
      VERSION: "1.12.2"
      TYPE: "FORGE"
    restart: always
Но я надеюсь вы гуру в Minecraft`e и у вас уже есть свой сервер, или вы знаете как включить на своем локальном компьютере rcon.
Сайт для отправки комманд в Minecraft
Если у вас нету своего хостинга, то можно воспользоватся хостингом за 9 рублей в месяц, тариф для лэндинга
после регистрации вы получите имя сайта примерно такого вида name_1232323.lh.parking.ru, его и нужно будет вставить в URL правила, то есть будет так:

На сайте размещаете скрипт index.php c кодом:
include './vendor/autoload.php';
$host = 'localhost'; //  IP адрес сервера Minecraft
$port = 28016;    // Порт rcon
$password = 'testing'; // rcon.password setting set in server.properties
$timeout = 3;  // How long to timeout.

use ThedudeguyRcon;

$rcon = new Rcon($host, $port, $password, $timeout);

if ($rcon->connect())
{
    if($_GET['value']==1){
        # Выполняется, когда поступила команда открыть, подставляем ваши координаты блоков
        $rcon->sendCommand('/fill 21 72 329 21 74 327 minecraft:air replace');
    }else{
        # Выполняется, когда поступила команда закрыть, подставляем ваши координаты блоков
        $rcon->sendCommand('/fill 21 72 329 21 74 327 minecraft:stone replace');
    }
}else{
    echo 'Ошибка авторизации, или соединения';
}
Скачать скрипт можно здесь, со всеми библиотеками
Настройка Яндекс Алисы
Теперь у вас все готово,после настройки приложения и кузи , вы сможете управлять Minecraft, как настроить смотрите в видео
назад в раздел smarthome
Вс 03 Май 2020.

Чит Майнкрафт Яндекс — это лучший чит для Майнкрафт всех версий. Этот чит содержит множество функций, от флая до киллауры. Ты сможешь читерить на всех серверах, даже лицензионных, таких как хайпиксель или майнплекс. Тебя никто не сможет заметить, но ты сможешь их гриферить, забирать их ресурсы и убивать.
Функции Чит Майнкрафт Яндекс:
AutoArmor — автоматичи одевать на себя броню.
AutoSoup — автом. пьёт суп.
KillAura — Бьёт автоматически быстро игроков в 360 градусов.
AutoPot — автомат. кидадает себя зельки (только не вредительнные)
TAB GUI — Меню чита.
HUD — маленькая менюшка читы (находить в верхем правом углу, возможно в левом)
Click Friend — Добавляет в друзья килл ауры (добавлять колёсиком)
Gomme Teleport — Телепорт для сервера gommeHD
AutoRespawn — автом. респавн.
FreeCam — Визульный полёт (для поиска жертвы)
FastUse — быстро кушать еду.
Teleport — Телепорт для AAC или хайпиксель.
No Fall — Нет урона, если вы упадёте с большой высоты.
Regen — быстрое востановление жизни (возможно вылет из сервера)
Phase — Пройти сквозь блоки
Blink — Телепорт,
Trajecrories — Указывает падение стрелы из лука.
NoSeeEffects — убирает негативные эффекты.
AutoFish — автоматическая ловля рыбы
ChestESP — эта функция показывает местоположение сундуков
FullBright — ВЕЧНОЕ ночное зрение
NoSlowDown — возможность есть, пить и ходить по песку душ без замедления
NoWeather — отключает смену погоды в игре (Дождь, снег)
PlayerESP — возможность видеть игроков, точнее «коробку», в которой этот игрок, сквозь стены
Tracers — обнаружение ближайших игроков
XRay — показывает все руды
NameTags — увеличивает ники игроков
FlyNCP — улучшенный Fly, который обходит анти-чит
FastPlace — с помощью этой функции ваш персонаж гораздо быстрее ставит блоки
InstantMine — ваш персонаж быстро ломает блоки
CreativeNuker — в определенном радиусе быстро ломает блоки
BowAimbot — AimbotAura для лука
AntiFire — защита от горения(огня)
FastBow — ускоренные выстрелы из лука
Criticals — постоянные критические удары
Radar — Радар, показывающий игроков в некотором радиусе
Inventory Move — хоть с открытым инвентарём.
Velosity — АнтиКноуБек (Анти Отталкивание)
FlyAAC — флай для обхода AAC
Long Jump — длинный прыжок
jesus — ходить по воде.
Flyght — полёт.
step — быстро забираться по блокам.

Чит Майнкрафт Яндекс
Этот чит очень поможет тебе выигрывать во всех мини-играх, ты сможешь очень быстро ставить блоки и убивать всех игроков которых только заметишь, скачивай чит и играй!
Скачать Чит Майнкрафт Яндекс

Деревня — это структура в виде группы домов. В домах поселения могут быть сундуки, в которых часто хранятся полезные предметы. В деревнях живут жители, с которыми можно торговать.
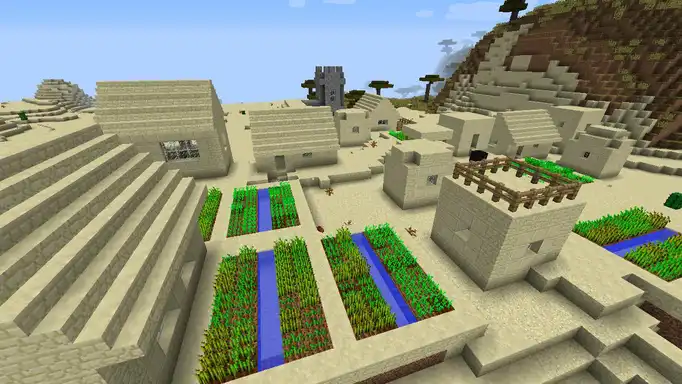
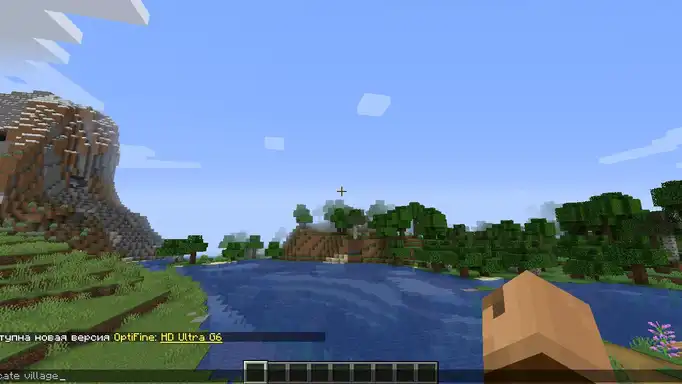
Самым простым и неэффективным способом поиска деревень является хождение по миру. Многие игроки обследуют биомы, где чаще всего селятся жители. Это саванны, пустыни, тайга и равнина. В творческом режиме, в полёте, это делать проще.
Для этого нужно переключить режим игры, командой /gamemode 1, нажать два раза на пробел и лететь по миру. После достижения цели переключайтесь в режим выживания. Введите команду /gamemode 0.
Но есть и более эффективные способы.
Поиск деревни командой
Самый простой и быстрый способ найти поселение — это использовать команду. Но сначала активируйте режим использования читов. Это делается в настройках мира. В режиме креатива он уже активирован. Далее нажмите английскую T и введите команду, которая покажет координаты ближайшей деревни.
/locate village
Жмите Enter. На экране появится надпись: ближайшее строение типа village находится по координатам. Далее переписываем эти координаты, или запоминаем. Следующей командой будет телепорт к деревне, координаты которой мы выяснили.
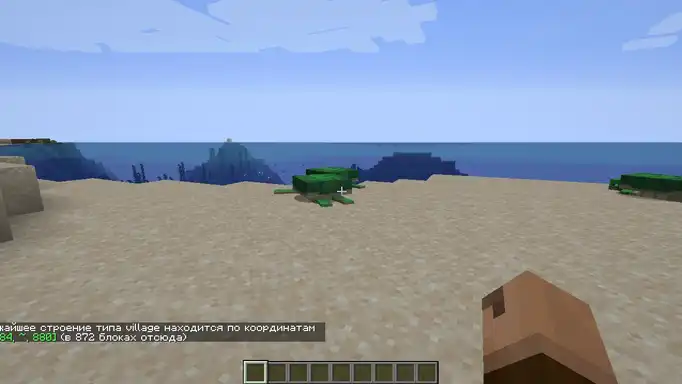
/tp -384 100 880
После ввода команды, жмём Enter и телепортируемся к поселению жителей. 100 — высота на которую мы заспавнимся. Чтобы не застрять в текстурах, лучше сделать её побольше. Я взял значение — 100.
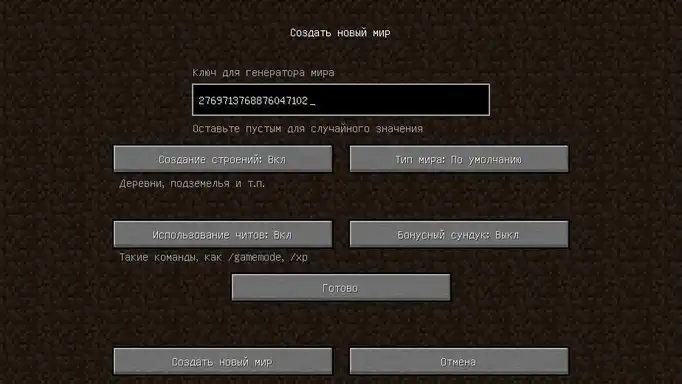
Поиск деревни по сиду
Это ещё один быстрый способ попасть в посёлок. Но вам нужно при создании мира указать сид, или специальный код. Он перенесёт игрока в ту местность, для которой он предназначался. Но минус этого способа в том, что для каждой версии игры свои коды. У нас есть сиды для разных версий игр. Версию игры можно увидеть в нижнем левом углу экрана, при выходе в игровое меню.
Опция Large Biomes
При создании мира, в его настройках укажите эту опцию. Также должна быть установлена опция Generate Structures в on. Эти настройки позволят расширить мир и сгенерировать в нём множество строений. Так у вас появится ещё больше возможностей найти деревню.
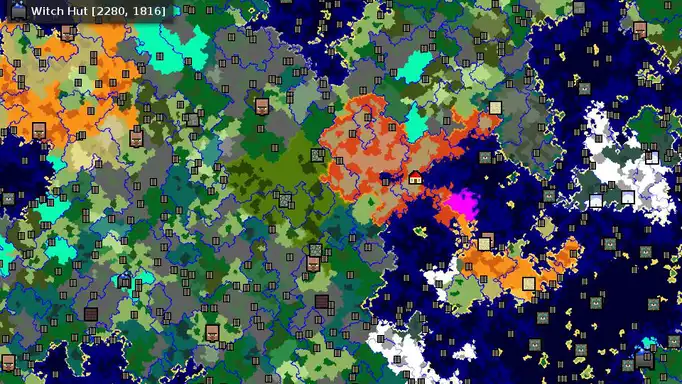
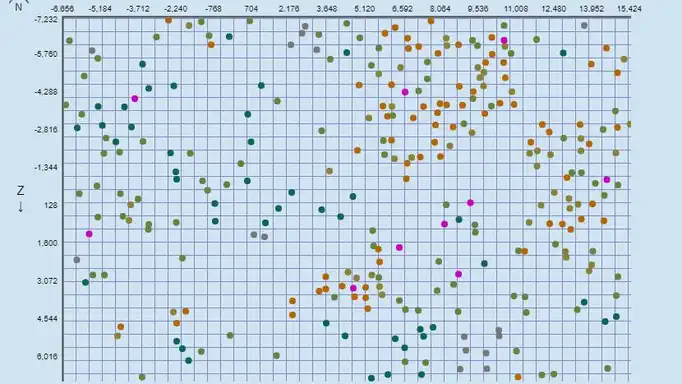
Village finder
В интернете есть приложение с помощью которого ищут все деревни находящиеся вокруг игрока. Для поиска, нужно
перейти по ссылке
, ввести свой сид в Майнкрафте и указать версию игры. Приложение проанализирует вашу генерацию и укажет точками расположение поселений. Также есть возможность загрузить сохранение для анализа. Его можно найти в папке %appdata%.minecraftsaves. Этот инструмент работает только для ПК версий игры.
Программа Amidst
Скачать программу можно на гитхабе. Это ещё один популярный инструмент для поиска локаций на карте.