![]()
Download Article
![]()
Download Article
Did you accidentally delete an important folder from your PC and now you don’t see it in the Recycle Bin? Don’t panic—we can help you restore most «permanently» deleted files and folders! This wikiHow tutorial will walk you through recovering files and folders you’ve deleted from Windows, even if they’re not in the Recycle Bin.
-

1
Try restoring previous versions in the File Explorer. Before we dive into a robust (but simple) tool, there might be an uncomplicated way you can restore the deleted folder without installing any software, especially if you regularly make backups. Press Windows key + E to open File Explorer, connect your backup drive (if you have one), and then try this quick trick:
- Navigate to the folder where the deleted folder was saved. For example, if you deleted a folder called «Songs» from your «Downloads» folder, locate the Downloads folder now.
- Right-click the folder and select Restore previous versions.[1]
You’ll see previous versions of the folder from system restore points and file history (backups). - If you see any previous dates available, select a date before the folder was deleted and click Restore to choose a restore location.
- If no previous versions are available, continue to the next step.
-
2
Install ShadowExplorer from https://www.shadowexplorer.com/downloads.html. The Volume Shadow Copy Service (VSS) is always running in the background on most Windows PCs, saving copies of the files (shadow copies) and folders you work on in automatically-created restore points.[2]
ShadowExplorer is a simple tool that allows you to browse through and restore copies of the files and folders you’ve deleted—even if you emptied the Recycle Bin. If the shadow copies of the deleted files were not permanently deleted, you can usually restore deleted files this way.- To install, click the ShadowExplorer Installer link near the top of the page to save the installer to your PC. Once downloaded, double-click the downloaded file (the one that ends with «setup.exe») and follow the on-screen instructions.
- VSS is not a replacement for normal backups, so you might not find everything you’re looking for. But in many cases, you can restore important documents, photos, and other files you’ve accidentally deleted, even if they aren’t in the Recycle Bin.
Advertisement
-
3
Open Shadow Explorer. After the installer completes, the tool should open automatically. If not, click the ShadowExplorer entry on your Windows menu to launch it now.
-
4
Select a drive and shadow copy time. Choose the drive from which you deleted the folder from the drop-down at the top-left. Then, select a date and time from the second drop-down menu to choose a time when you know the folder was still at its previous location.[3]
-
5
Navigate to the last location of the folder you deleted. For example, if you emptied the Recycle Bin, double-click Recycle.Bin in ShadowExplorer to view a list of previous folders.
- If you deleted the folder without sending it to the Recycle Bin, just go to the folder that used to contain the deleted folder, for example, your Downloads, Documents, or Desktop folder.
-
6
Browse through the folders for the deleted files. Note that the deleted file and folder names are going to be different than the ones you deleted, as these are just shadow copies of the original files. For example, if you deleted a Word document, it might be called something like «R27SMTN.doc» instead of «My file.doc.»
- If you’re browsing the Recycle Bin, you may find several folders, all with different files inside. It can be tough to determine which files are the ones you’re looking for now that the names are different, but once you restore the folders that have files inside, you can easily double-click the files to see what’s inside of them and rename them.
-
7
Right-click a deleted folder and choose Export…. You can do this for individual file as well, but right-clicking a folder will allow you to restore the entire folder’s contents.
-
8
Select a location and click OK. The location you choose is where you’ll be restoring the folder to, such as your desktop. Once you click OK, a copy of the folder and its containing files will be at the selected location.
- Since the names of the files and folders are different, you can rename any files you want to keep. Just right-click a restored file, choose Rename, type a new name, and press Enter.
- If this tool doesn’t work for you, you might be able to recover the files using the Deep Scan option of a file recover app like Recuva.


Advertisement
-
1
Install the free version of Recuva. Recuva is a free tool that can restore files that you’ve deleted from Windows, even if those files aren’t in the Recycle Bin.[4]
You can download it from https://www.ccleaner.com/recuva.- Recuva works by locating files that have been deleted from the PC but haven’t yet been overwritten by other files.[5]
Because those deleted files can be overwritten rather quickly, the earlier you can use Recuva to recover your deleted files, the better. The best thing you can possibly do is to stop everything you’re doing and run that software on it before something overwrites it with anything. - You won’t find the actual deleted folder in Recuva—instead, you’ll be looking for the files that were inside of the deleted folder.
- The paid version of Recuva includes tools for restoring files from virtual hard drives, but most people can restore deleted folders without needing to upgrade.
- Recuva works by locating files that have been deleted from the PC but haven’t yet been overwritten by other files.[5]
-
2
Open Recuva. If the file doesn’t launch automatically, click the new Recuva entry on your Windows menu. A recovery wizard will open.
- If Windows blocks the app from running, click the pop-up, choose the first item in the list, click Actions, and then choose Allow on device.
-
3
Click Next to begin. Recuva’s recovery wizard will now walk you through restoring the deleted folders.
-
4
Select All Files and click Next. This tells Recuva to look at all deleted files.
-
5
Choose the last known location for the folder and click Next. Where was the folder before it disappeared? Choose one of the locations, insert media if needed, and then click Next.
-
6
Click Start to search for deleted files. Recuva will now look for the files you’ve deleted from the selected location, which can take several minutes. A list of files will appear once the scan finishes.
- The «Enable Deep Scan» checkbox is there for tougher tasks. If you are not able to recover the lost files without a deep scan at first, repeat this process and check this box next time.
-
7
Select the file(s) you want to recover and click Recover…. This restores the selected file(s) and/or folder(s) to the original location.


Advertisement
-
1
The Recycle Bin may have been emptied by Storage Sense. If you’re using Windows Storage Sense to manage your files, it may have deleted the contents of the Recycle Bin after a certain amount of time.[6]
To check:- Open your Windows Settings and click System.
- Click Storage.
- Click Storage Sense.
- If «Automatic User content cleanup» is enabled here, the tasks under «Configure cleanup schedules» will run automatically to free up disk space. You can see how often Storage Sense empties your Recycle Bin in the «Delete files in my recycle bin if they have been there for over» menu.
- To prevent Storage Sense from managing your Recycle Bin, select Never from this menu, or toggle off «Automatic User content cleanup» entirely to manage your own storage manually.
-
2
The Recycle Bin may have filled up. If you’re looking for a folder you deleted prior to deleting other large files and folders, your Recycle Bin may have grown too large, and Windows automatically deleted the oldest files to make room for new ones.
-
3
The folder was too large for the Recycle Bin. If the folder size exceeded the Recycle Bin’s allotted size, you would have seen a message that said, «This file is too big to recycle,» which would’ve prompted you to bypass the Recycle Bin. To check the size of the Recycle Bin, right-click the Recycle Bin icon and choose Properties.
- If you have disk space to spare, you can increase the size of the Recycle Bin. Just be aware that as time goes on, the Recycle Bin can get pretty big. You can adjust the size in the «Custom size» field (in MB) in the Recycle Bin properties.
-
4
You might have manually bypassed the Recycle Bin. If you deleted a folder by pressing Shift + Delete instead of just Delete, the folder would skip the Recycle Bin and disappear completely.
-
5
You may have disabled the Recycle Bin. Right-click the Recycle Bin and select Properties. If there’s a checkmark next to «Don’t move files to the Recycle Bin. Remove files immediately when deleted,» none of your deleted files will wind up in the Recycle Bin. To reenable the Recycle Bin, remove that checkmark and click OK.


Advertisement
Add New Question
-
Question
How do I recover permanently deleted folders in Google Drive?

Luigi Oppido is the Owner and Operator of Pleasure Point Computers in Santa Cruz, California. Luigi has over 25 years of experience in general computer repair, data recovery, virus removal, and upgrades. He is also the host of the Computer Man Show! broadcasted on KSQD covering central California for over two years.
Computer & Tech Specialist
Expert Answer
Google Drive holds on to the trash for 30 days. So, if you have deleted a folder, it should be just sitting in the trash on the left-hand side for a month. If it’s after 30 days, you may be able to contact Google and they may have some extra steps, but recovery is not guaranteed.

Ask a Question
200 characters left
Include your email address to get a message when this question is answered.
Submit
Advertisement
References
About This Article
Article SummaryX
1. Try right-clicking the parent folder and selecting Restore previous versions.
2. If that doesn’t work, install ShadowExplorer and browse for shadow copies to restore.
3. Try a file recovery tool like Recuva for more difficult jobs.
Did this summary help you?
Thanks to all authors for creating a page that has been read 9,787 times.
Is this article up to date?
Английский
К сожалению, эта статья недоступна на вашем языке.
If you can’t locate a lost file from your backup, then you can use Windows File Recovery, which is a command line app available from the Microsoft Store. Use this app to try to recover lost files that have been deleted from your local storage device (including internal drives, external drives, and USB devices) and can’t be restored from the Recycle Bin. Recovery on cloud storage and network file shares is not supported.
Note This app requires Windows 10 build 19041 or later (See which version of Windows 10 you have).
Important: If you want to increase your chances of recovering a file, minimize or avoid using your computer. In the Windows file system, the space used by a deleted file is marked as free space, which means the file data can still exist and be recovered. But any use of your computer can create files, which may over-write this free space at any time.
Windows File Recovery — Winter 2020 release
-
If necessary, download and launch the app from Microsoft Store.
-
Press the Windows key, enter Windows File Recovery in the search box, and then select Windows File Recovery.
-
When you are prompted to allow the app to make changes to your device, select Yes.
-
In the Command Prompt window, enter the command in the following format:
winfr source-drive: destination-drive: [/mode] [/switches]
-
There are 2 basic modes you can use to recover files: Regular and Extensive.
Regular mode examples
Recover your Documents folder from your C: drive to the recovery folder on an E: drive. Don’t forget the backslash () at the end of the folder.
Winfr C: E: /regular /n Users<username>Documents
Recover PDF and Word files from your C: drive to the recovery folder on an E: drive.
Winfr C: E: /regular /n *.pdf /n *.docx
Extensive mode examples
Recover any file with the string «invoice» in the filename by using wildcard characters.
Winfr E: C: /extensive /n *invoice*
Recover jpeg and png photos from your Pictures folder to the recovery folder on an E: drive.
Winfr C: E: /extensive /n Users<username>Pictures*.JPEG /nUsers<username>Pictures*.PNG
The source and destination drives must be different. When recovering from the operating system drive (often C: ), use the /n <filter> switches to specify the user files or folder.
Microsoft automatically creates a recovery folder for you called, Recovery_<date and time> on the destination drive. -
When you are prompted for confirmation to continue, enter Y to start the recovery operation. Depending on the size of your source drive, this may take a while. To stop the recovery process, press Ctrl + C.
The following information can help you decide which file system you have and which mode to use.
File systems
|
File system |
Examples |
|---|---|
|
FAT and exFAT |
SD cards, flash or USB drives (< 4GB) |
|
NTFS |
Computers (HDD, SSD), external hard drives, flash or USB drives (> 4GB) |
There are several file systems supported by Windows that vary depending on the storage device or operating system. Recovering files from non-NTFS file systems is only supported by extensive mode. To see which file system you have, right click a drive in File Explorer and select Properties.
Deciding which mode to use
Use the following table to help you decide which mode to use. If you are not sure, start with Regular mode.
|
File system |
Circumstances |
Recommended mode |
|---|---|---|
|
NTFS |
Deleted recently |
Regular |
|
NTFS |
Deleted a while ago |
Extensive |
|
NTFS |
After formatting a disk |
Extensive |
|
NTFS |
A corrupted disk |
Extensive |
|
FAT and exFAT |
Any |
Extensive |
General syntax
The following table summarizes what each advanced switch is used for.
|
Parameter / switch |
Description |
Supported mode(s) |
|---|---|---|
|
Source-drive: |
Specifies the storage device where the files were lost. Must be different from the destination-drive. |
All |
|
Destination-drive: |
Specifies the storage device and folder on which to put the recovered files. Must be different from the source-drive. |
All |
|
/regular |
Regular mode, the standard recovery option for non-corrupted NTFS drives |
Regular |
|
/extensive |
Extensive mode, a thorough recovery option suitable for all file systems |
Extensive |
|
/n<filter> |
Scans for a specific file by using a file name, file path, file type, or wildcards. For example:
|
All |
|
/? |
Summary of syntax and switches for general users. |
All |
|
/! |
Summary of syntax and switches for advanced users. |
All |
Advanced syntax
The following table summarizes what each advanced switch is used for.
|
Switch |
Description |
Supported modes |
|---|---|---|
|
/ntfs |
NTFS mode, a fast recovery option for healthy NTFS drives using the master file table |
NTFS |
|
/segment |
Segment mode, recovery option for NTFS drives using file record segments |
Segment |
|
/signature |
Signature mode, recovery option for all file system types using file headers |
Signature |
|
/y:<type(s)> |
Recover specific extension groups, comma separated |
Signature |
|
/# |
Signature mode extension groups and supported file types. |
Signature |
|
/p:<folder> |
Saves a log file of the recovery operation in a different location than the default location on the recovery drive (for example, D:logfile). |
All |
|
/a |
Overrides user prompts, which is useful in a script file. |
All |
|
/u |
Recovers undeleted files, for example, from the Recycle Bin. |
NTFS |
|
/k |
Recovers system files. |
NTFS |
|
/o:<a|n|b> |
Specifies whether to always (a), never (n), orkeep both always(b) when choosing whether to overwrite a file. The default action is to prompt to overwrite. |
NTFS |
|
/g |
Recovers files without primary data streams. |
NTFS |
|
/e |
To keep your results manageable and focus on user files, some file types are filtered by default, but this switch removes that filter. For a complete list of these file types, see the information after this table. |
NTFS |
|
/e:<extension> |
Specifies which file types are filtered. For a complete list of these file types, see the information after this table. |
NTFS |
|
/s:<sectors> |
Specifies the number of sectors on the source device. To find sector information, use fsutil. |
Segment |
|
/b:<bytes> |
Specifies the cluster size (allocation unit) on the source device. |
Segment |
File extension filter list
The following file types are filtered from results by default. Use the /e switch to disable this filter or the /e:<extension> filter to specify file types not to filter.
_, adm, admx, appx, appx, ascx, asm, aspx, aux, ax, bin, browser, c, cab, cat cdf-ms, catalogItem, cdxm, cmake, cmd, coffee, config, cp, cpp, cs, cshtm, css, cur, dat, dll, et, evtx, exe, fon, gpd, h, hbakedcurve, htm, htm, ico, id, ildl, ilpdb, iltoc, iltocpdb, in, inf, inf_loc, ini, js, json, lib, lnk, log, man, manifest, map, metadata, mf, mof, msc, msi, mui, mui, mum, mun, nls, npmignore, nupkg, nuspec, obj, p7s, p7x, pak, pckdep, pdb, pf, pkgdef, plist, pnf, pp, pri, props, ps1, ps1xm, psd1, psm1, py, resjson, resw, resx, rl, rs, sha512, snippet, sq, sys, t4, targets, th, tlb, tmSnippet, toc, ts, tt, ttf, vb, vbhtm, vbs, vsdir, vsix, vsixlangpack, vsixmanifest, vstdir, vstemplate, vstman, winmd, xam, xbf, xm, xrm-ms, xs, xsd, ym
Can you give some tips to help me use the correct syntax?
-
Always use drive letters in the source and destination path, don’t forget the colon (:) after the drive letter, and make sure there is a space between the source and destination.
-
When you specify just a folder name, such as /n Myfolder, add a backslash () at the end of it.
-
If a file or folder name has spaces, surround it with quotes. For example:
winfr C: E: /regular /n «Users<username>DocumentsQuarterly Statement.docx»
What does <username> mean in the command examples?
In the File Explorer address bar, enter C:users to see a list of potential users on your computer. There may be several users on your computer, including you, the administrator, and the default account. When you see <username> in a file path, it is a placeholder for the current username on your computer.
Why am I getting this message: «Source and Destination cannot refer to the same physical partition?»
The source and destination drive or partition path should not be the same. If you only have one drive, use a USB or external hard drive as your destination path. Don’t create a partition after losing data, because this reduces the chance of a successful recovery.
Why does the recovery operation take so long?
Depending on the size of the disk, it may take some time to recover the file, especially if you are using Extensive mode.
Why are additional files recovered from my operating system drive?
Behind the scenes, Windows is constantly creating and deleting files. By default, Windows File Recovery filters out these files, but some slip through. To prevent this, use the /n <filter> as per examples in this article.
What is the $Recycle.Bin folder?
For NTFS and segment modes, you may also see lost files recovered from the Recycle Bin (files either in the recycle bin or that were permanently deleted) with the name $files.xxx and stored in a folder called $RECYCLE.BIN.
What happens if the destination drive is full?
If you see the following message: »Destination disk is full, please free up space before resuming: (R)esume, (S)kip file, or (A)bort,» free up drive space on the destination drive, and then choose one of the options.
I was not able to recover the file, now what?
If you used Regular mode, try again in extensive mode if the file type is supported. It’s possible that the free space was overwritten, especially on a solid-state drive (SSD). If you need help, contact your administrator.
Windows File Recovery — Summer 2020 release
-
If necessary, download and launch the app from Microsoft Store.
-
Press the Windows key, enter Windows File Recovery in the search box, and then select Windows File Recovery.
-
When you are prompted to allow the app to make changes to your device, select Yes.
-
In the Command Prompt window, enter the command in the following format:
winfr source-drive: destination-drive: [/switches]
The source and destination drives must be different. When recovering from the operating system drive (often C: ), use the /n <filter> and /y:<type<(s)> switches to specify the user files or folder.
Microsoft automatically creates a recovery folder for you called Recovery_<date and time> on the destination drive.
There are three modes you can use to recover files: Default, Segment, and Signature.
Default mode examples
Recover a specific file from your C: drive to the recovery folder on an E: drive.
winfr C: E: /n Users<username>DocumentsQuarterlyStatement.docx
Recover jpeg and png photos from your Pictures folder to the recovery folder on an E: drive.winfr C: E: /n Users<username>Pictures*.JPEG /n Users<username>Pictures*.PNG
Recover your Documents folder from your C: drive to the recovery folder on an E: drive.winfr C: E: /n Users<username>Documents
Don’t forget the backslash () at the end of the folder.
Segment mode examples (/r)
Recover PDF and Word files from your C: drive to the recovery folder on an E: drive.
winfr C: E: /r /n *.pdf /n *.docx
Recover any file with the string «invoice» in the filename by using wildcard characters.winfr C: E: /r /n *invoice*
Signature mode examples (/x)
When using signature mode, it’s helpful to first see the supported extension groups and corresponding file types.
Recover JPEG (jpg, jpeg, jpe, jif, jfif, jfi) and PNG photos from your C: drive to the recovery folder on an E: drive.winfr C: E: /x /y:JPEG,PNG
Recover ZIP files (zip, docx, xlsx, ptpx, and so on) from your C: drive to the recovery folder on an E: drive.winfr C: E:RecoveryTest /x /y:ZIP
-
When you are prompted for confirmation to continue, enter Y to start the recovery operation.
Depending on the size of your source drive, this may take a while.
To stop the recovery process, press Ctrl+C.
The following information can help you decide which file system you have and which mode to use.
File systems
There are several file systems supported by Windows that vary depending on the storage device or operating system. Recovering files from non-NTFS file systems is only supported in signature mode. To see which file system you have, right click a drive in File Explorer and select Properties.
|
File system |
Examples |
|
FAT and exFAT |
SD cards, flash or USB drives (< 4GB) |
|
ReFS |
Windows Server and Windows Pro for Workstations |
|
NTFS |
Computers (HDD, SSD), external hard drives, flash or USB drives (> 4GB) |
Deciding which mode to use
Use the following table to help you decide which mode to use. If you’re not sure, start with the default mode.
|
File system |
Circumstances |
Recommended mode |
|
NTFS |
Deleted recently |
Default |
|
NTFS |
Deleted a while ago |
Segment, followed by Signature |
|
NTFS |
After formatting a disk |
Segment, followed by Signature |
|
NTFS |
A corrupted disk |
Segment, followed by Signature |
|
FAT, exFAT |
Recovery file type is supported (see following table) |
Signature |
Signature mode extension groups and file types
The following table summarizes the extension groups and the supported file types for each group when you use the /y:<type(s)> switch
|
Extension group |
File type |
|
ASF |
wma, wmv, asf |
|
JPEG |
jpg, jpeg, jpe, jif, jfif, jfi |
|
MP3 |
mp3 |
|
MPEG |
mpeg, mp4, mpg, m4a, m4v, m4b, m4r, mov, 3gp, qt |
|
|
|
|
PNG |
png |
|
ZIP |
zip, docx, xlsx, pptx, odt, ods, odp, odg, odi, odf, odc, odm, ott, otg, otp, ots, otc, oti, otf, oth |
General syntax
The following table summarizes what each basic command line parameter and switch is used for.
|
Parameter or switch |
Description |
Supported modes |
|
Source-drive: |
Specifies the storage device where the files were lost. Must be different from the destination-drive. |
All |
|
Destination-drive: |
Specifies the storage device and folder on which to put the recovered files. Must be different from the source-drive. |
All |
|
/r |
Uses segment mode, which examines File Record Segments (FRS). |
Segment |
|
/n <filter> |
Scans for a specific file by using a file name, file path, or wildcards. For example:
|
Default |
|
/x |
Uses signature mode, which examines file types and works on all file systems. |
Signature |
|
/y:<type(s)> |
Scans for files with specific file types. Separate multiple entries by using commas. For a list of extension groups and corresponding file types, see the table, «Signature mode extension groups and file types» in the section, «About modes and file systems». |
Signature |
|
/# |
Shows signature mode extension groups and corresponding file types in each group. |
All |
|
/? |
Shows a quick summary of syntax and switches for general users. |
All |
|
/! |
Shows a quick summary of syntax and switches for advanced users. |
All |
Advanced syntax
The following table summarizes what each advanced switch is used for.
|
Switch |
Description |
Supported modes |
|
/p:<folder> |
Saves a log file of the recovery operation in a different location than the default location on the recovery drive (for example, D:logfile). |
All |
|
/a |
Overrides user prompts, which is useful in a script file. |
All |
|
/u |
Recovers undeleted files, for example, from the Recycle Bin. |
Default |
|
/k |
Recovers system files. |
Default |
|
/o:<a|n|b> |
Specifies whether to always (a), never (n), orkeep both always(b) when choosing whether to overwrite a file. The default action is to prompt to overwrite. |
Default |
|
/g |
Recovers files without primary data streams. |
Default |
|
/e |
To keep your results manageable and focus on user files, some file types are filtered by default, but this switch removes that filter. For a complete list of these file types, see the information after this table. |
Default |
|
/e:<extension> |
Specifies which file types are filtered. For a complete list of these file types, see the information after this table. |
Default |
|
/s:<sectors> |
Specifies the number of sectors on the source device. To find sector information, use fsutil. |
Segment |
|
/b:<bytes> |
Specifies the cluster size (allocation unit) on the source device. |
Segment |
|
/f:>sector> |
First sector to scan on the source device. |
Segment |
Can you give some tips to help me use correct syntax?
Here are some suggestions:
-
Always use drive letters in the source and destination path, don’t forget the colon (:) after the drive letter, and make sure there is a space between the source and destination.
-
If a switch has a colon, such as /y:, don’t add a space between the colon and the rest of the value.
-
When you specify just a folder name, such as /n Myfolder, add a backslash () at the end of it.
-
If a file or folder name has spaces, surround it with quotes. For example:
winfr C: E: /n «Users<username>DocumentsQuarterly Statement.docx»
-
To stop the recovery process, press Ctrl+C.
What does <username> mean in the command examples?
In the File Explorer address bar, enter C:users to see a list of potential users on your computer. There may be several users on your computer, including you, the administrator, and the default account. When you see <username> in a file path, it is a placeholder for the current username on your computer.
Why am I getting this message: «Source and Destination cannot refer to the same physical partition?»
The source and destination drive or partition path should not be the same. If you only have one drive, use a USB or external hard drive as your destination path. Don’t create a partition after losing data, because this reduces the chance of a successful recovery.
Why does the recovery operation take so long?
Depending on the size of the disk, it may take some time to recover the file, especially if you are using signature mode.
Why are additional files recovered from my operating system drive?
Behind the scenes, Windows is constantly creating and deleting files. By default, Windows File Recovery filters out these files, but some slip through. To prevent this, use the /n <filter> switch in default and segment modes and the /y:<type(s)> switch in signature mode.
What is the $Recycle.Bin folder?
For default and segment modes, you may also see lost files recovered from the Recycle Bin (files either in the recycle bin or that were permanently deleted) with the name $files.xxx and stored in a folder called $RECYCLE.BIN.
What happens if the destination drive is full?
If you see the following message: «Destination disk is full, please free up space before resuming: (R)esume, (S)kip file, or (A)bort», Free up drive space on the destination drive, and then choose one of the options.
I was not able to recover the file, now what?
If you used default or segment mode, try again in signature mode if the file type is supported. It’s possible that the free space was over-written, especially on a solid state drive (SSD). If you need help, contact your administrator.
Нужна дополнительная помощь?
Нужны дополнительные параметры?
Explore subscription benefits, browse training courses, learn how to secure your device, and more.
Communities help you ask and answer questions, give feedback, and hear from experts with rich knowledge.
Думаю у многих была ситуация в которой вы случайно или кто то преднамеренно удалил файл или папку с очень важной информацией. И естественно сам собой возникал вопрос- Как восстановить удаленный файл или папку? Первое что необходимо сделать- это не огорчаться и не расстраиваться, потому что практически любую информацию удаленную с компьютера/ ноутбука, USB носителя, можно легко восстановить самому, но для успешного восстановления необходимо уяснить одно правило:
— Не нужно записывать файлы или устанавливать программы на жесткий диск или USB флешку на котором находится информация, которую вы хотите восстановить. Это связанно, с принципом удаления информации, дело в том, что информация при нажатии на кнопку «удалить» на самом деле не удаляется, а лишь затирается ее заголовок, сам файл или папка остаются, но при следующей записи на диск или USB на место где находится удаленный файл или папка записывается новая информация, старая соответственно уже не восстановима.
Способы восстановить удаленный файл или папку.
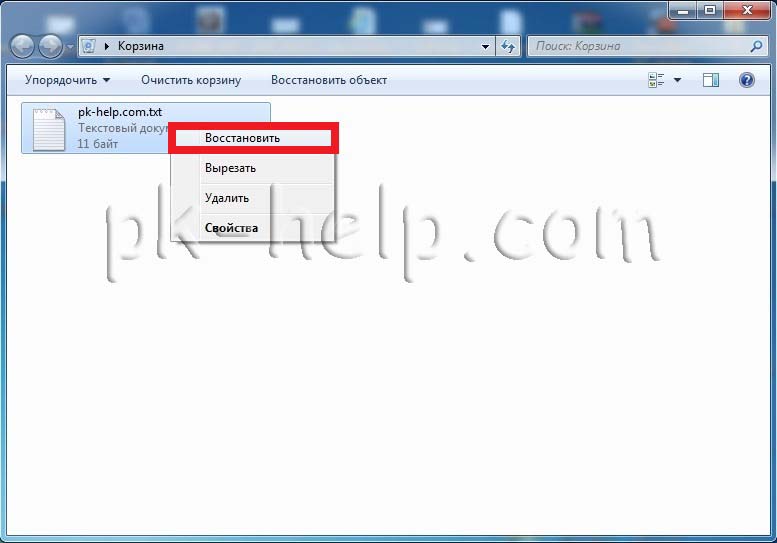
1) Проверить корзину
Первое и самое простое, что необходимо сделать это проверить Корзину, нет ли там удаленного файла или папки. Для этого нажимаете на ярлыке Корзина на рабочем столе и если там вы увидели файл или папку, которую вы случайно удалили нажимаете на ней правой кнопкой мыши и выбираете «Восстановить». Данные будут восстановлены в то же место где находились до удаления.
Если вам не посчастливилось и в корзине вы не нашли удаленного файла или папки, в таком случае необходимо воспользоваться одной из программ восстановления описанный ниже
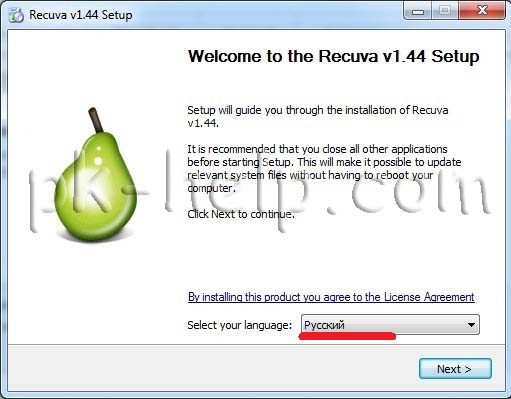
2) Воспользоваться бесплатной программой для восстановления данных Recuva.
Первым делом заходим на сайт Recuva и скачиваем последнюю версию программы. Затем запускаете установку скачанной программы, процесс установки весьма прост, первым шагом необходимо выбрать язык установки.
Затем указываем дополнительные параметры (создавать ли ярлык на рабочем столе, искать ли обновления программы…), можно оставить по умолчанию. Учтите, если удаленный файл находился на диске где установлена операционная система (зачастую диск С), то программу Recuva не следует устанавливать на этот диск иначе ее установкой можете затереть файл и его нельзя будет восстановить. Для того, что выбрать другой диск для установки программы нажмите кнопку «Дополнительно» и укажите другой путь установки программы.
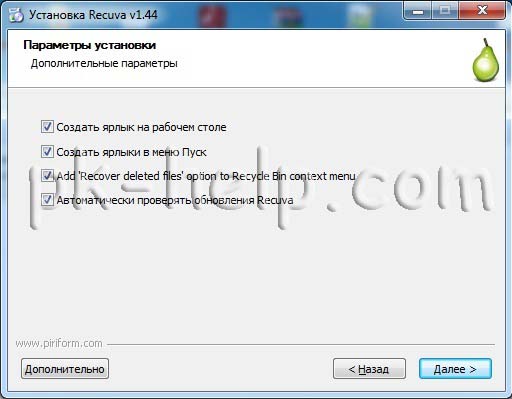
После этого будет предложено установить браузер Google Chrome, если не хотите устанавливать снимите галочку.

После установки будет запущен мастер Recuva, который поможет вам восстановить файлы или папку. Настоятельно рекомендую пользоваться именно мастером, поскольку он более понятен и удобен. Нажимаем «Далее»
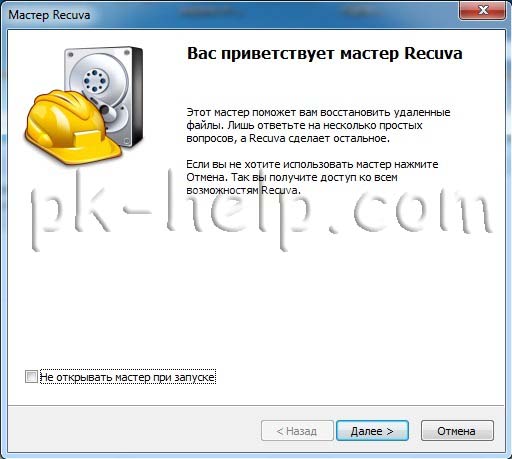
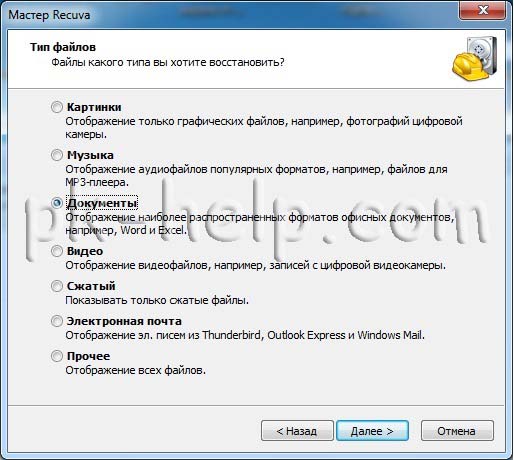
Выбираем тип восстановленного файла
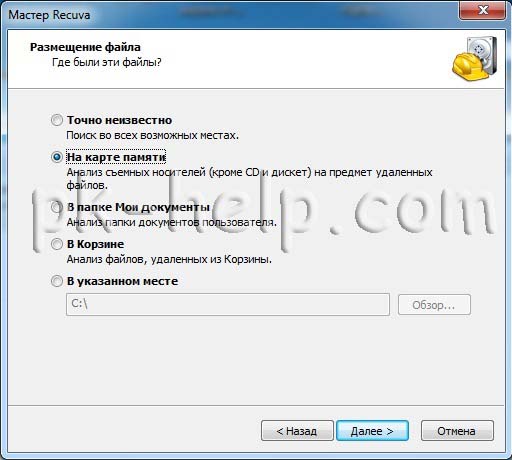
Выбираем место где находился файл или папка.
Ставим галочку «Включить углубленный анализ», нажимаем «Начать».
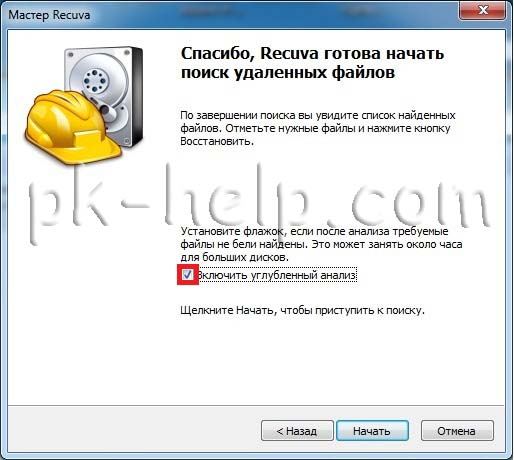
После этого начнется поиск файлов, это может занять до нескольких десятков минут, зависит от многих факторов (мощности компьютера, объема диска или USB устройства, скорости работы диска, USB устройства и т. д.).
После поиска вы увидите список файлов, которых можно восстановить. Если вы хотите получить более подробную информацию о файлах, можете нажать на кнопку «Перейти в расширенный режим».
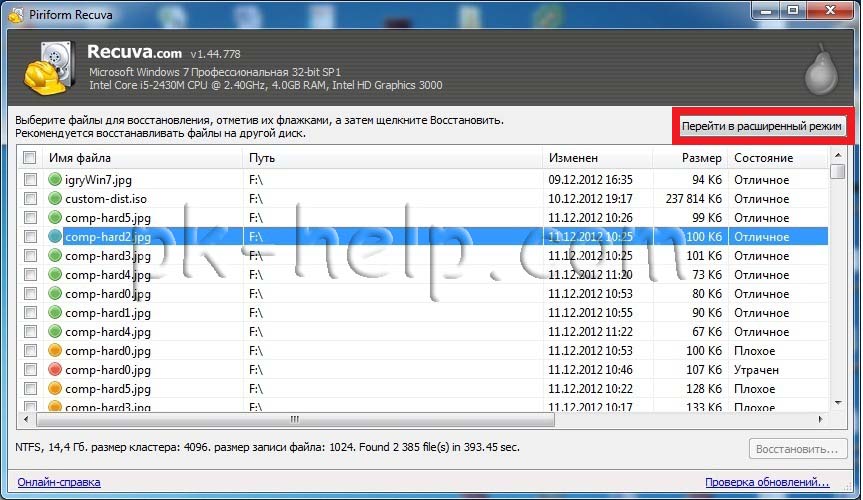
Для восстановления файла установите напротив них галочки и нажмите кнопку «Восстановить», после этого укажите куда восстановить файл и в течении нескольких секунд файл будет восстановлен.
3) Использование платной программы EasyRecovery.
Я, как и многие, за бесплатное программное обеспечение, но в данной статье опишу восстановление файлов и с помощью платной программы, поскольку при моих тестовых восстановлениях эта программа увидела больше удаленных файлов, чем Recuva (2385 файлов против 2461). Я бы рекомендовал использовать эту программу в случае если бесплатная не помогла. Вы все равно ничего не потеряете, поскольку этой программой вы можете бесплатно найти удаленные файлы, вот только для восстановления этих найденных файлов и папок понадобиться лицензионный ключ.
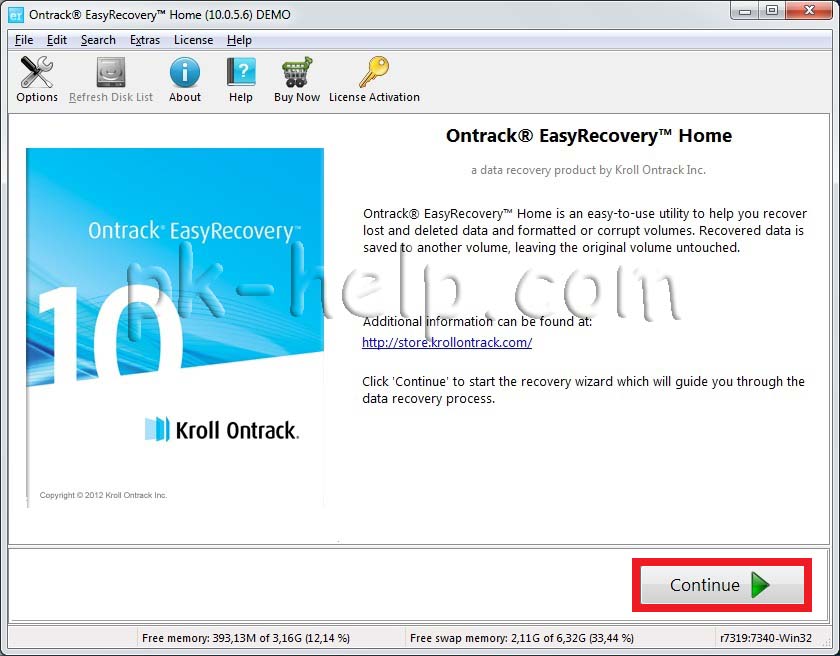
Итак, первым делом скачиваем свежую версию программы EasyRecovery (в данном примере я буду использовать Home версию). Устанавливаем… процесс не сложный, со всем соглашаемся и нажимаем «Next», напомню, что программу нужно устанавливать на том (диск) с которого вы не будете восстанавливать файл или папки, поскольку вы можете затереть восстанавливаемый файл или папку. После установки запускаем программу, первым окном появиться окно лицензирования, которое можно пропустить если нажать «Run as a DEMO». Перед нами появилось первое окно EasyRecovery нажимаем «Continue».
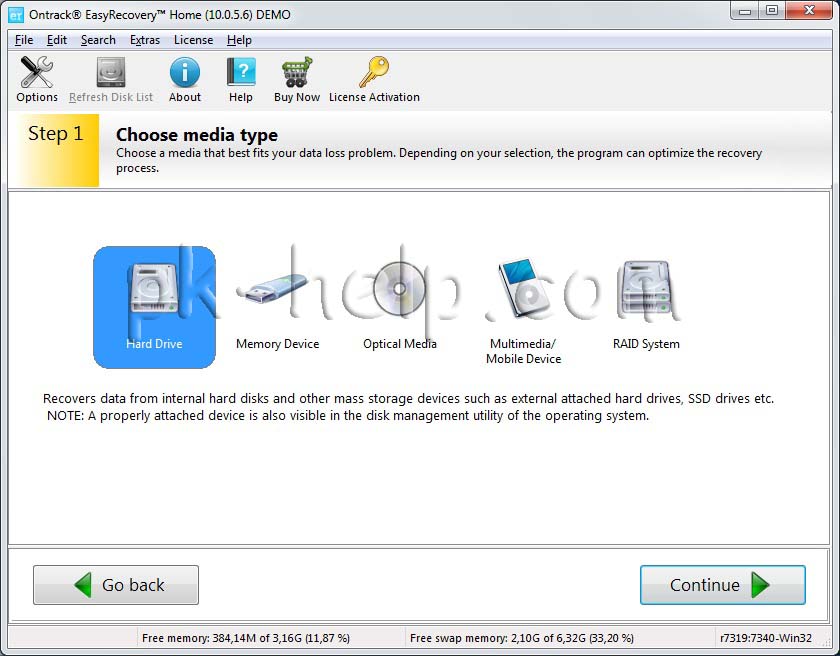
В следующем окне выбираем место где находится файл, который необходимо восстановить.
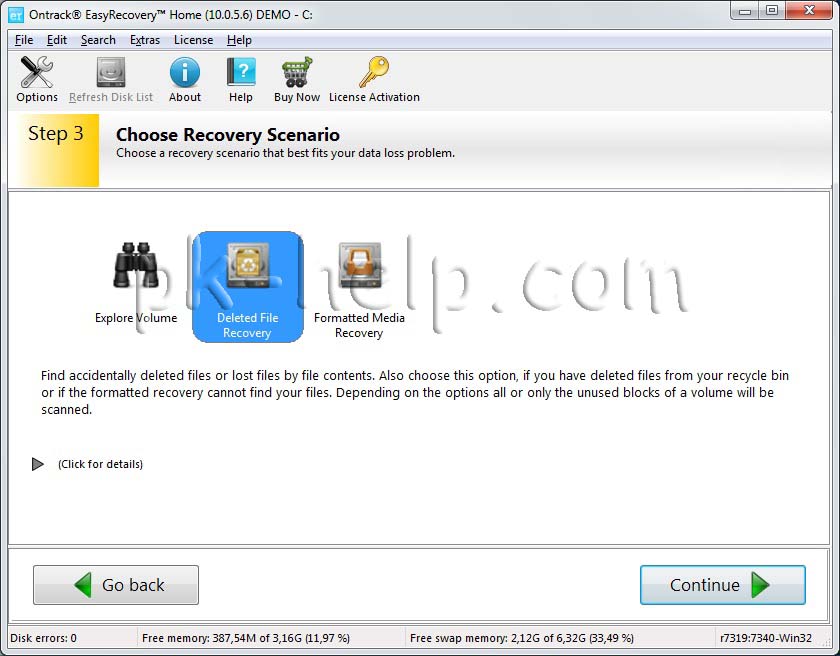
Следующим шагом выбираем сценарий восстановления. Если файл или папка была просто удалена рекомендуется выбрать «Deleted File Recovery», если жесткий диск/ USB флешка были отформатированы необходимо выбрать «Formatted Media Recovery».
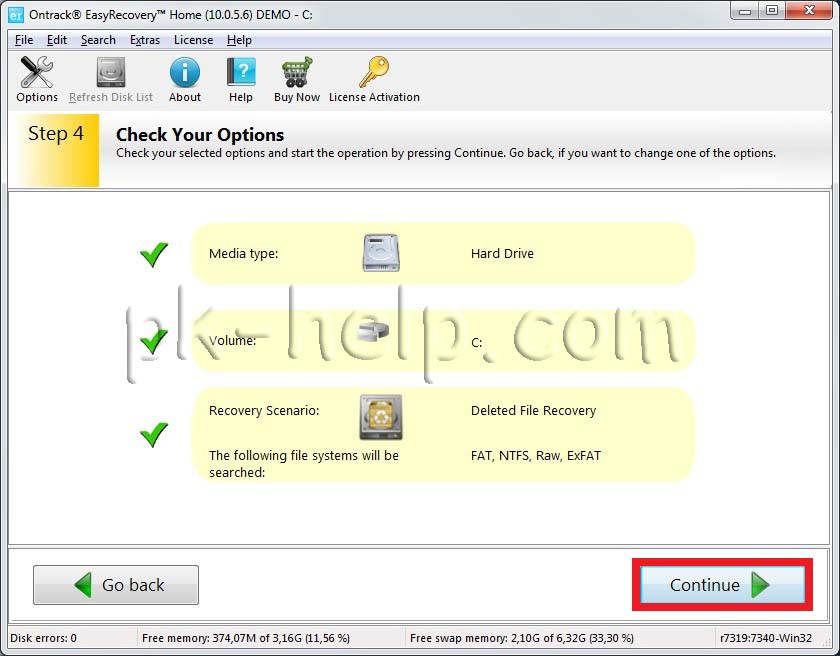
После этого появиться информационное окно в котором указаны все указанные настройки поиска, если вы ничего не напутали, нажимаете «Continue».
Начнется поиск файлов, этот процесс может занять довольно много времени, зависит от размера тома жесткого диска или USB устройства, мощности компьютера и т. д. После того как весь диск или USB флешка отсканированны, перед вами появятся все удаленные файлы разбитые по группам в зависимости от расширения. Если вы нажмете на файл и попытаетесь открыть файл (Open) или сохранить его (Save as) вам будет предложено ввести лицензионный ключ, без него восстановить файл не удастся.
Я надеюсь данное пошаговое руководство помогло вам восстановить ваши файлы и папки, сэкономив не мало времени, а возможно и денег. В дальнейшем рекомендую использовать бекап важных файлов, если есть возможность храните важные файлы на нескольких носителях ну или хотя бы в разных папках.