
(Image credit: jxfzsy via Getty Images)
The night sky is becoming increasingly busy! If you spend any time gazing at the stars on a clear night, you’re guaranteed to see a satellite or two passing among them. But how do you know whether that’s a spent rocket booster, the Hubble Space Telescope, or a crewed space station gliding silently overhead? And what was that momentary flash of light? Was it a meteor — or the glint from a shiny satellite?
Since the first artificial satellite, the Soviet Union’s Sputnik 1, kicked off the space age on Oct. 4, 1957, thousands of objects have been launched into orbit. Many of these were satellites for scientific, telecommunication, and military uses, while the rest consisted of spent rocket boosters and other space debris. The largest object by far is the International Space Station (ISS). This 490-ton (444 metric tons) crewed orbiting space laboratory is about the size of a football field (including the end zones) and includes an acre of solar panels! At the other end of the scale are tiny CubeSats measuring only 4 inches (10 centimeters) on each side.
Related: How to see and track the International Space Station (ISS)
Recently, SpaceX and several other commercial operators have begun launching thousands of communications satellites designed to deliver broadband Internet access across the globe. While most of those aren’t particularly bright, the SpaceX Starlink satellites frequently create a buzz among skywatchers immediately after they are launched. Before they spread out into their final orbits they appear as long chains of dots moving together across the night sky.
Since everyone carries a phone around with them, mobile apps are ideal tools for tracking the satellites that are visible with unaided eyes. They can tell you which object you are seeing (or saw earlier), alert you just before a space station will appear in the night sky and show you exactly where to look for it.
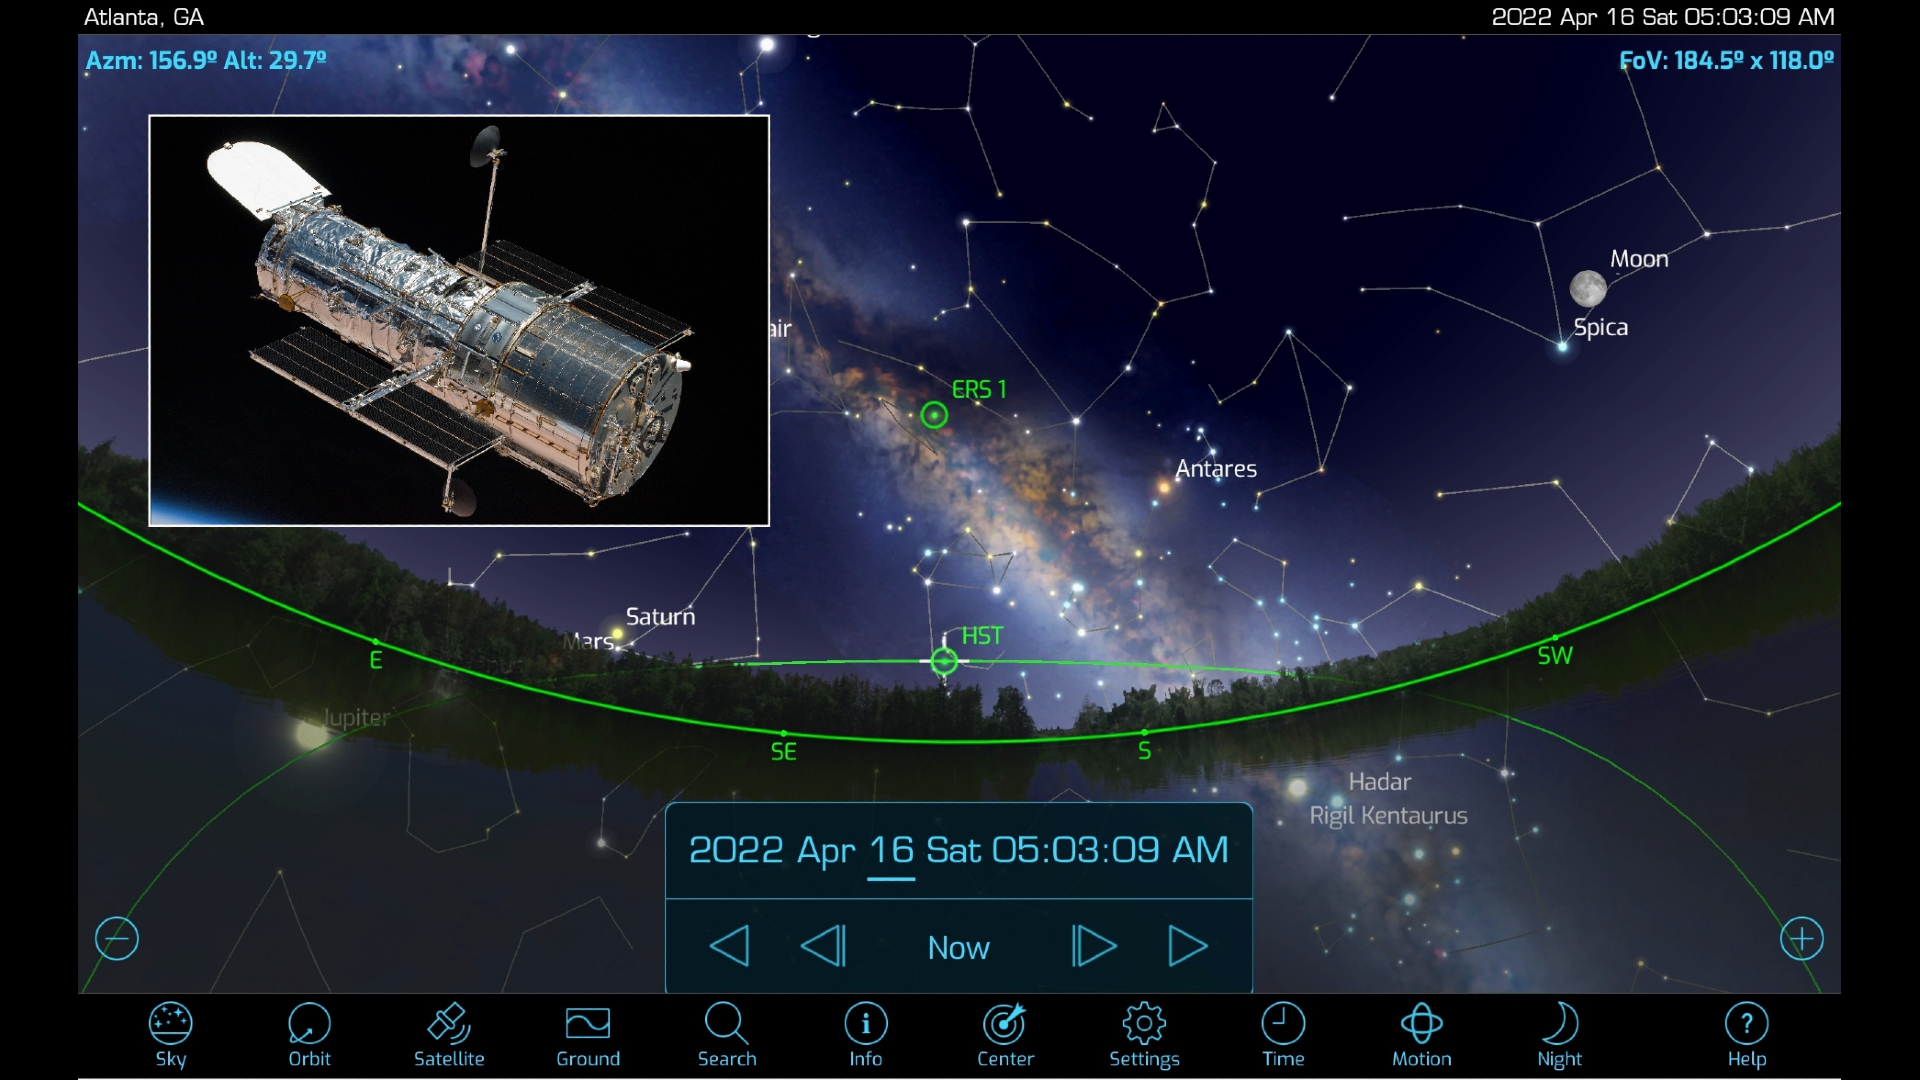
The most useful satellite apps utilize your device’s compass and gyroscope to guide you where to look in the sky for satellites — a necessity when sharing the fun of satellite-watching with friends and family, or at star parties. Let’s look at the best mobile apps for spotting these artificial denizens of the night sky. But first, some satellite basics!
What’s that light?
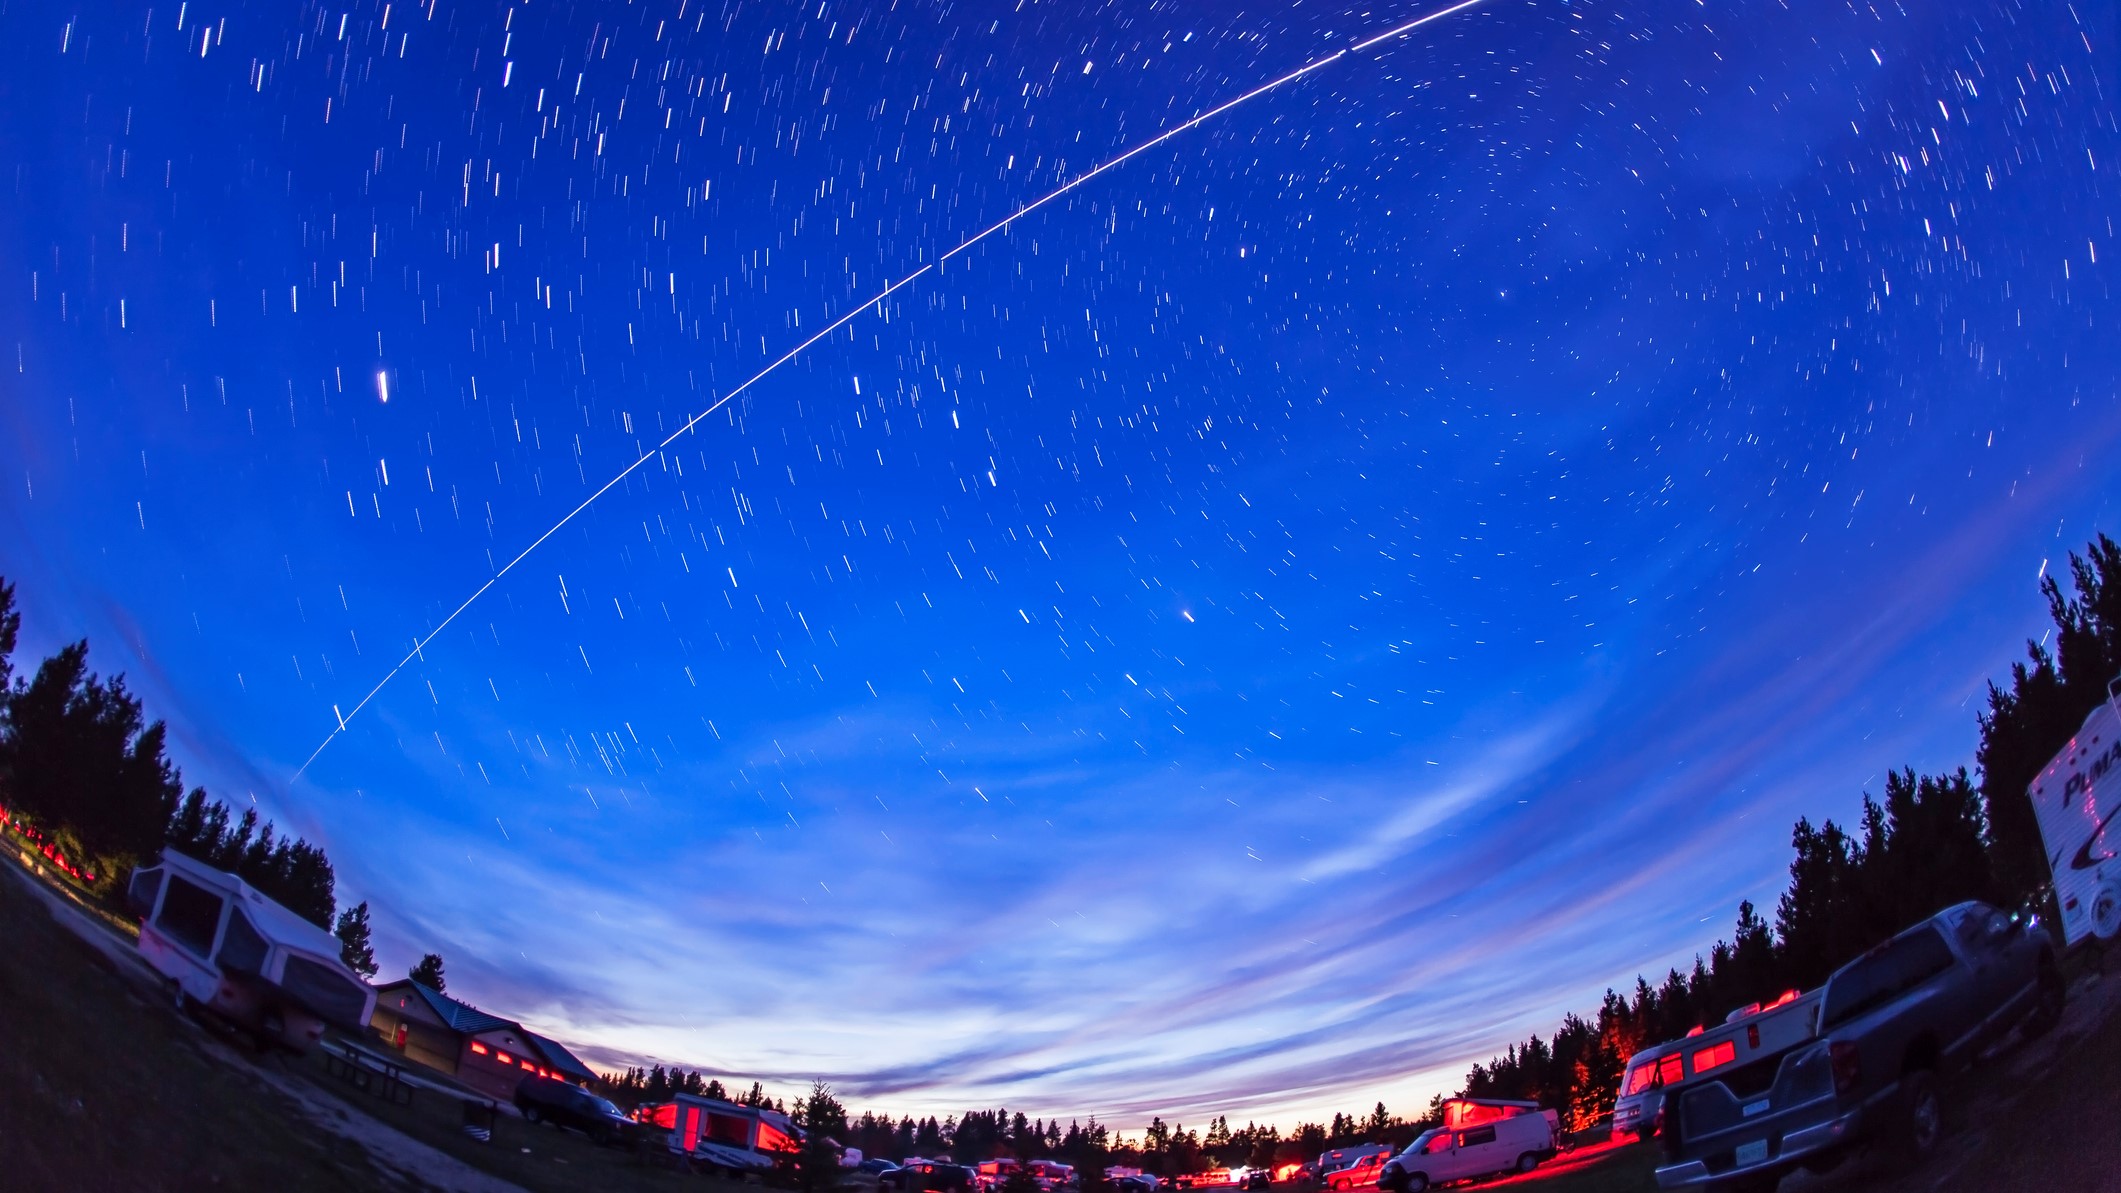
Orbiting satellites are visible to us because they are high enough overhead to be illuminated by sunlight, even when the sun is below the horizon for ground observers. That’s why most satellites are seen an hour or two before dawn and after dusk. When a passing satellite seems to disappear, it has entered Earth‘s shadow — a circular patch of the sky where the sunlight can’t reach it. Satellites can also pop into view when they exit the shadow.
The brightness of a satellite depends on its distance from you and on how much sunlight it deflects toward you, which is a function of both its flat surface area and reflectivity. Most satellites shine with a steady light, but objects that are tumbling can glow and darken as they travel. Other than crewed vehicles, satellites do not have lights — and no artificial light in orbit would be bright enough to spot from the ground anyway. If you see an object with flashing lights, it’s an aircraft.
Telecommunication and some surveillance satellites have geosynchronous orbits designed to keep them in view from the same spot on Earth at all times. To do this, they need to orbit above Earth’s equator, at 22,236 miles (35,786 km) above sea level. At that range, this type of satellite will be dim. While observing with your telescope, you might spot one moving very slowly against the background stars. In the night sky, geosynchronous satellites are concentrated in a strip running several degrees below the celestial equator. At their extremely distant orbits, the Earth’s shadow covers only a small patch of the sky, so they can appear all night long. These are the satellites that you aim your satellite TV dish at. When searching the app store, you’ll find many apps designed for that purpose, and not skywatching.
Spacecraft that need to move around the Earth at a modest rate orbit closer in, around 12,600 miles (20,200 km) above sea level. This includes the 31 Global Positioning System (GPS) satellites, and the satellites in the navigation networks of Russia (GLONASS), Europe (Galileo), China (BeiDou), India (NavIC) and Japan (QZSS). Those satellites pass over the same spot on Earth every 12 hours and are not observable to the naked eye, but they can zip through your telescope’s field.
Satellites that need to closely observe Earth’s surface and weather, or that are too heavy to lift into high orbits, are placed in low Earth orbit (LEO). These are the bright satellites you’ll see zipping across the night sky. Low Earth orbits fall into a range. To minimize drag on spacecraft from the upper atmosphere and allow for high-resolution close-up views of our planet, 190 miles (300 km) is the lower limit. The upper limit is about 1,250 miles (2,000 km), just inside the protective shell of Earth’s Van Allen radiation belts.
Satellites in LEO need to move fast, taking between 90 and 225 minutes to complete one orbit of Earth. Well-known examples are the ISS, the Hubble Space Telescope, China’s Tiangong Space Station, National Oceanic Atmospheric Administration weather satellites, Landsat (used for Google Maps), Iridium satellites, and Europe’s Envisat. The American Atlas-Centaur and Russian COSMOS (sometimes spelled Kosmos) and Breeze (sometimes spelled Briz) expended rocket upper stages also fall into this class.
The ISS was assembled by launching individual modules and connecting them in orbit. The first component, dubbed Zarya (which means «sunrise» in Russian), was launched on a Russian rocket on Nov. 20, 1998, so many satellite apps refer to the ISS as Zarya. Another name you’ll see is Nauka, the name of Roscosmos’ Multipurpose Laboratory Module-Upgrade that was added on July 29, 2021. The space station’s solar panel arrays rotate constantly to keep them aimed toward the sun, and reflections from them produce the steady glow we see as it flies overhead. The ISS is the most easily observable man-made object. In the night sky, only the moon and Venus shine brighter.
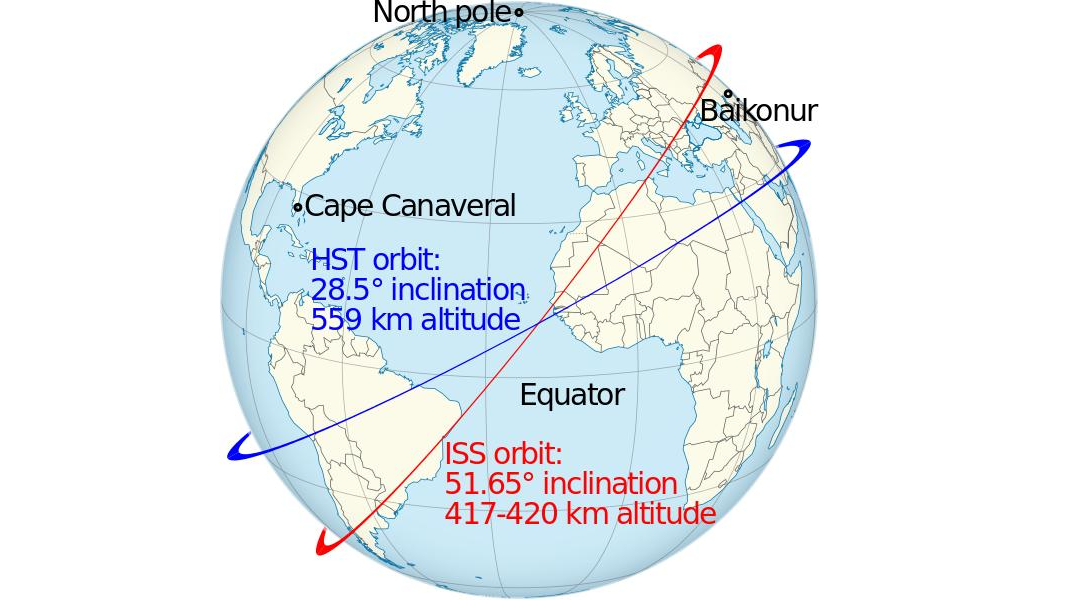
The ISS’ orbit is approximately 250 miles (402 km) high, according to NASA, so it is one of the objects that completes one orbit of the Earth every 92.5 minutes (or 16 per day). When the ISS completes one orbit, the Earth has rotated to the east by 22.5 degrees. By tilting the station’s orbit with respect to the Earth’s equator, a series of diagonal strips are covered, with each strip west of the previous one. That way, almost all of Earth’s surface will be flown over every few days.
The ISS’ orbit is inclined 51.6 degrees from the equator, so it only travels roughly between the Kamchatka Peninsula and the Falkland Islands. While it passes over the same spot on Earth every three days, the time when it does so drifts, so it takes 63 days for the space station to reappear over your house at the same time of night. The station need not be straight overhead to see it, though. One or two passes east and west of your location should be visible, too, if conditions are right — often giving us two or even three sightings on the same day.
ISS-tracking apps know the orbital details and work out the geometry of the sun’s position, and your location, to predict sightings for you. Higher passes are always brighter and longer — up to 5 minutes from horizon to horizon, often passing nearly overhead. For passes well east or west of your location, the station’s maximum elevation above the horizon will be so low that it might only be visible for a minute or less, or hidden completely by trees or buildings. The app will indicate the maximum height above the horizon in degrees, the direction of motion and the duration. Most apps offer an icon to distinguish a high-quality pass from a mediocre one. The better apps allow you to filter out the poor sightings.
The Chinese Tiangong Space Station was launched in April 2021. Components will continue to be added over the coming several years. As of spring, 2022 only the Tianhe core module, with a mass of 24.5 tons (22.6 tonnes) and dimensions of 54 by 14 feet (16.6 by 4.2 meters), is in orbit at a mean altitude of 241 miles (389 km). It swings between 41.58 degrees north and south latitude, circling the globe every 92 minutes. That makes Tianhe far less bright than ISS, and only observable from latitudes within about 45 degrees of the equator.
Next, we’ll look at two of the best apps for satellite skywatchers.
Orbitrack
The Orbitrack app, available for Apple products and Android devices, is the most powerful and comprehensive satellite tracking app I’ve found. It’s from Southern Stars, the developer of the popular SkySafari app. Users of that app will already be accustomed to its user interface because the main toolbar looks almost the same.
The app tracks every active orbiting satellite and man-made object that is large enough to be visible. As with SkySafari, all data is stored locally, allowing you to use the app without a data connection. Orbitrack automatically adds new objects as they are launched, such as Dragon crewed and cargo deliveries to ISS, and it updates satellites’ orbits that change over time. Everything is included for an inexpensive, one-time purchase price.
Orbitrack’s Search menu begins with Special Interest Satellites, those that will be visible tonight, newly launched satellites, space stations, and bright satellites. Next up are sections for Weather & Earth Resources, Communication, Navigation, Scientific, and Miscellaneous satellites, each divided into sub-categories with the entries listed in alphabetical order. Satellites that are above your horizon now are highlighted with brighter text. You can also find an individual satellite (or family of satellites) by entering all or a portion of the name into the search bar.
The page for each satellite includes an Object Info tab containing the physical characteristics of the satellite, its position in the sky, the location on Earth it is flying over, and its orbital parameters. Scroll down to find the upcoming passes. Tap the clock icon for the rise, culminate, set, or eclipsed time to show the sky at that time or set an alert for the pass. An Object Description tab opens a page with details about the satellite’s history and photographs of selected satellites.
Alerts appear on your device’s lock screen. In the main Settings menu, you can adjust the amount of advanced warning time (the default is 1 minute) and view and cancel alerts. I recommend enabling Sort Lists by Pass Time and showing Visible Passes Only — unless you are a Ham radio operator who wants to know when satellites are passing during the daytime.
Orbitrack displays satellites in four modes: Sky View, Orbit View, Satellite View, and Ground View, each enabled by tapping icons on the toolbar.
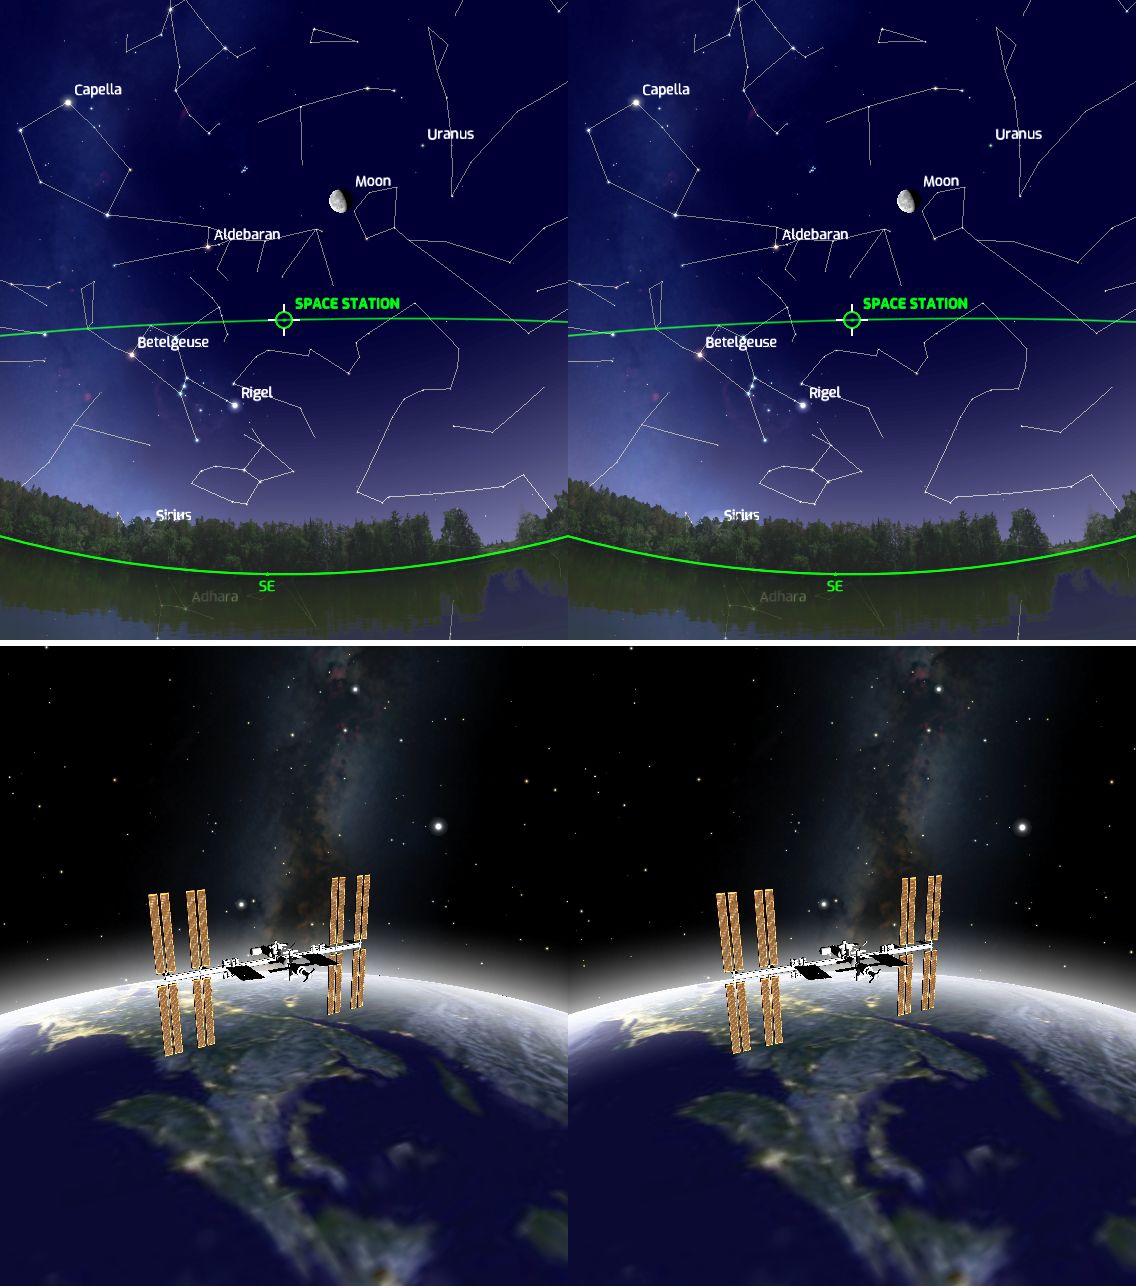
Sky View displays the sky at your location, or from any other location in the app’s database. Satellites are shown with labeled green symbols. There’s an option to also draw the selected satellite’s orbit, which is my preference. The number of satellites shown can be controlled by adjusting the magnitude limit value. The default value of 6.0 is too dim to see with the naked eye but is well within reach of binoculars. You can toggle between a photorealistic horizon and a purely flat horizon, and decide which celestial objects you want to be shown and labeled (constellations, star names, and planets). In fact, Orbitrack doubles as a very good basic sky charting app in Sky View mode.
The time controls operate the same way they do in the SkySafari app series. They allow for a lot of added functionality. If you are planning an observing session, you can preview the passes that will happen that night. Or, if someone tells you about a satellite pass they saw, you can enter the corresponding date, time, and location into the app, swipe to bring the correct part of the sky into the display and see which satellites were passing. By stepping time forward or backward, you can allow for a bit of uncertainty in the time it happened. You can also make time flow faster, which helps see an entire pass, in case you intend to photograph the satellite.
Sky View is the fastest way to identify passing satellites. With the app’s time set to Now, hold your device up to the sky in portrait mode to trigger Orbitrack’s Augmented Reality feature. If your device has compass and gyro sensors, the app will display the part of the sky you are pointed at and show the satellites currently passing through it. You can then tap a satellite’s symbol to select it, and use the Info button to learn more about it. Another useful trick is to tilt the device downwards to show the sky below the horizon and the satellites that will be rising soon. A Locate button will display an arrow that guides you to the target.
iPhone owners can place their device into a VR viewer and use Orbitrack’s Virtual Reality feature to explore a virtual representation of the night sky by moving their heads around. While in VR mode, simple voice commands will control the flow of time and alter the amount of zoom in the display. (AR and VR operation and voice control can be disabled in the Settings menu if you prefer.)
Related: VR headset deals
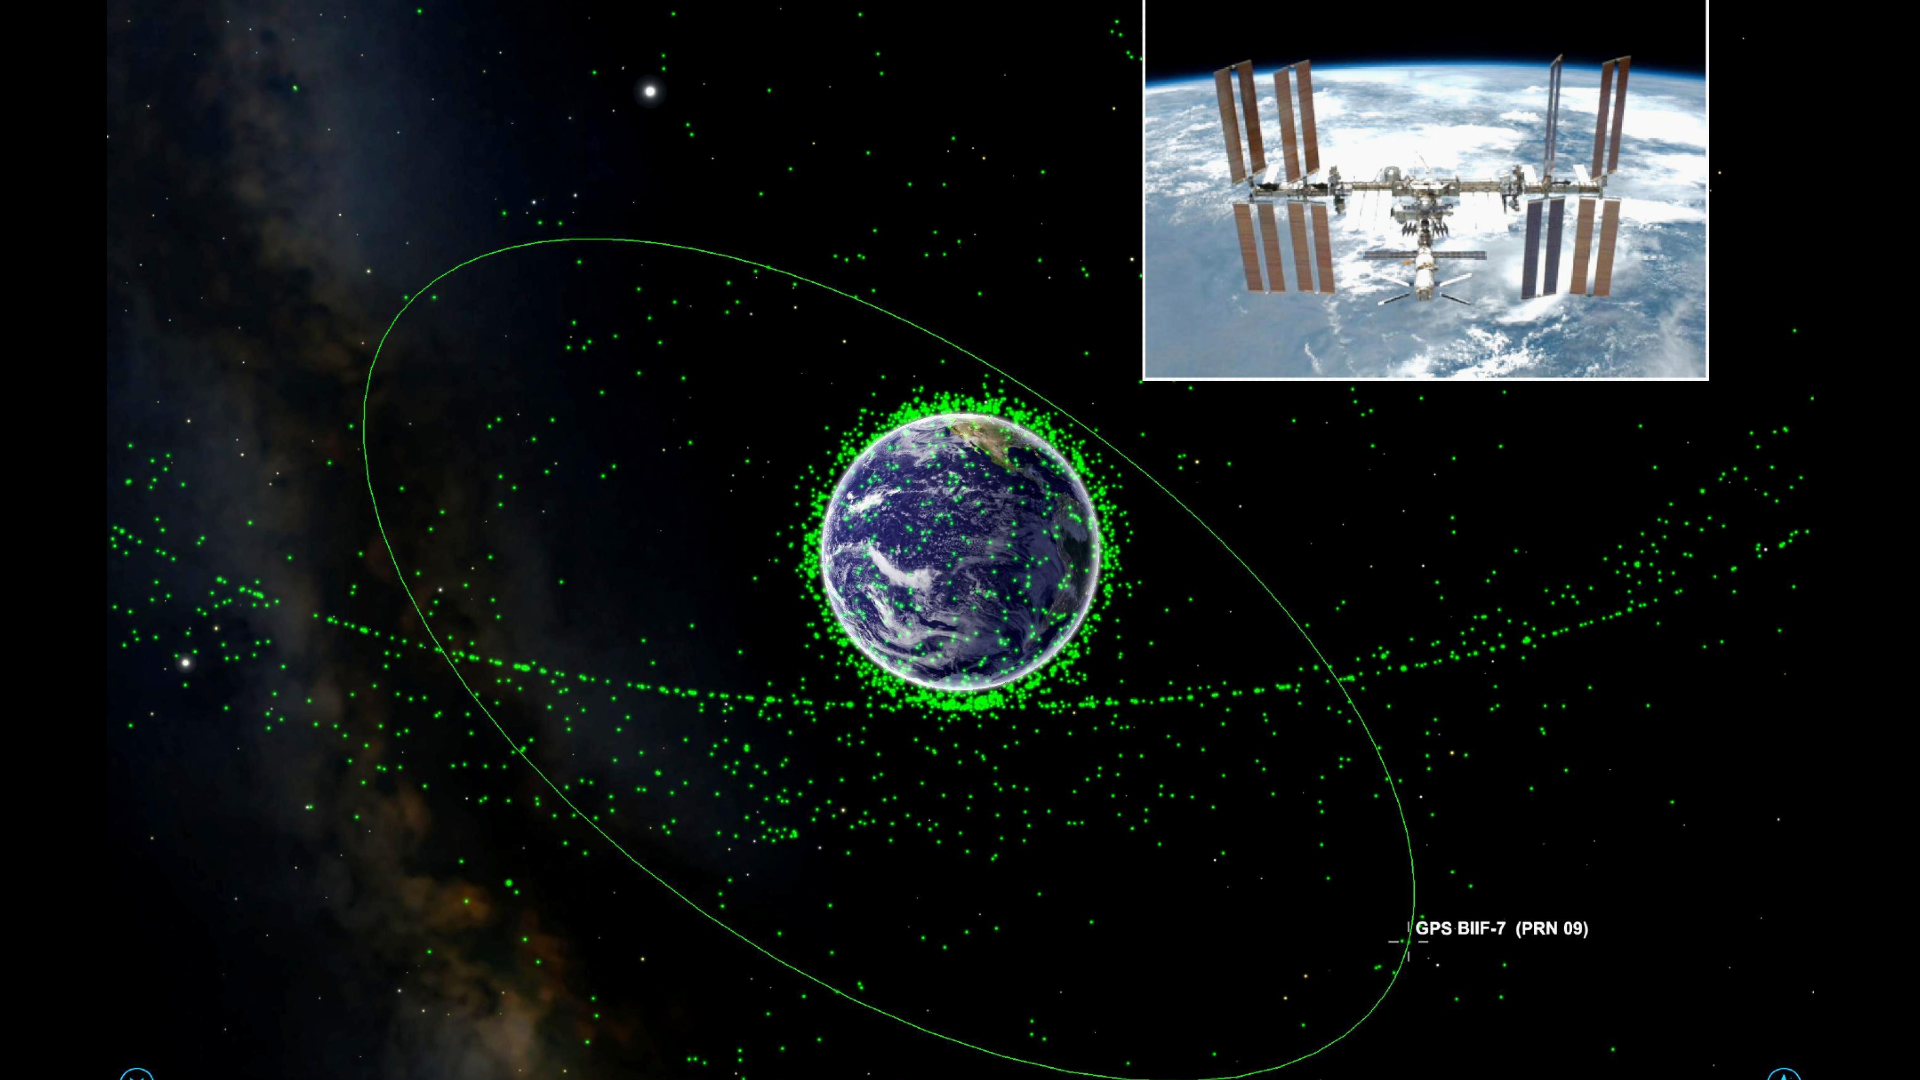
Orbit View displays a zoomable 3D rendered model of the Earth surrounded by green dots for orbiting satellites. Tap a dot to show that satellite’s orbit and name. By default, the display will be fairly cluttered. In the Settings menu, under Satellites Shown, you can decide which classes of satellites to include. As a fun exercise, enable just the geostationary satellites to see how their distant orbits contrast with low Earth orbit satellites such as the ISS and the Hubble Space Telescope. You can also opt to display all satellite names, major cities, and show only the selected satellite.
In Satellite View you see a 3D rendering of major satellites and travel in space alongside them. By swiping your finger you can view the satellite from any angle and watch it transition from fully lit to shadowed as it orbits Earth. Launching VR mode allows you to fly around the satellite by moving your device while viewing it immersively.
The fourth mode, Ground View, is a feature found in most satellite tracking apps. It displays a top-down view of the selected satellite as it flies over Earth. The orbital track is displayed, along with a «you are here» indicator. In any of the modes, tapping the Centre icon will bring the selected satellite front and center.
ISS Detector
The free ISS Detector app by RunaR is a personal favorite. The free version for Android and iOS tracks the ISS. An inexpensive extension pack will track additional a great many satellites, planets, and even comets.
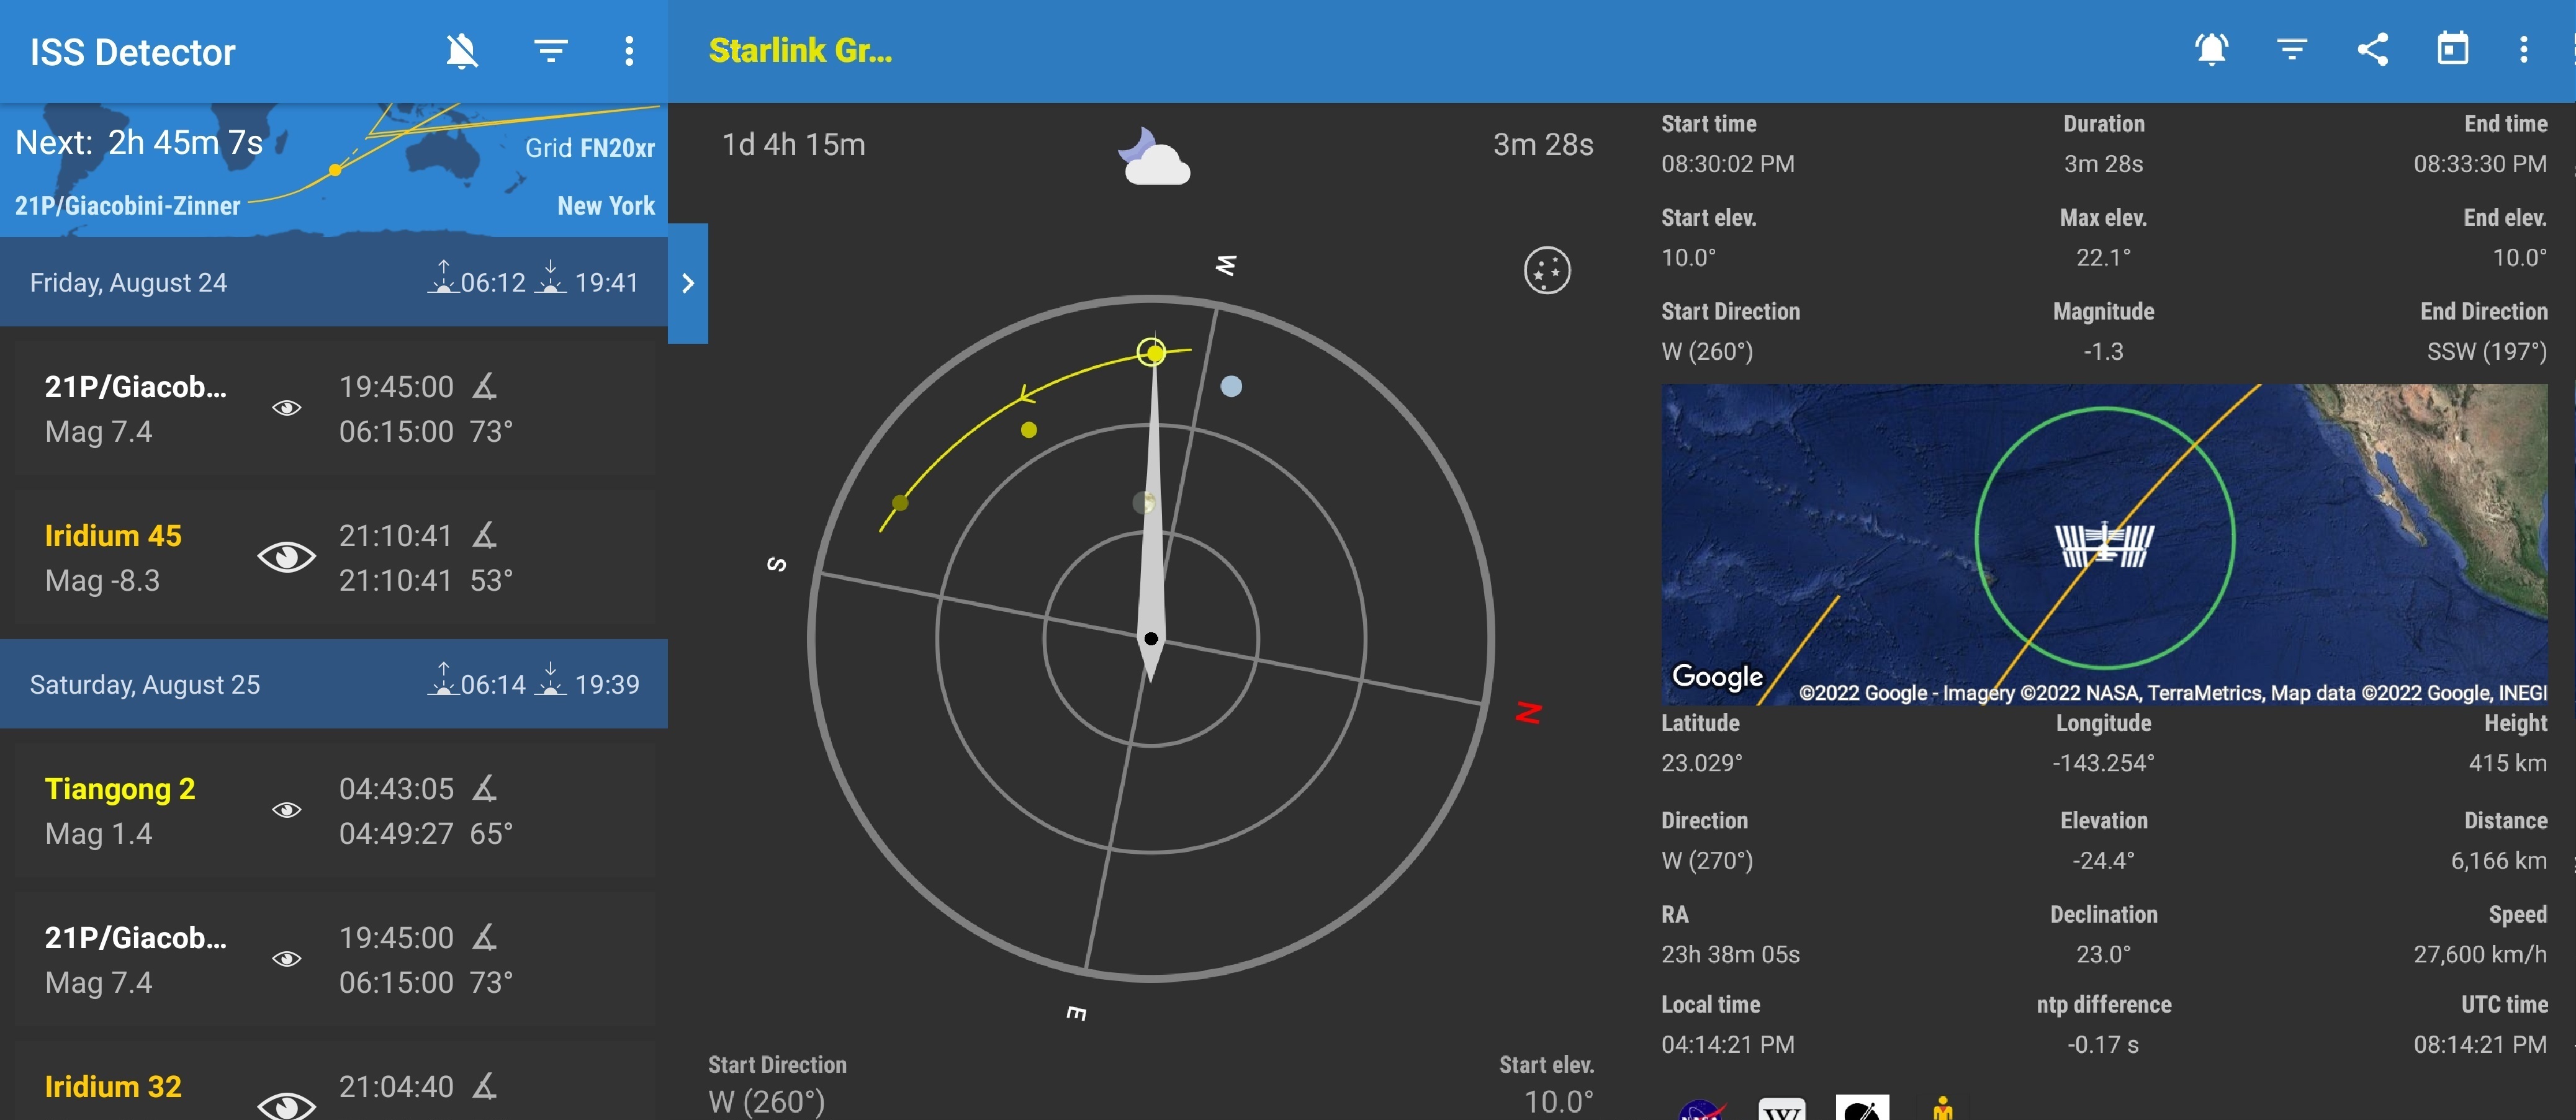
The app’s user interface is very easy to understand. The main page lists upcoming events ordered soonest to latest and distinguishes the ISS, Starlink, famous satellites, comets, and other objects’ labels by color codes. For each pass, an «eye» icon is sized to represent the quality of the pass. The local time of the start and end of the satellite pass, as well as the angle above the horizon at which it will occur, completes the information provided. The app can link to your local weather forecast, grade the probability of the pass quality, and show the weather as a symbol. Even the sunrise and sunset times are available at a glance.
If you are only interested in certain types of events, use the filters on the Events page, and enable alerts for only the events you want to observe. Within each object category, you can set limits on the minimum elevation (if your horizon is obstructed) and the minimum brightness, toggle all-day or night-only passes, and even set the quality threshold. You can manually refresh the orbital data anytime. The time until the next event is indicated prominently.
On the phone version of ISS Detector, selecting an event brings up a trio of tabs labeled Radar, Details, and Live Video. Tapping a panel reveals it. Swiping left and right switches between panes. The Details pane shows the numerical parameters for the pass, including the current location above Earth and in the sky. A map of Earth shows the orbit track and current location. A double-tap enlarges the map for pan, pinch and zoom exploring.
The handy Radar pane makes ISS Detector shine. It displays a dynamic compass and tilt indicator to allow you to align your device with the satellite in real-time, indicating clearly where in the sky to look. A solid blue arc shows the track of the satellite and the point of maximum height. You can rehearse a pass at any time to see how it will cross your sky. During a live event, the compass needle follows the satellite, allowing you to track it by moving your device. In both cases, the moon and the planets are displayed to help orient you. Hold a finger on the pane to display pass timings and planet labels. You can toggle between compass mode and a whole sky star map, where the object’s track and direction through the stars are nicely indicated. The app will guide you to any visible comets in the same manner, if you’ve purchased that upgrade.
The Live Video pane allows you to watch the video being streamed by NASA from the ISS, in either HD or SD mode; but an internet connection is required. On a tablet’s larger display, the pass list, Radar, and Detail panes are shown at the same time — but the live feed option is unavailable.
The ISS Detector app will notify you of impending passes, from 1 minute to 1 hour in advance, and offer silent periods. You can also add any pass to your personal calendar. The app can link to the IP address of a rotator, to allow a ham antenna or a telescope to track a satellite — but I haven’t tried out that feature. It sounds like fun!
Sky charting apps track satellites, too
Users of popular sky charting apps already have satellite predicting tools at hand, albeit with a bit less functionality. The free Stellarium desktop utility has a plug-in called Satellites that will display their locations in the sky and permit searches for names — but it does not provide pass predictions.
The free Stellarium Mobile app for Android and the paid Stellarium Plus for iOS, both produced by Stellarium Labs, offers plenty of information about satellites, and terrific tools for predicting them and seeing them. Using the default settings, only one or two satellites might appear on the displayed sky. But long-press the labels menu and run the satellites slider to the right to reveal everything passing overhead. Tap on a satellite to select it and then swipe up to expand its information panel. There you can review data about the object and read its Wikipedia entry. Tapping the «3D» label will place you in space beside the object and allow you to fly around it with finger swipes.
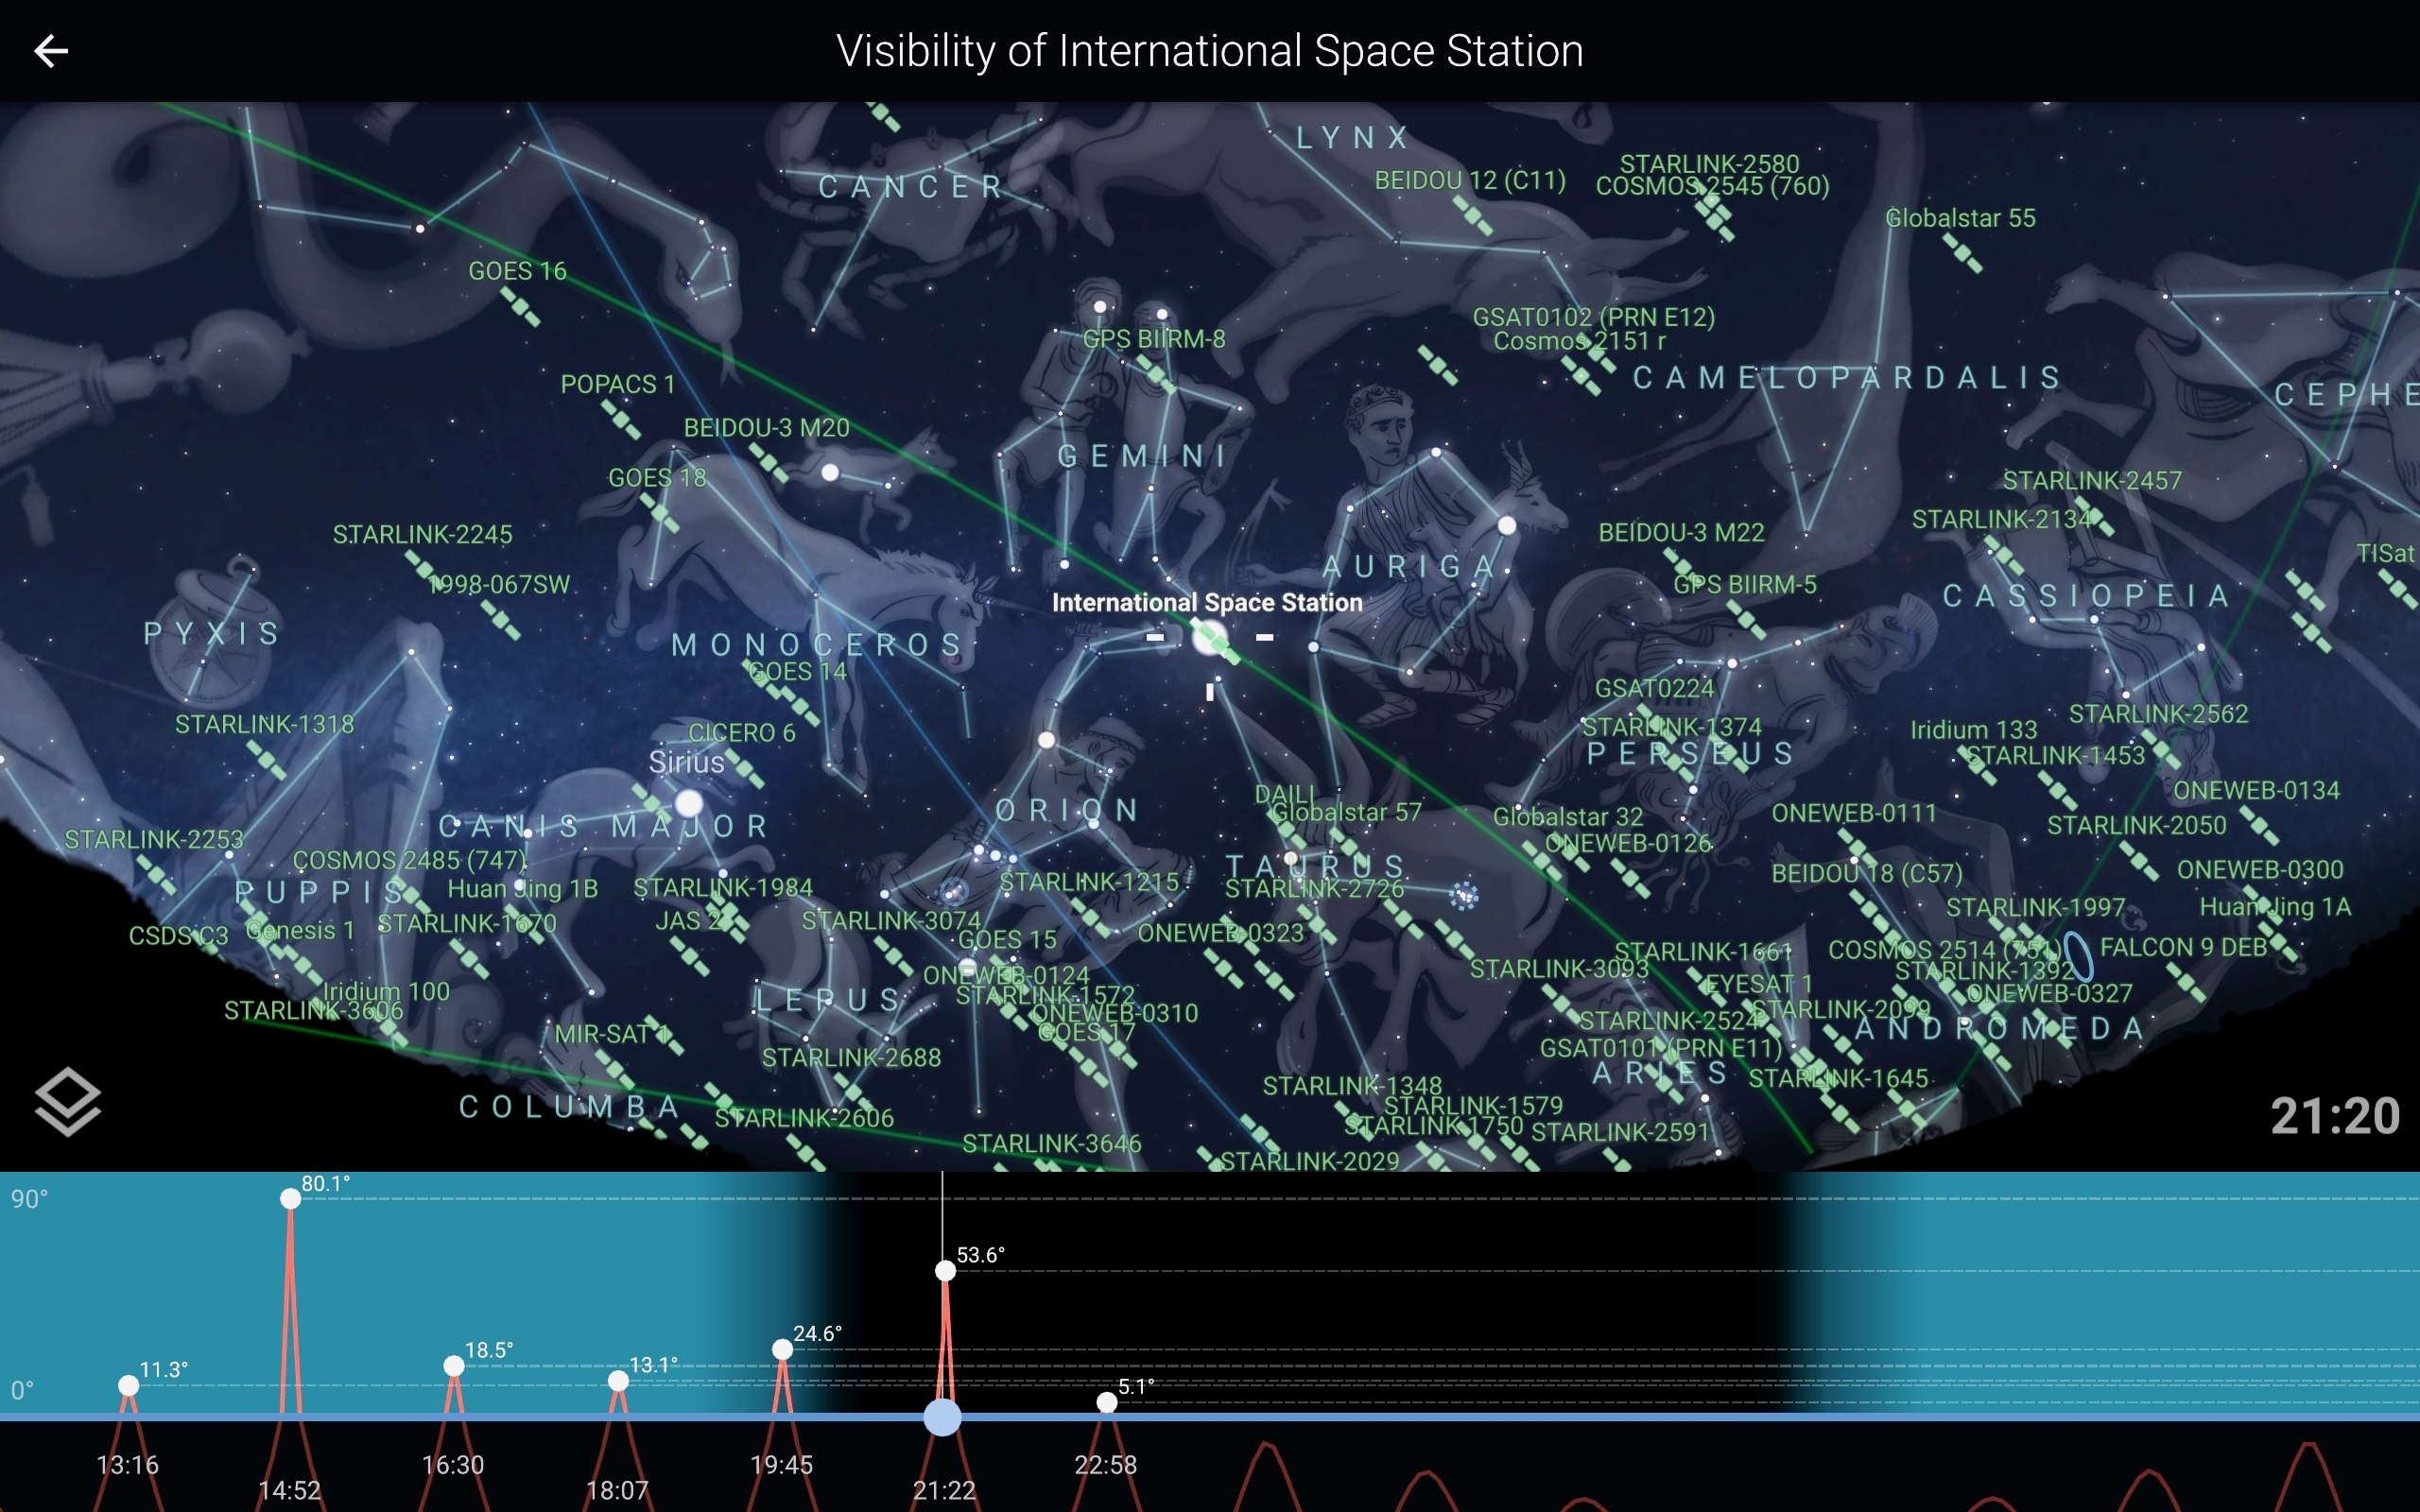
Tap the button labeled «Visibility» to summon a graph of that satellite’s elevation during today’s 24 hour period. Higher elevations suggest longer, brighter passes. Moving a slider at the bottom of the graph alters the sky to that time, allowing you to review or preview the satellite’s path through the stars. Tapping a pass does the same thing. Tilting the phone up to the sky will trigger compass mode, showing you the annotated Stellarium sky in front of the real thing. Center the satellite (or any object, for that matter) in the display and the real object will be in front of you. Tapping the Locate button in the toolbar will summon an arrow to show you where to point your phone.
The various versions of the SkySafari app each allow you to search for individual satellites or select from a list called Current Satellites that can be sorted by brightness, height, rise time, and more. By default, satellites aren’t displayed in the sky, but the current ones can be plotted as small blue circles on the sky by tapping the Actions & Settings gear icon and then the Highlight Objects checkbox.
Tapping a satellite in a list, or its symbol on the sky calls up its information page. Scroll down to find a chronological list of passes. Both Daylight — Not Visible and Night Passes — Visible are provided. For each pass, the date and rise, culminate, and set times are given, including the direction and elevation for each event. Tap the small clock icon beside an event to show at that time. You can also tap the Center icon to show a satellite’s location in the sky now. The Orbit icon will park you in space beside a 3D model of the satellite. The basic versions of SkySafari limit the number of satellites to about 125. The Plus and Pro versions track almost 2,000 of them.
Good luck with your satellite hunting pursuits, and keep looking up!
Editor’s note: Chris Vaughan is an astronomy public outreach and education specialist at AstroGeo, an award-winning member of the Royal Astronomical Society of Canada, and an operator of the historic 74″ (1.88-meter) David Dunlap Observatory telescope. In 2021, he and John A. Read published 110 Things to See with a Telescope. You can reach him via email, and follow him on Twitter as @astrogeoguy, Instagram, and Facebook.
Follow us @Spacedotcom, Facebook and Google+.
Join our Space Forums to keep talking space on the latest missions, night sky and more! And if you have a news tip, correction or comment, let us know at: community@space.com.
Get breaking space news and the latest updates on rocket launches, skywatching events and more!
Chris Vaughan, aka @astrogeoguy, is an award-winning astronomer and Earth scientist with Astrogeo.ca, based near Toronto, Canada. He is a member of the Royal Astronomical Society of Canada and hosts their Insider’s Guide to the Galaxy webcasts on YouTube. An avid visual astronomer, Chris operates the historic 74˝ telescope at the David Dunlap Observatory. He frequently organizes local star parties and solar astronomy sessions, and regularly delivers presentations about astronomy and Earth and planetary science, to students and the public in his Digital Starlab portable planetarium. His weekly Astronomy Skylights blog at www.AstroGeo.ca is enjoyed by readers worldwide. He is a regular contributor to SkyNews magazine, writes the monthly Night Sky Calendar for Space.com in cooperation with Simulation Curriculum, the creators of Starry Night and SkySafari, and content for several popular astronomy apps. His book «110 Things to See with a Telescope», was released in 2021.
Most Popular
Счётчик «Спутник» — что это?
Эта статья создана специально для всех, с кого требуют отчёты о посещаемости официального сайта образовательной организации, но будет полезна и если вы хотите выяснить популярность определённого раздела или страницы сайта, таких как страница психолога или раздел «методический кабинет».
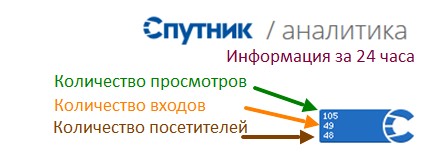
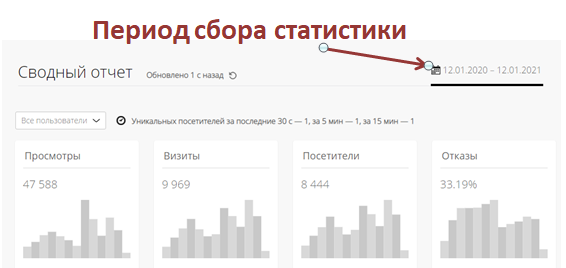
В нижнем правом углу Вашего сайта находится значёк счётчика системы Спутник-аналитика. На изображении ниже детально раскрыто значение цифр.
Значёк содержит данные только за последние 24 часа работы Вашего сайта, но если по нему кликнуть левой клавишей мыши, Вы перейдёте на страницу расширенной статистики посещаемости вашего сайта.
На сайте «Спутник-аналитика» вы можете выбрать требуемый период, если кликните по значку календаря
Как узнать количество посетителей конкретной страницы сайта?
Часто сотруднику государственного учреждения, образовательной организации, некоммерческой организации требуется узнать посещаемость отдельной страницы официального сайта — это могут потребовать учредители, организаторы мероприятий, надзорные органы.
Например, вы опубликовали объявление о родительском собрании и хотите узнать как много людей его увидело.
Для этого необходимо:
- Нажать левой клавишей мыши на значёк счётчика «Спутник» в правом нижлем углу вашего сайта. (Если вы не нашли этот значёк или ваш сайт находится не на Портале Все-ДОУ.РФ, то звоните 8-800-350-88-75 — мы обязательно поможем)
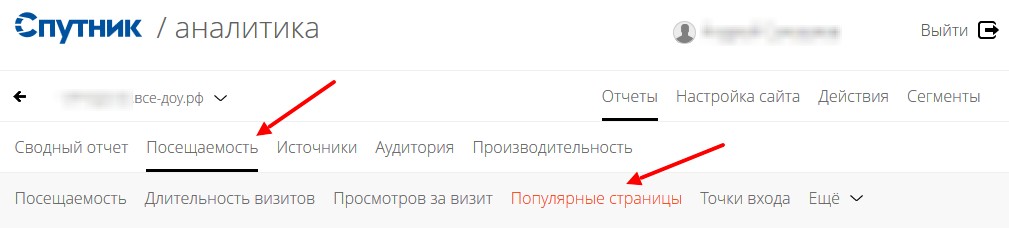
- На сайте «СПУТНИК / аналитика» перейдите в раздел ПОСЕЩАЕМОСТЬ -> ПОПУЛЯРНЫЕ СТРАНИЦЫ.
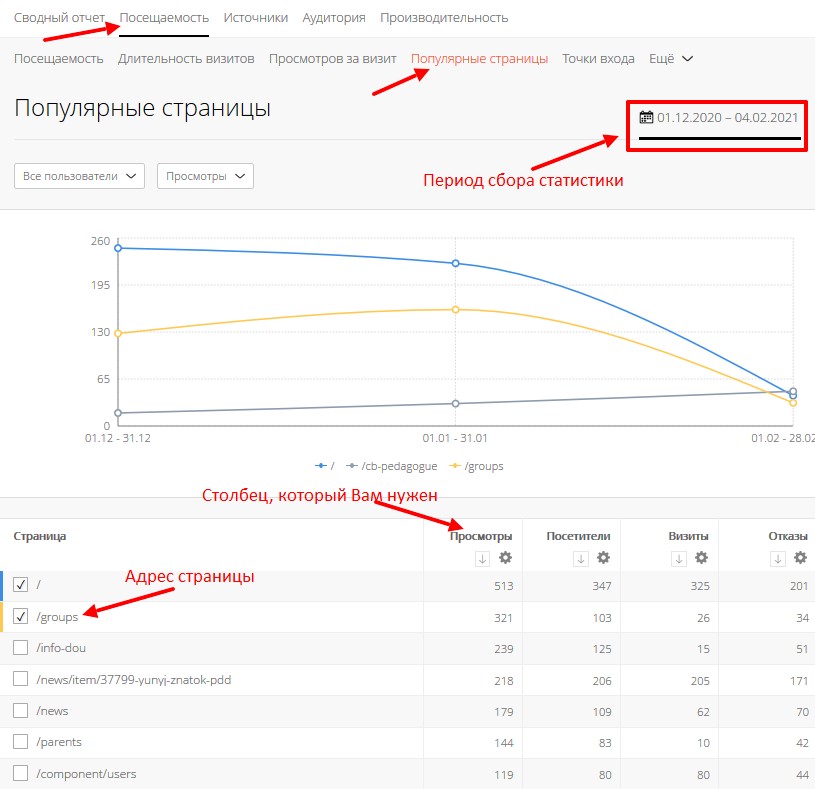
- Здесь вы увидите адреса страниц и их показатели за выбранный вами период. Обратите внимание, что страницы имеют не привычные названия (Главная, Группы, Новости, Методический кабинет) а технические названия, которые могут быть нечитаемыми.
- Чтобы найти нужную вам страницу, надо на соседней вкладке браузера открыть СВОЙ сайт, перейти на нужную страницу и запомнить «хвостик» адреса
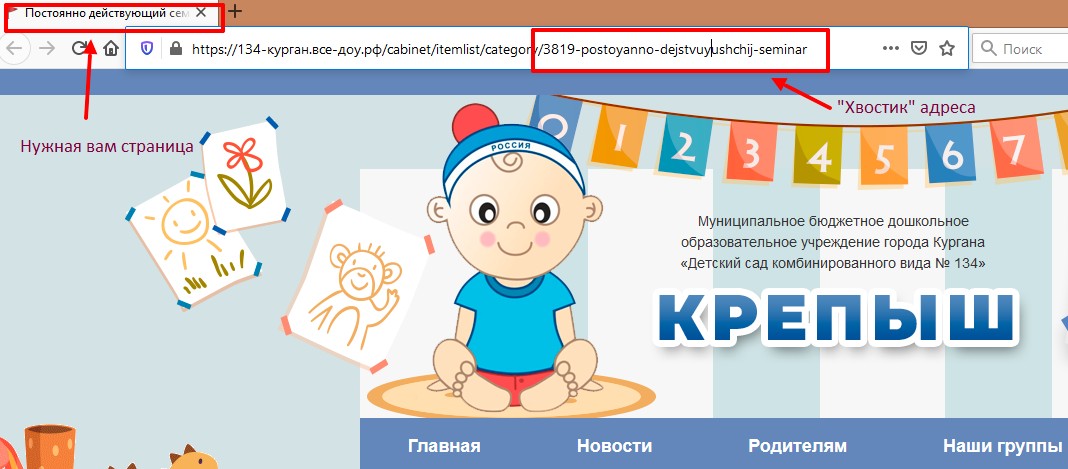
- Найти такой же хвостик в списке «Популярные страницы» на сайте СПУТНИК | аналитика

А что ещё «умеет» счётчик СПУТНИК?
Счётчик на вашем сайте выполняет следующие функции:
- Сбор данных о посетителях;
- Времени входа и выхода с сайта;
- Источниках переходов на сайт (поисковые системы, 2Гис, управление образования или старый сайт учреждения);
- Наличии ошибок на страницах.
Счётчики помогают нашим специалистам вовремя выявить неисправности сайта, оценить и распределить нагрузку, составить рейтинг посещаемости и привлекательности сайтов.
На вашем сайте не установлен счётчик «Спутник»?
Наши специалисты с радостью помогут решить любые задачи, связанные с сайтами образовательных организаций.
Для получения консультации заполните форму или звоните по телефону
8-800-350-88-75
Существует довольно много веб-сервисов и приложений, предоставляющих пользователю доступ к карте мира. Некоторые из них поддерживают отображение в режиме спутниковых снимков, которые периодически обновляются, поддерживая актуальность местности. В реальном времени информацию передает всего несколько спутников, и чаще всего обычному пользователю такие сведения недоступны. Однако и обычные карты обновляются регулярно, что позволяет просматривать более или менее свежие снимки местности с неплохой детализацией.
Содержание
- Google Карты
- Google Планета Земля
- Яндекс.Карты
- MapTiler
- EOSDIS Worldview
- MAXAR
Google Карты
Самым популярным сервисом для просмотра местности можно смело считать Google Карты. Сайт и мобильное приложение (Android, iOS) содержит актуальную информацию по улицам, местам и различным объектам. Все функции предоставляются бесплатно, поддерживается русский язык интерфейса и присутствует простая навигация. Конечно, есть и режим просмотра карты со спутника, о котором пойдет речь в следующей инструкции. Спутниковые фото в Гугл обновляются с периодичностью примерно один раз в 1-2 года.
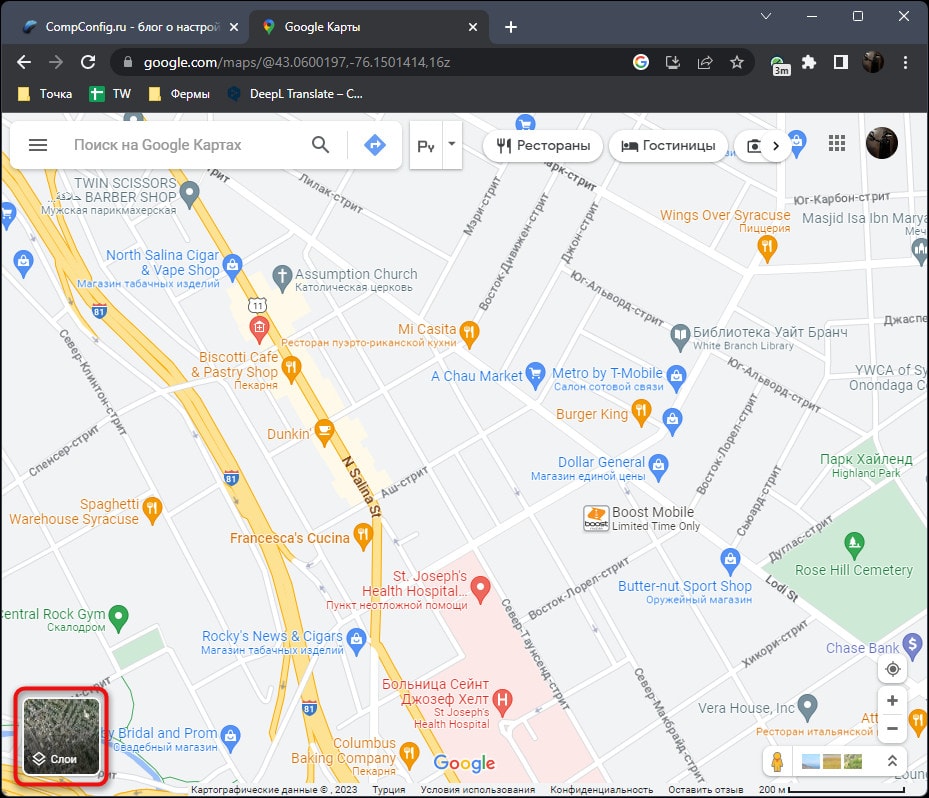
- Разберем принцип работы Гугл Карт на примере их сайта. После открытия веб-страницы слева нажмите по значку «Слои», чтобы переключиться в режим просмотра со спутника.

- На следующем изображении я не сильно приближал улицы, чтобы вы могли оценить общий вид карты. Здания различимы, большие объекты видно хорошо и даже можно увидеть стоящие или едущие по дороге машины. Всех этих сведений уже вполне достаточно обычному пользователю. Вместе с этим всегда подсвечивается название улиц и отмечаются места. Иногда это можно считать и минусом, ведь необходимо наложение таких слоев далеко не всегда.
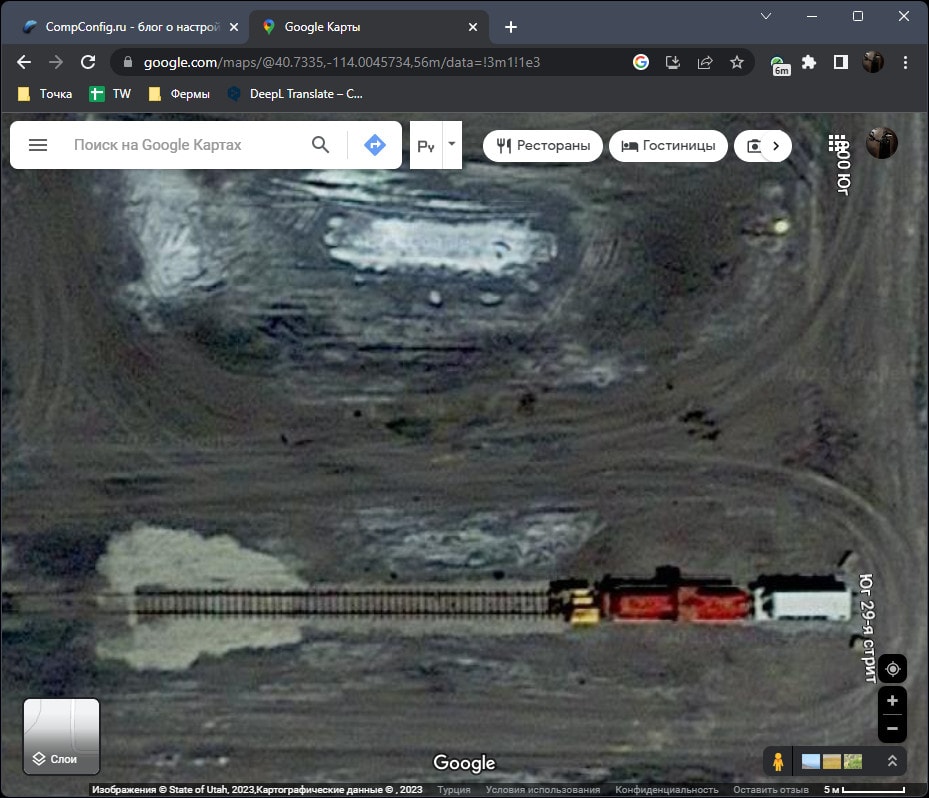
- На следующем изображении вы видите уже максимально возможное приближение. Отчетливо видно железнодорожные пути, следы от колес на дорогах, ямы и холмы. При должных навыках можно даже различать модели стоящей на местности техники, если это для каких-то целей необходимо.
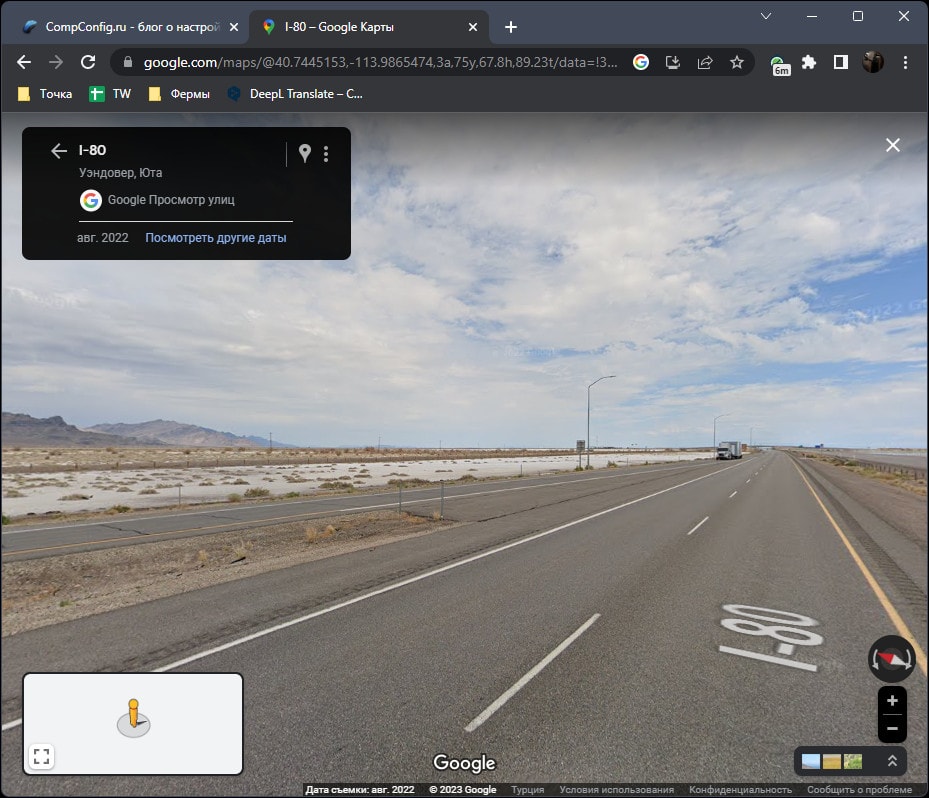
- Машина от Google тоже поездила во многих местах мира, поэтому при достаточном приближении или перетаскивании человечка на дорогу можно перейти в просмотр улиц. Это если просмотра со спутника вам недостаточно.

Дополнительно отмечу, что вы можете всегда выполнить поиск места по координатам, чтобы затем переключиться в спутниковый режим и оценить окружение. Иногда это оказывается очень полезным при изучении конкретного объекта, ландшафта или получения любой информации о точке по ее координатам.
Google Планета Земля
Google Планета Земля — отдельный веб-сервис от Google с дополнительными версиями для компьютеров и мобильных устройств. От обычных карт данный сервис отличается не только интерфейсом, но и позволяет получить немного больше информации через спутниковые снимки, которые даже чаще обновляются (обычно раз в год).
- Земля в данном онлайн-сервисе от Гугл представлена в форме планеты, что позволяет вам получать более точную информацию о каждом объекте. Эту планету вы можете как угодно крутить, приближать, изменять угол просмотра и использовать стандартные инструменты навигации для определения точек.
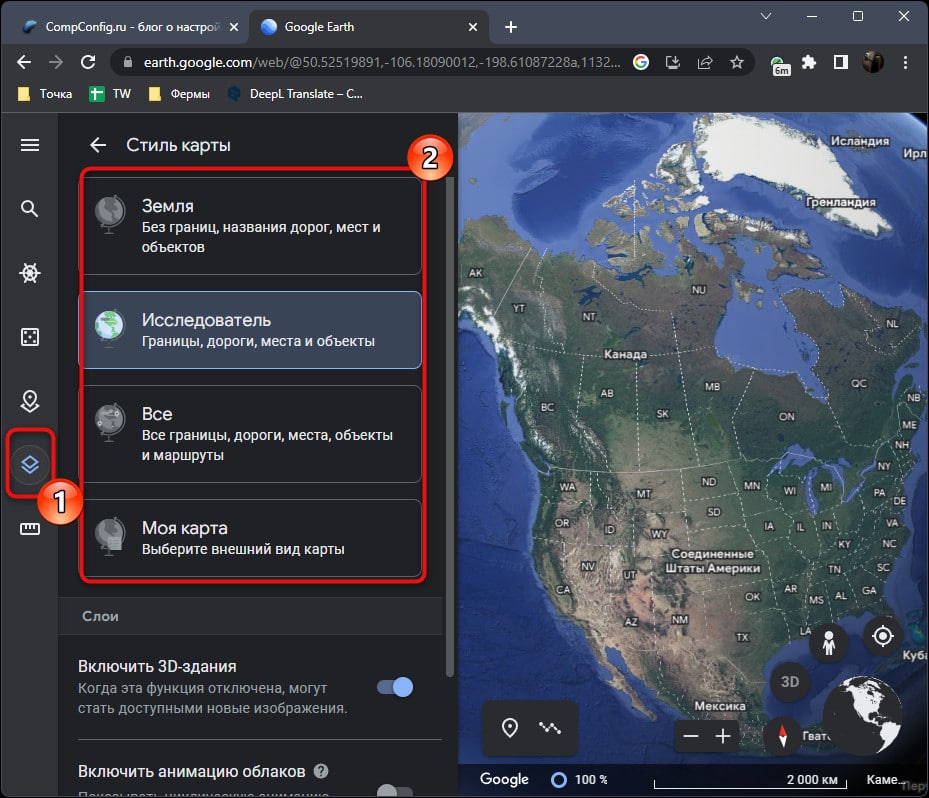
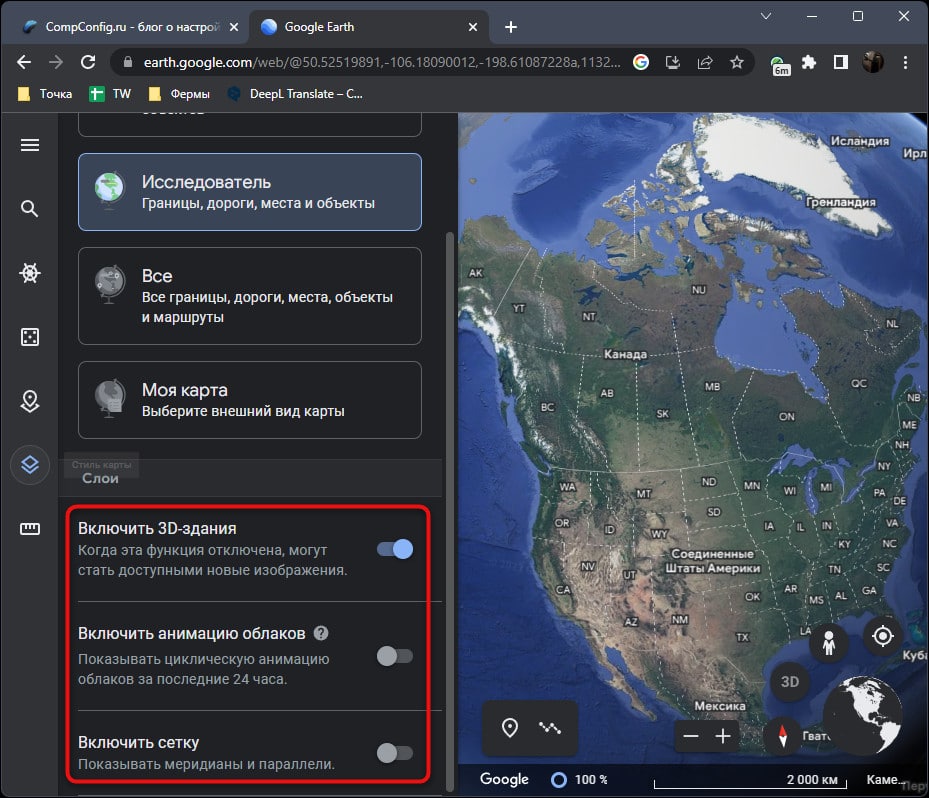
- На панели слева вызывается меню «Стиль карты», чтобы через него отключать или активировать определенные элементы. Можно полностью избавиться от границ, названия дорог, городов и объектов.
- Ниже есть переключатели для слоев. Через них регулируется анимация облаков, сетка на глобусе и переключается отображение 3D-зданий, которые пока что поддерживаются только в самых крупных городах мира.
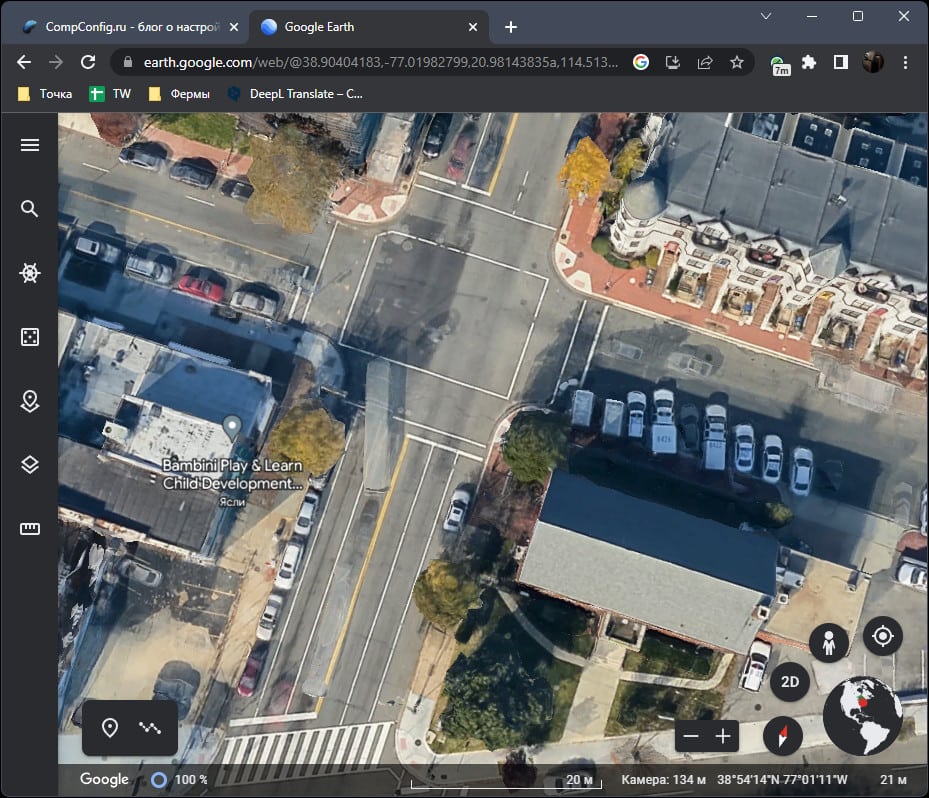
- На следующем изображении вы видите практически полное приближение спутникового снимка вместе с поддержкой трехмерных зданий. Некоторые объекты немного расплываются, но это можно исправить, немного перемещая камеру вида до тех пор, пока результат не будет вас устраивать. Как показывает практика, детализация снимков Google Планета Земля гораздо лучше, нежели во всех других картах (за исключением платных профессиональных, о которых речь пойдет в завершение данного материала).
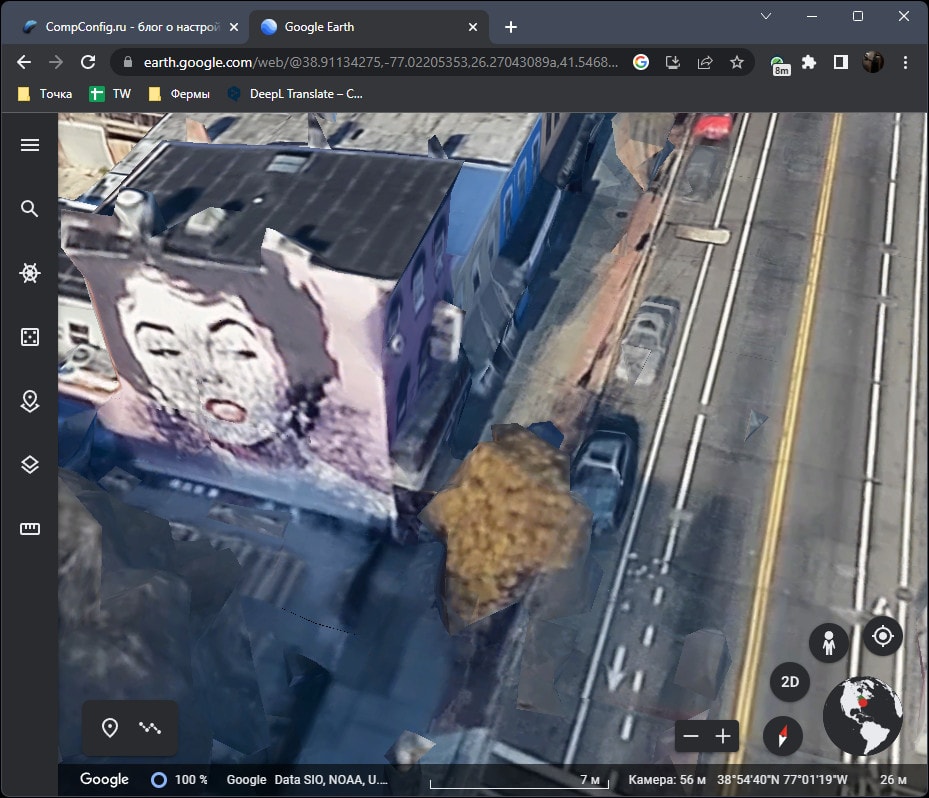
- Если говорить о 3D-зданиях, то для их отображения вам необходимо максимально приблизить камеру в том городе, где поддержка таких зданий присутствует. Их текстуры будут не самого высокого качества, но некоторые объекты отображаются прям хорошо, можно разобрать вывески, принты и мелкие детали.
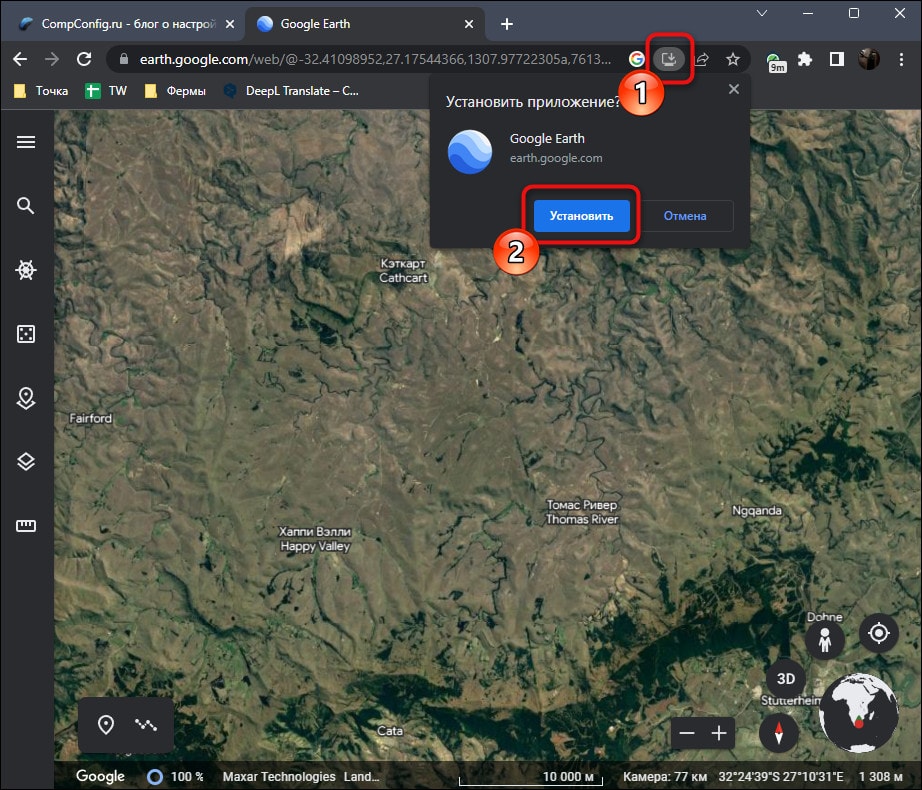
- Вы можете всегда скачать полную версию Google Планета Земля по ссылке выше, выбрав подходящую для себя платформу, или установить стандартную сборку из браузера на компьютер прямо через просмотр на сайте. После нажатия кнопки «Установить» значок запуска программы отобразится на вашем рабочем столе.


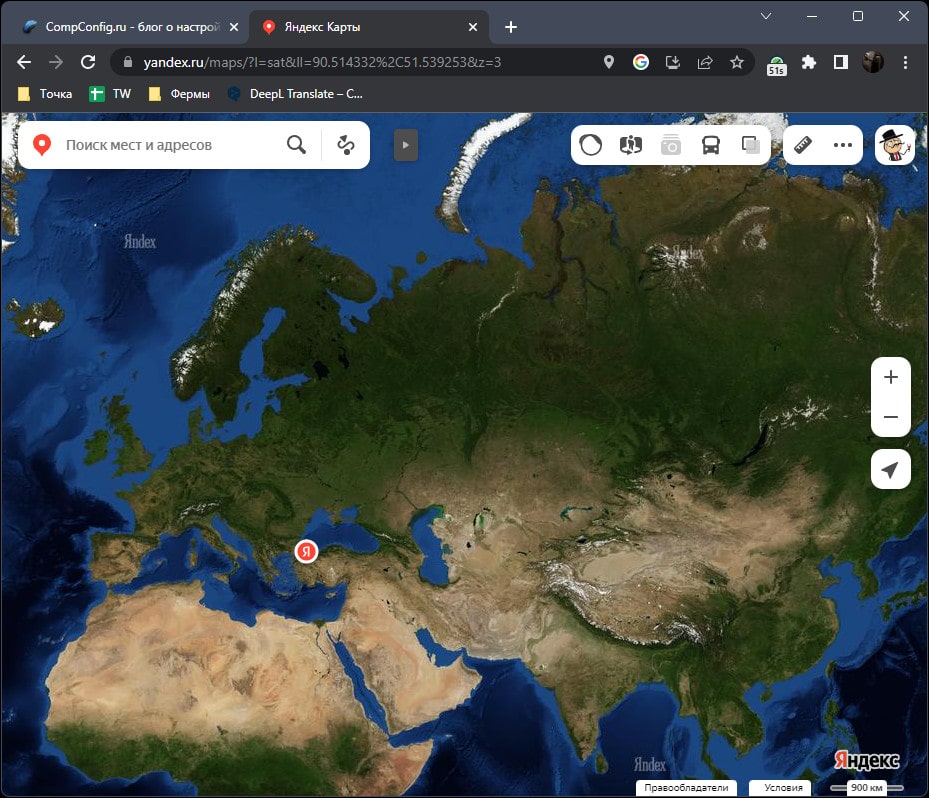
Яндекс.Карты
Если говорить об отечественных картах, то явным лидером является Яндекс.Карты, тем более, пока что это единственный сервис, поддерживающий полноценный просмотр спутниковой карты с обновлениями раз в несколько лет. Работа с Яндекс.Картами одинакова как на сайте, так и через мобильное приложение (Android, iOS), поэтому следующую инструкцию можно считать универсальной.
- При открытии сайта или приложения понадобится развернуть меню «Слои» и переключиться на режим «Спутник» или «Гибрид».
- При переключении на первый режим отображается карта со спутника без любых обозначений. Не отображаются границы, названия стран и улиц. Такой тип отображения особенно подходит в тех случаях, когда нужно изучить местность до мельчайших подробностей, а отображение надписей и линий дорог только мешает это делать.
- Если выбрать «Гибрид», то появятся названия стран, городов, поселений и дорог, вместе с океанами, морями, реками и озерами. Что касается отображения линий границ государств, то Яндекс решил отказаться от такой разметки и ее вы не увидите ни в одном из режимов.
- При сравнении снимков от Google (речь о картах, а не о Планете Земля) можно сказать, что у Яндекса качество немного лучше при значительном приближении объектов. Детали лучше видно, различима растительность и небольшие объекты в виде тех же автомобилей. Изучать карту в максимальном приближении удобнее через Яндекс.Карты.


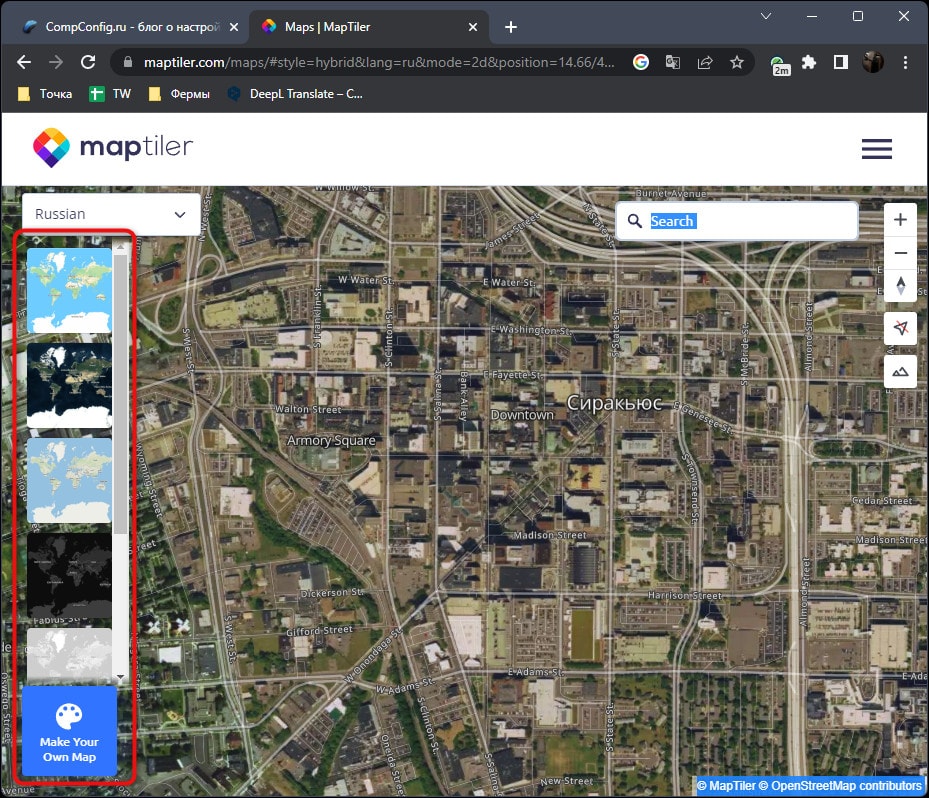
MapTiler
MapTiler позиционируется как крупная компания, предоставляющая для предприятий картографические услуги. Обычному пользователю доступно бесплатное ознакомление с разными видами карт на сайте через браузер на компьютере или смартфоне. Мобильное приложение или программа для ПК пока не поддерживается. Интерфейс на английском языке, но название объектов можно переключить на русский, чтобы упростить навигацию по спутниковым снимкам. Обновляются они точно так же, как и на других подобных картах, — не чаще раза в несколько лет.
- Для начала на странице с картой вам нужно выбрать ее тип. Поддерживается несколько разных вариантов, но сейчас остановимся на «Satellite», что и переводится как «Спутник» (данный тип карты второй в списке).
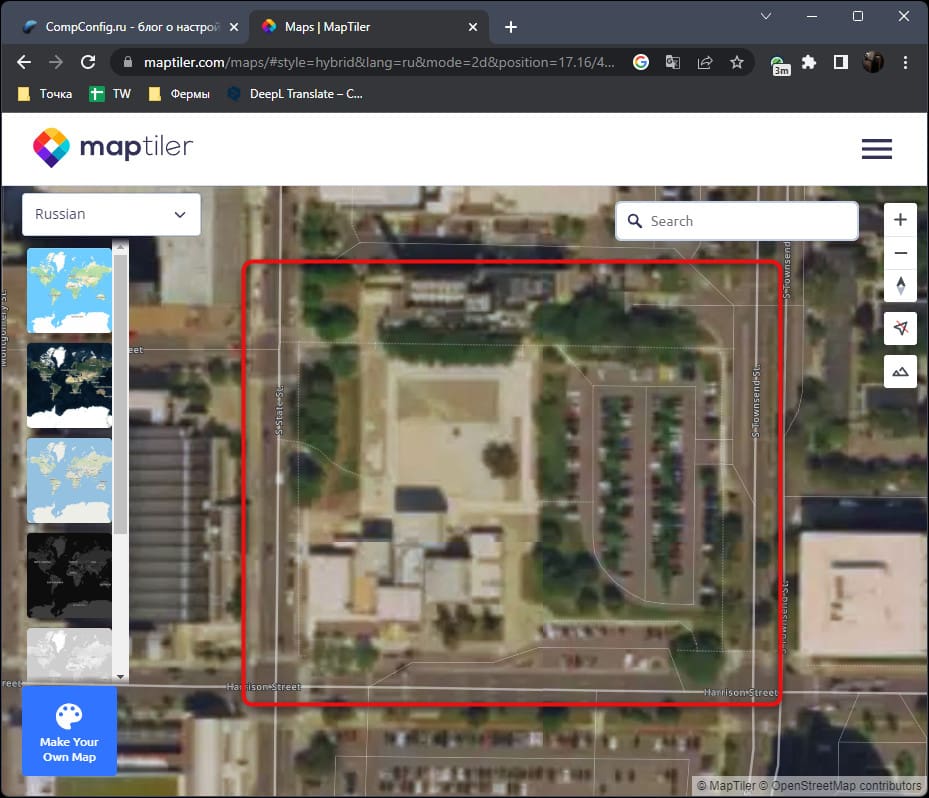
- Сразу отмечу максимальное приближение, поскольку эта информация одна из самых ценных при работе со спутниковыми снимками. Здесь оно довольно плохое, все объекты замылены и с трудом удается разглядеть даже крупные объекты. Это явный минус MapTiler и используемых ими снимков.
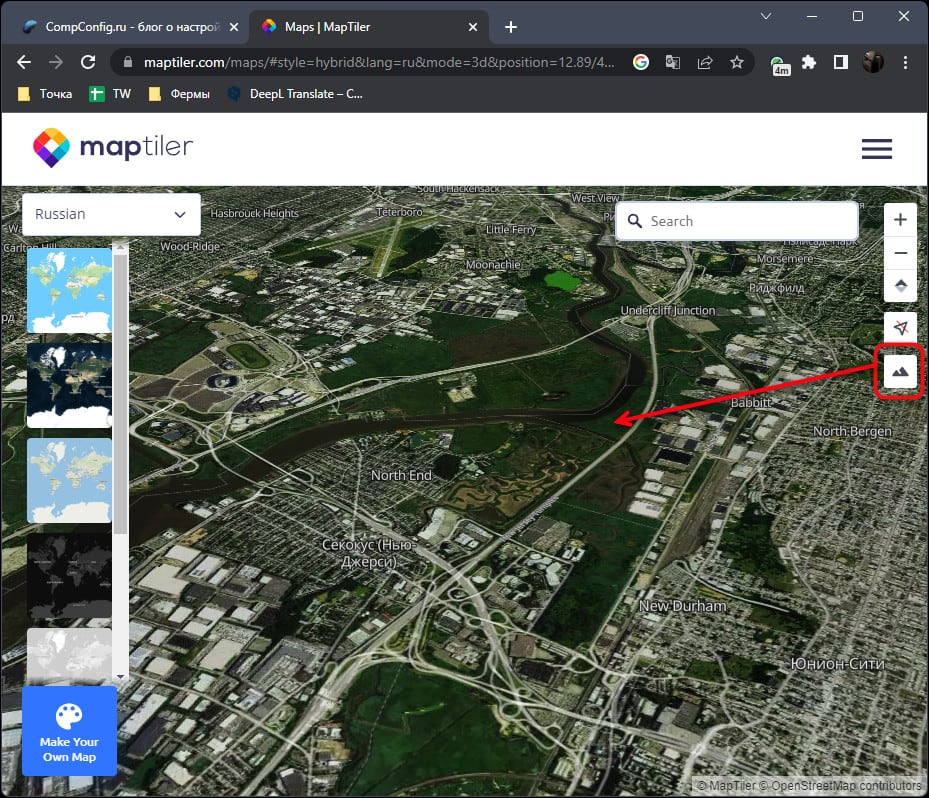
- Поддерживается переключение в просмотр рельефов, но высоты особо не разглядеть, поэтому данный режим можно считать полезным только для изменения самого угла обзора и не более.
MapTiler оставляет двоякие впечатления после использования. Скорее всего, карты на сайте добавлены больше для ознакомления, а для получения кадров высокого разрешения нужно связываться с представителями и обсуждать стоимость услуг по предоставлению всей спутниковой карты или только конкретных снимков. Обновление карт в бесплатной версии точно происходит не чаще, чем раз в два-три года.
EOSDIS Worldview
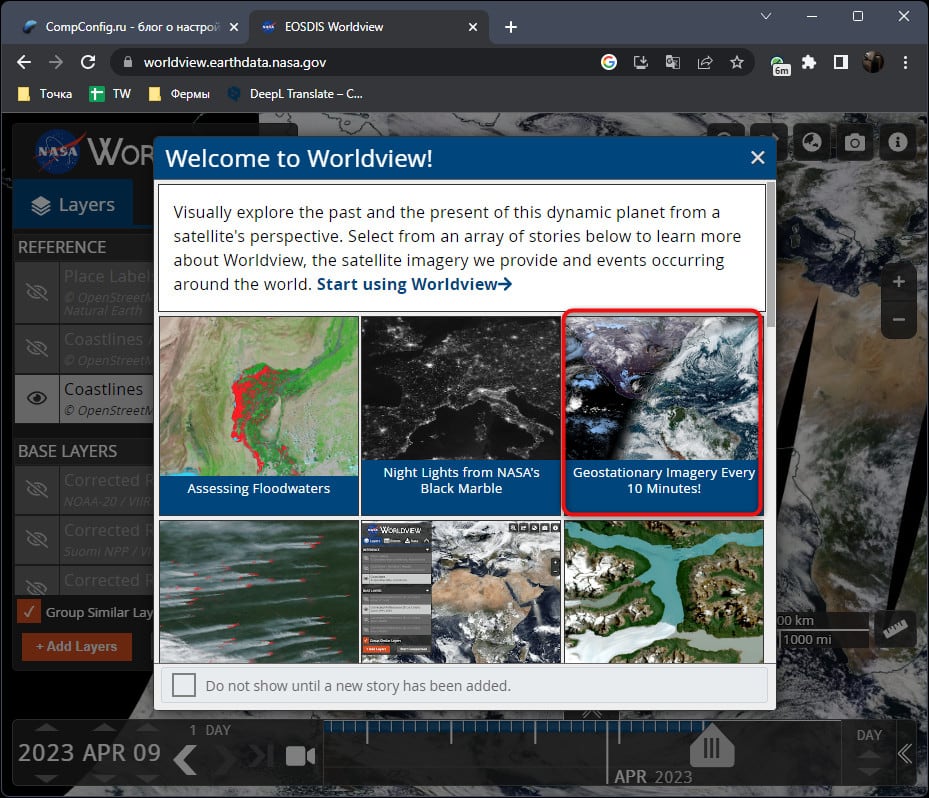
EOSDIS Worldview отличается от всех представленных выше сервисов, поскольку не является как таковой спутниковой картой. Это официальный проект от NASA, позволяющий в режиме реального времени следить за обстановкой на Земле. Он показывает общий план снимка со спутника, позволяет узнать ситуацию по ветрам, посмотреть на ночную карту или отследить, какие погодные явления сейчас возникают по всему миру. Поддержки русского языка на сайте нет, поэтому придется во всем разбираться самостоятельно или с помощью переводчика в браузере.
- Если говорить о спутниковой карте, то в качестве основного режима в EOSDIS Worldview нужно выбрать «Geostationary Imagery Every 10 Minutes». Этот режим передает вид со спутника с регулярным обновлением в 10 минут. Позволяет оценить ситуацию по облакам и увидеть общий план земли.
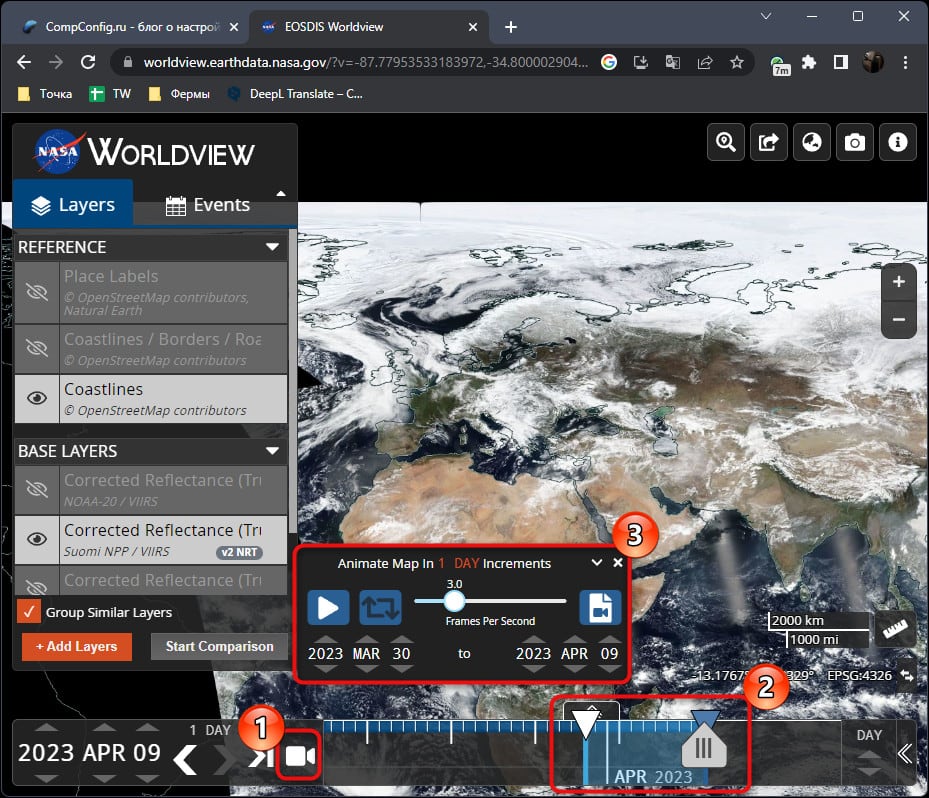
- При использовании данного режима, если интересуют снимки в реальном времени, нужно установить сегодняшнюю дату справа внизу.
- Вместе с этим можете включить воспроизведение динамики кадров в установленный промежуток времени. Для этого нужно щелкнуть по значку с камерой, затем выбрать часовой диапазон, который вы хотели бы просмотреть, и воспроизвести видео. Вы увидите движение облаков и изменение освещения со спутника.
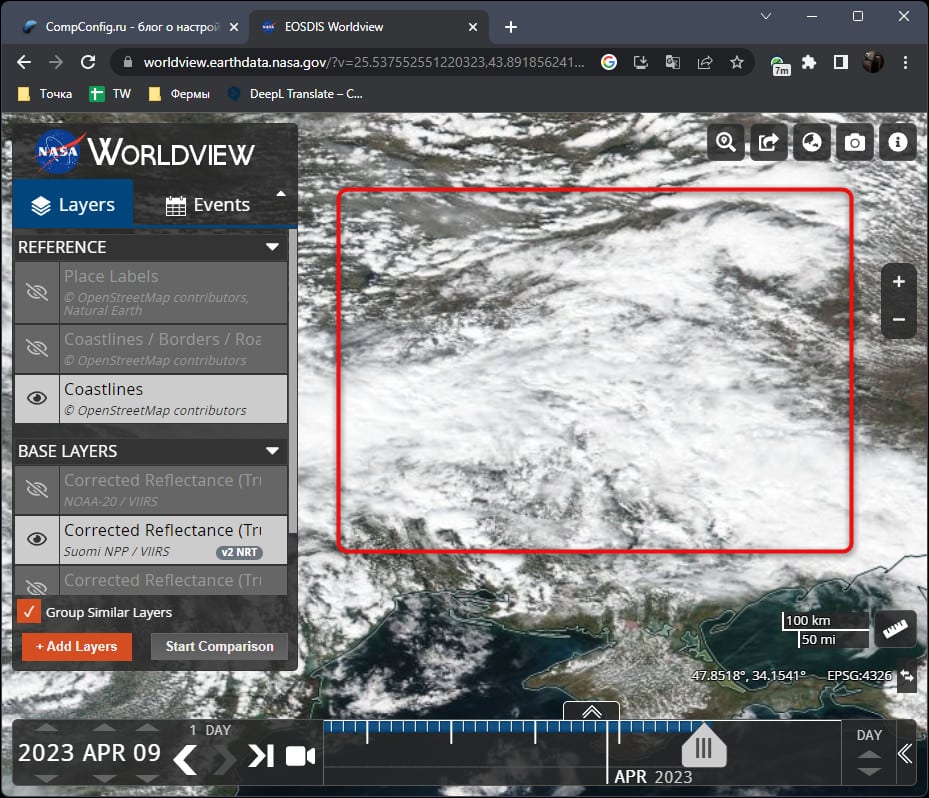
- Как раз важно отметить положение облаков. Из-за них довольно трудно посмотреть на некоторую местность, что видно на следующем скриншоте. Поэтому рекомендуем изменять время и дату снимка, чтобы получить тот кадр, когда облаков над нужным объектом еще не было.
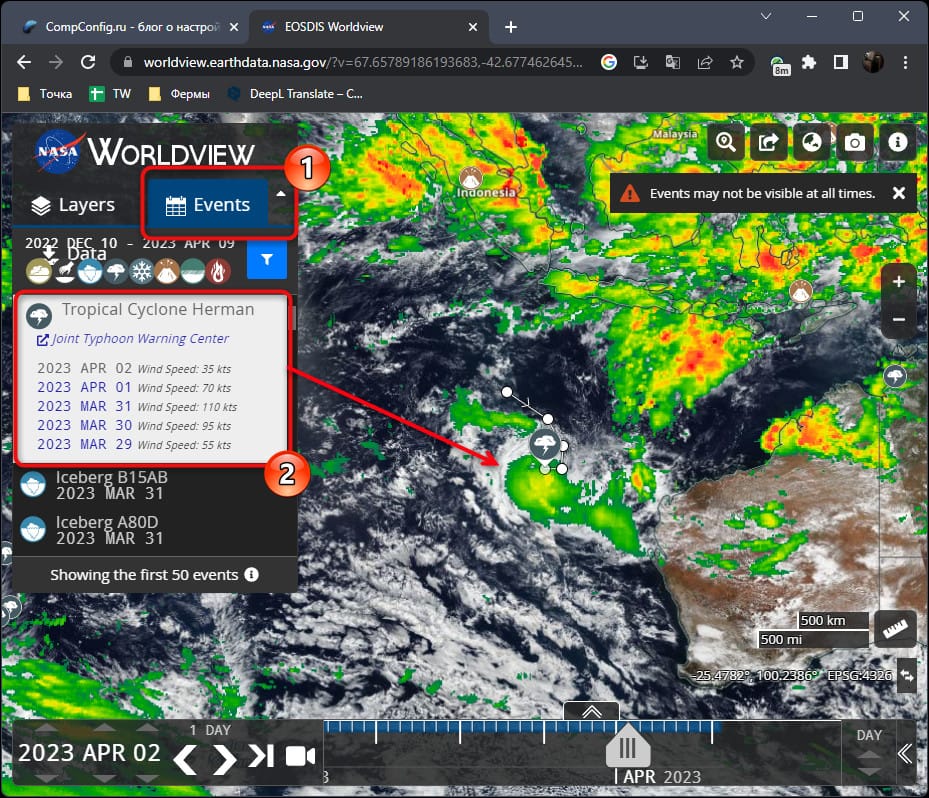
- Переключаясь на вкладку «Events» и выбирая одно из последних событий, вы будете видеть его отметку на карте и узнаете, где сформировался циклон, возник айсберг или началось торнадо. Все это очень увлекательно и для полезно даже для простого ознакомления с природной ситуацией в мире.

MAXAR
В завершение затрону компанию MAXAR, которая специализируется на запуске спутников и получении снимков практически в режиме реального времени. Данная компания сейчас практически быстрее всех (если не говорить о государственных спутниках) получает любую информацию со спутников, фотографирующих Землю. У обычного пользователя доступа к снимкам нет, их можно получить только в том случае, Если MAXAR самостоятельно выложит их в открытый доступ или предоставит какой-либо организации, правительству или СМИ. Поэтому, если вы желаете получать информацию от MAXAR, лучше всего читать новости о данной компании, просматривать их блог или анализировать уже выложенные снимки в сети. Обычно они занимаются этим, когда происходят природные катастрофы: пожары, подтопления, цунами и прочие разрушения. Еще предоставляют самые свежие снимки с горячих точек, показывая разрушения городов, скопление войск и прочую узкоспециализированную информацию.
***
Как я уже писал выше, информацию со спутников в режиме реального времени сейчас практически не получить. Поэтому остается только довольствоваться периодически обновляемыми картами. Если вас интересует качество снимков при максимальном увеличении, я бы рекомендовал точно обратить внимание на Яндекс.Карты, а для продвинутого изучения Земного шара — Google Планету Земля.
Обложка: Google Earth
Как определить, где находится спутник Триклор, МТС, НТВ и проверить отсутствие препятствий для установки антенны.
Определение направления по карте
Сначала находим направление на спутник на карте. Для этого лучше всего подходит сервис MapSat (mapsat.ru).
- Укажите название спутника.
Выберите в списке “Выбор спутника” название (координаты) интересующего Вас спутника, либо укажите название оператора спутникового телевидения (например МТС, Триколор ТВ, НТВ+)
- Найдите на карте адрес установки антенны.
Для поиска координат установки спутниковой антенны на карте введите адрес объекта в поле “Адрес или объект”(находится в верхней левой части карты). В случае, если система найдет несколько адресов подходящих под параметры поиска, Вам будет предложено выбрать один из них. При выборе требуемого адреса карта автоматически настроится на интересующий Вас объект.Альтернативный метод поиска текущего адреса — использование кнопки “Определить местоположение”. Метод особенно эффективен если Вы находитесь рядом с местом где будет производиться настройка спутниковой антенны, а для доступа к карте используется устройство оснащенное GPS (например смартфон или планшет). В этом случае центр карты будет перемещен в точку с координатами полученными с GPS устройства.
- Укажите точное место монтажа спутниковой антенны
На спутниковой карте необходимо как можно точнее задать координаты места установки антенны. Для этого увеличивается масштаб карты, “Тип карты” переключается в режим отображения спутниковых снимков Google Map или Yandex Map (в зависимости от того какая карта более детализирована для вашего региона). Левой кнопкой мыши отмечается точка монтажа спутниковой тарелки. В указанном месте появится маркер с линией направленной в сторону спутника. Расположение маркера можно изменять, перетаскивая его по карте.Убедитесь что приему спутникового сигнала ничего не мешает — линия направления на спутник не пересекает крупные деревья, высокие здания и т.п.. Если линия пересекает крупный объект, необходимо удостовериться в том, что он не будет мешать приему сигнала. Для этого можно воспользоваться кнопкой “Расчет препятствий”. Перетащите маркер, символизирующий препятствие, на исследуемый объект. В графе “Высота преодолеваемого препятствия” будет рассчитана максимальная высота объекта, который не будет мешать приему. Если объект, расположенный на пути приема сигнала со спутника, возвышается над антенной больше данного значения, он может препятствовать приему. В таком случае придется увеличить высоту установки антенны, либо выбрать другое место.
Программы (приложения) для настройки спутникового ТВ
SatFinder — cамое популярное приложение. Есть версии для iOS и Android. К сожалению, популярность породила множество клонов этой программы с таким же или похожими названиями, но сильно уступающих по качеству. Программа бесплатная, с простым и понятным интерфейсом. Отлично определяет направление на спутник, при этом, в отличие от многих других приложений, есть возможность выбора конкретного спутника. Единственное, для использования SatFinder нужен смартфон с хорошим экраном, в обратном случае на нем будут плохо видны спутники.
Как пользоваться
Скачайте SatFinder. Запустите приложения и, держа смартфон вертикально, подождите, пока программа определит ваше местонахождение. На вашем смартфоне должна работать функция GPS.
Далее выберите спутник (МТС — ABS-2A, Триколор, НТВ+ — Eutelsat 36B/36C (Express-AMU1)) в меню приложения, и оно поможет вам направить антенну точно по координатам выбранного спутника. Желтые стрелки будут указывать направление, в котором следует перемещать смартфон, пока он не станет направлен точно на спутник, после чего цвет стрелок изменится на зеленый, и вы услышите звуковой сигнал. Далее необходимо будет повернуть антенну в нужном направлении.


На видео демонстрируется работа приложения SatFinder

Диcклеймер — я практически не знаком с астрономией, только вот в Kerbal на орбиту выходил и как-то мне удалось сделать парочку орбитальных маневров. Но тема интересная, так, что даже если я где-то не верно выражаюсь — сорян.
Все ссылочки в конце статьи.
На всякий случай, под видимостью подразумевается не только видимость глазом.
Для того, что бы начать взаимодействовать со спутником, он должен быть виден в небе. Видимость спутника зависит от того, где он находится на текущий момент относительно вашего расположения. Существуют спутники которые никогда не видны из некоторых локаций. К таким относятся спутники находящиеся на геосинхронной орбите — они видны только с половины Земли, так как их движение синхронизировано с вращением Земли.
Так же на видимость спутника влияет наклон орбиты.
Орбиты с низким наклоном находятся ближе к экватору. Находясь на экваторе, вы наверняка увидите спутники в какой-то момент времени. Если вы находитесь выше по широте, то видимость спутника зависит от высоты его орбиты. Чем дальше спутник от Земли, тем больше локаций с которых его можно увидеть. Например спутник LEMUR-2 JOEL, находится на высоте 640км и может быть виден в Найроби и Дар-эс-Салам, но его никогда не видно в Ереване.
O3B FM8 который находится на высоте 8,000км, можно увидеть из Стокгольма или южней из Tierra del Fuego. Оба спутника с очень низким наклоном и возле экватора. Высота спутника с высоким наклоном (полярная орбита) так же влияет на то откуда он может быть виден, но в основном они видны отовсюду (если хорошенько подождать, пока он пролетит в поле вашего зрения).
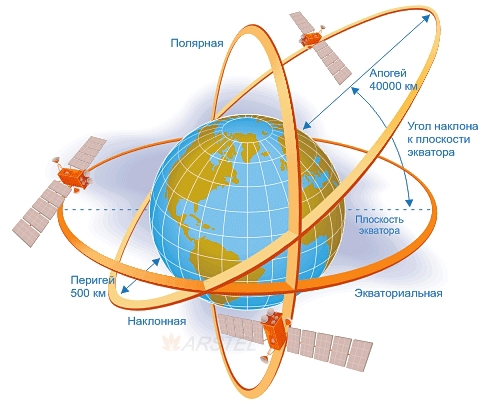
Что такое орбита?
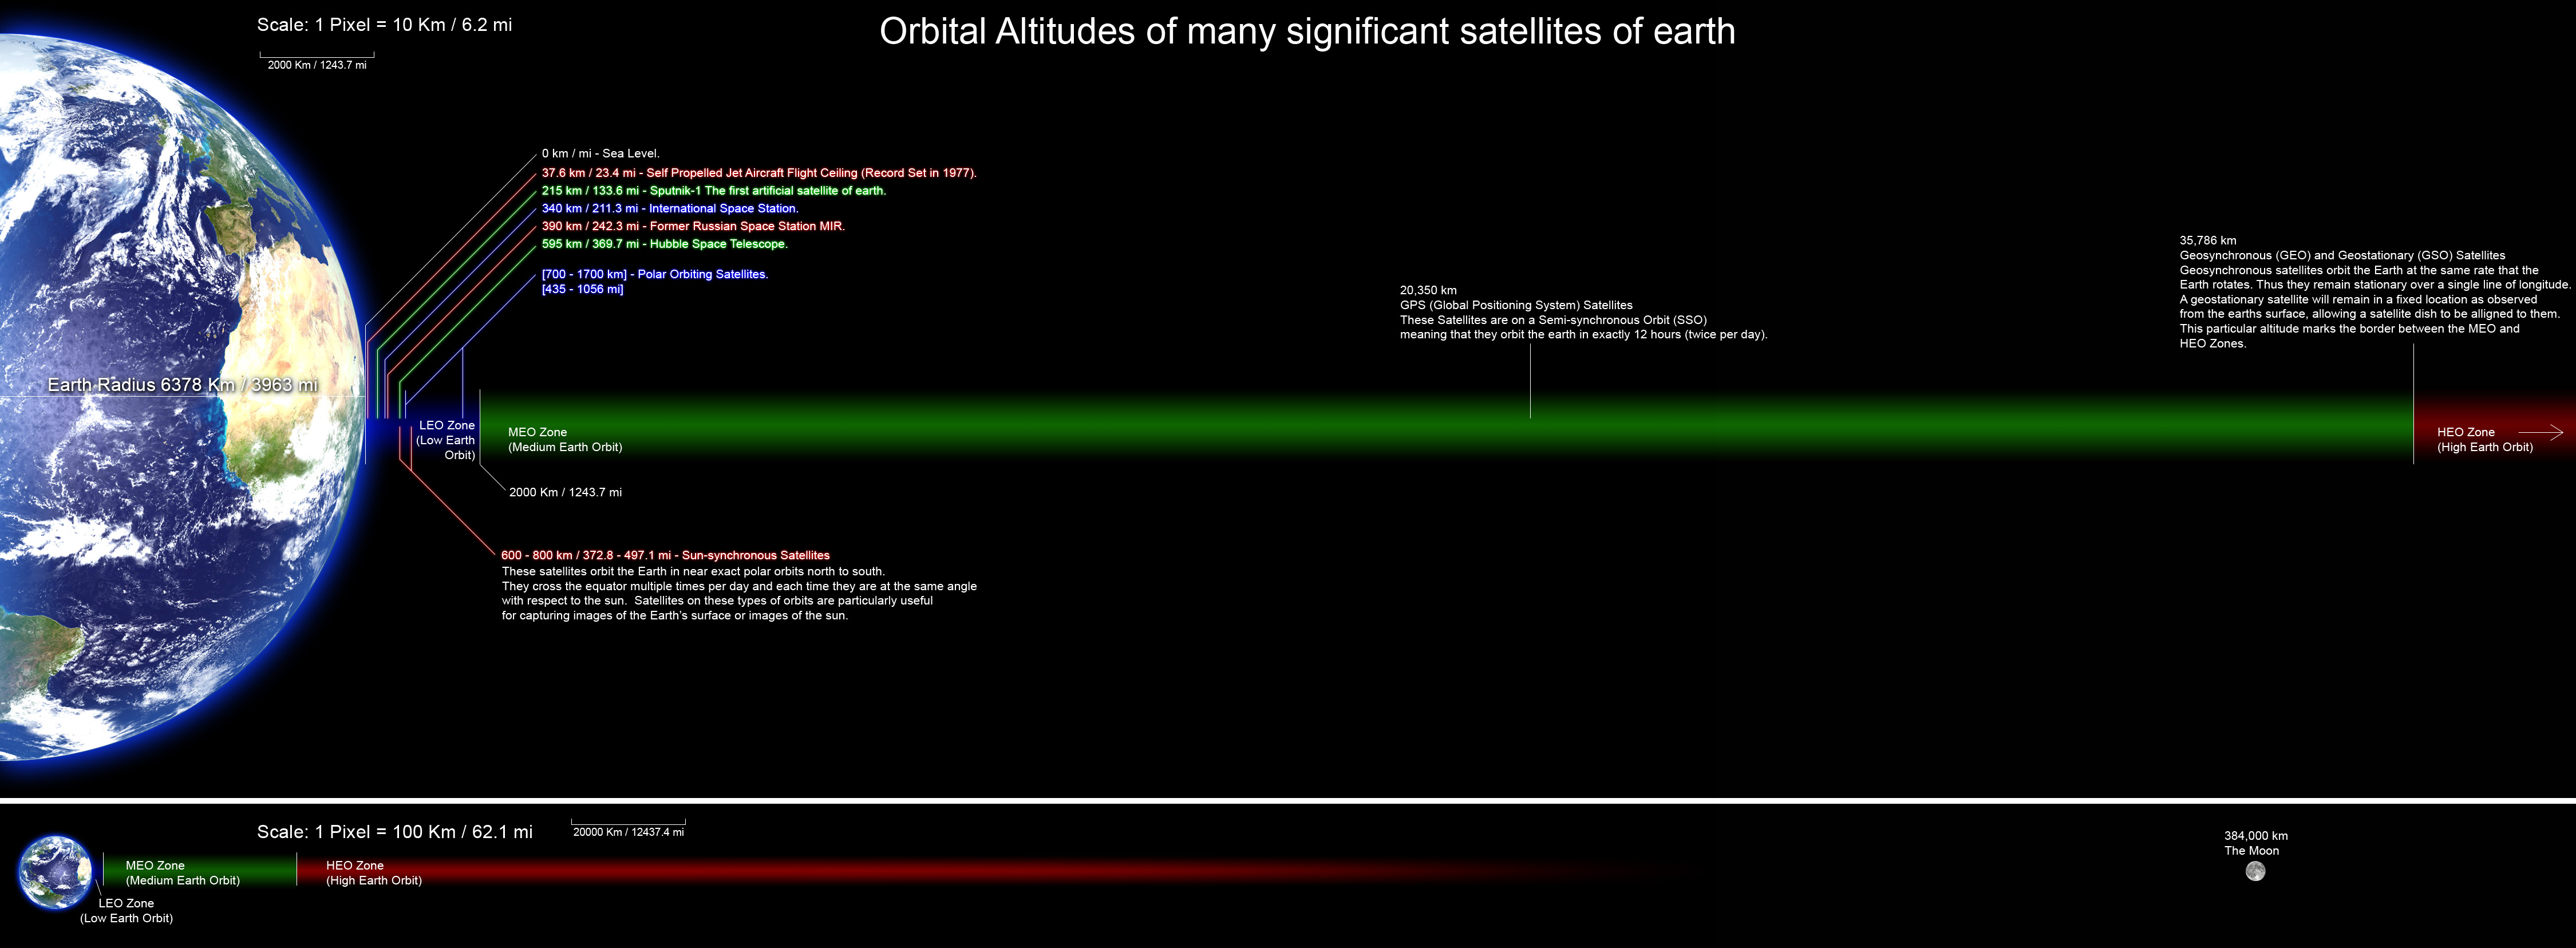
(Откройте изображение в новой вкладке, что бы получше разглядеть)
Все орбиты разные. Большинство спутников находятся в 3-х основных зонах Низкая околоземная орбита (LEO), Средняя околоземная (MEO), или Геосинхронной орбите (GSO).
Спутники на низкой орбите, находятся ближе всех к поверхности Земли (до 2,000км), требуют меньше всего энергии для выхода на такую орбиту (так как если вы играли в Kerbal, то знаете, чем больше скорость тем выше орбита, а скорость это кол-во сожженного топлива и время работы двигателя), а так же с ними проще общаться. На такой орбите находится Международная космическая станция и спутники телефонной связи. Такие спутники движутся по небу довольно быстро и находятся в поле зрения около 20-30 минут. Но до нового пролета ждать примерно столько же. Вращение вокруг земли занимает около 90 минут.
Медиана, средняя орбита или Medium Earth Orbit — орбита, которая находится между геосинхронной орбитой (GSO) и низкой орбитой (LEO). Большинство спутников находятся на высоте между 10,000км и 30,000км. Орбиты между 2000км и 8000км не желательны из-за высокой радиации от Van Allen Belt (пояса радиации).
На таких орбитах много GPS спутников. Они так же двигаются вокруг поверхности Земли, но медленней (так как орбита выше). Оборот вокруг Земли занимает примерно 12 часов.
На геосинхронной орбите спутники делают 1 оборот за день. Находятся они на высоте 36,000км. Если геосинхронный спутник вращается вокруг экватора, то такая орбита называется геостационарная. Спутники всегда находятся в одном и том же положении относительно наблюдателя на земле. Словно они находятся на высокой вышке. Задержка сигнала достигает пол секунды.
Зачем целиться в спутник?
Так как я знаком с FPV хобби, я что-то уже знаю про антенны. Минимально, но понимаю, что есть антенны направленные которые словно фонарик, а есть всенаправленные антенны.
Направленные антенны лучше принимают и отправляют сигналы, но они ограничены «полем зрения».
В хобби обычно комбинируют антенны:

(плоские это направленные патч антенны, а ниже всенаправленные)
Но вернемся к нашей теме, для общения со спутниками используют такие вот параболические антенны:
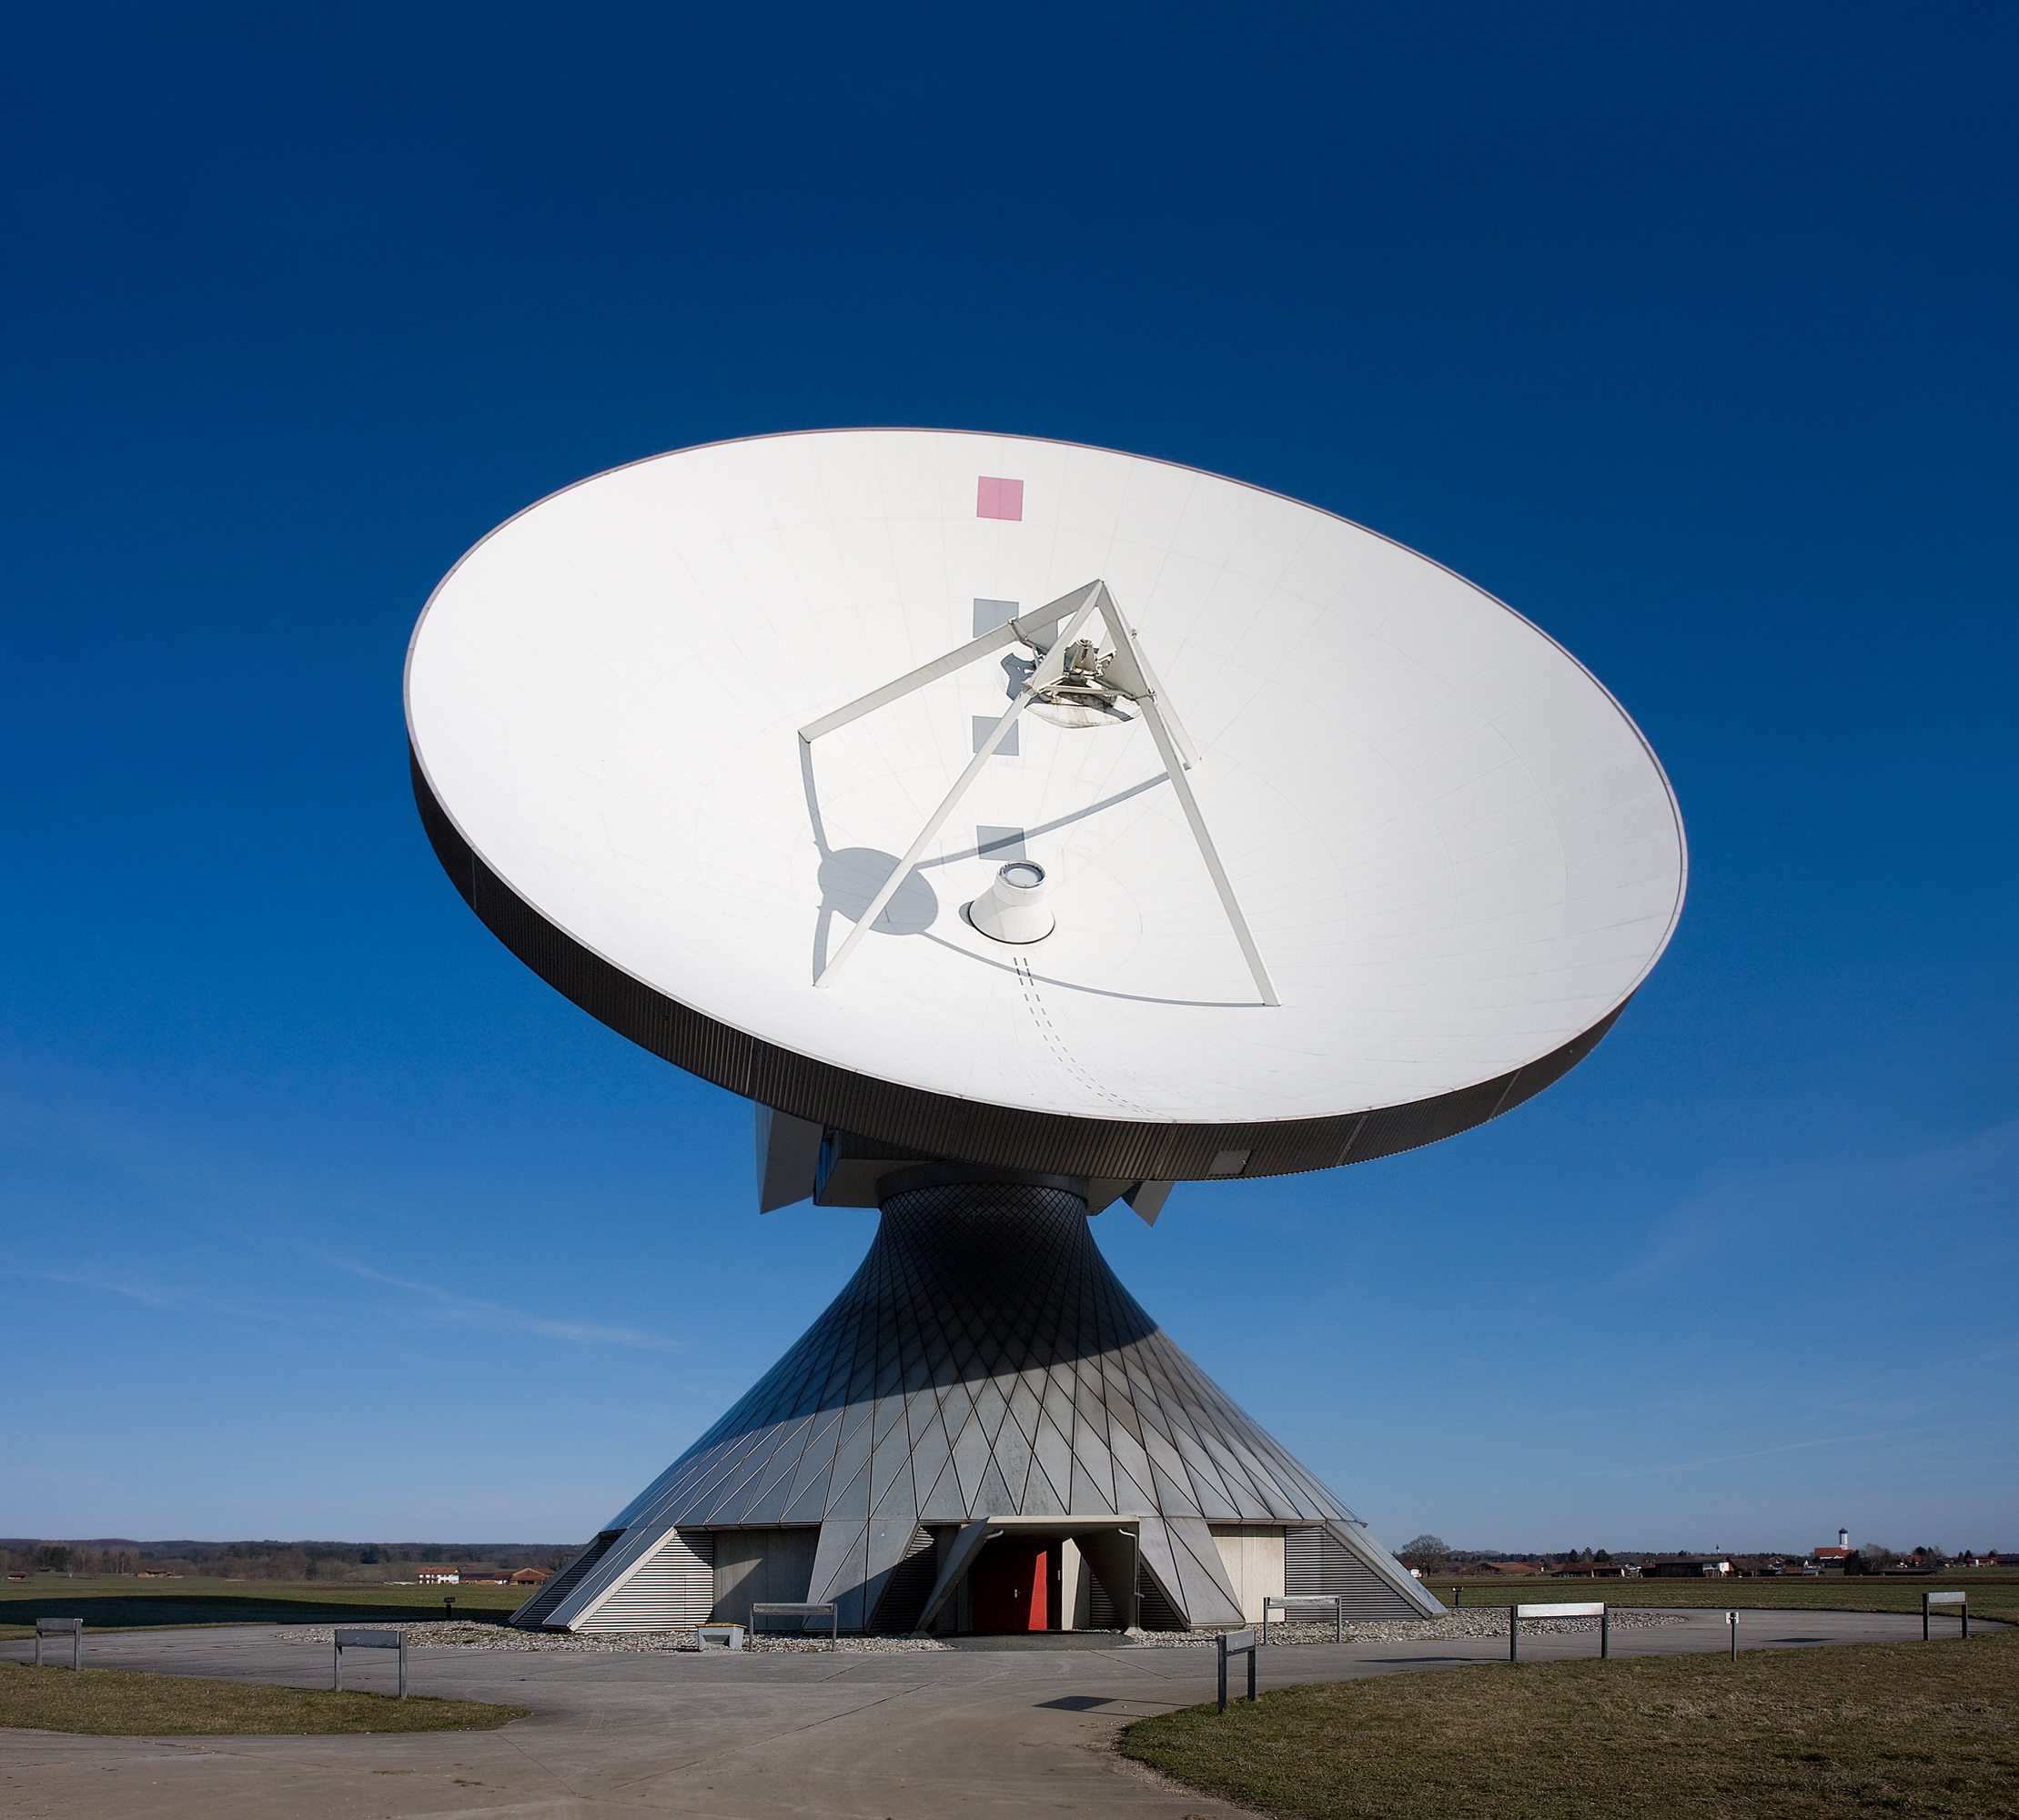
Работают следующим образом — собирая сигнал на своей параболической «тарелке» они концентрируют его на «feed antenna». Не могу найти как это называется по-русски. Скорей всего принимающая антенна.
Можно провести аналогию с солнечными электростанциями:
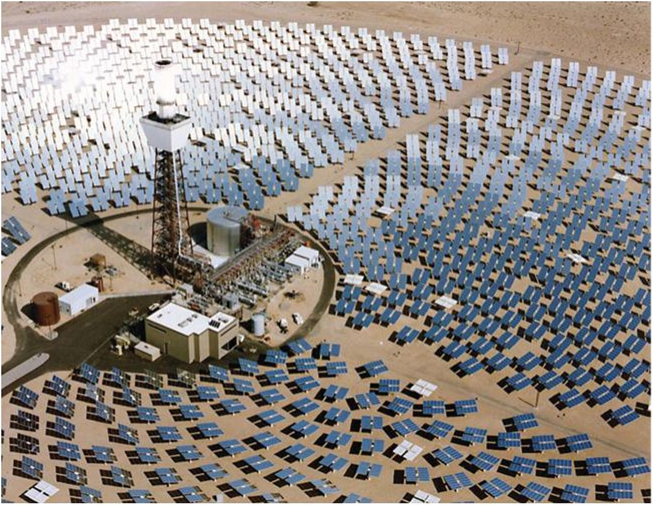
Слежение за спутником (прицеливание вашей направленной антенны), технически не обязательно для отправки и получения сигнала. Но вместо того, что бы тратить энергию и отправлять сигналы во все стороны, это можно делать концентрировано. Такой подход более эффективен и позволяет использовать антенны поменьше.
Находим положение спутника относительно вашей локации
Для получениях данных о движении спутников относительно конкретной локации, можно воспользоваться библиотекой Skyfield или публичной базой данных. С помощью этих данных можно предсказать, когда конкретный спутник будет над вами и в поле зрения. Следовательно, и прицеливать антенну.
Например мы можем предсказать когда МКС пролетит над вами, и если на улице не слишком светло, то вы сможете увидеть МКС невооруженным глазом. Станция делает один оборот в 90 минут, двигается она по ночному небу очень быстро. Относительно вас она будет в поле зрения не более 8 минут. Если станция будет пролетать низко — коло 10 — 2- градусов над горизонтом, то возможно из-за зданий и деревьев ее будет сложно разглядеть. Но как я сказал выше, мы можем подождать, пока пролет станции будет повыше и использовать данные для предсказания положения в будущем.
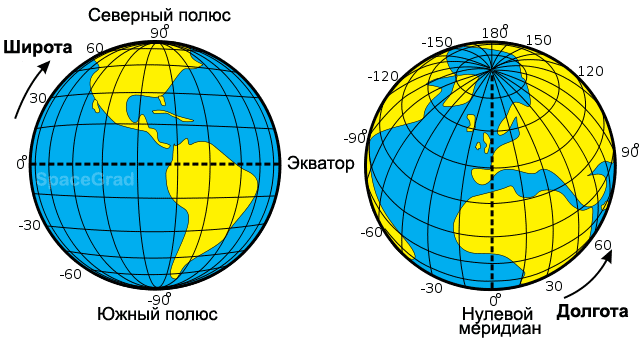
Угол спутника к горизонту от вашей локации, называют высотой (altitude) или elevation.
Горизонтальная система координат.

Для того, что бы хорошо наблюдать спутник, надо примерно 45 градусов. Другой параметр который нам интересен — азимут. Это направление, куда надо смотреть. Азимут равный 0 градусов находится на севере, 180 на юге.
Skyfield написан на Python, поэтому придется использовать Python (3). Конечно, можно сделать и на другом языке, но не будем усложнять себе задачу.
Нам необходимо поставить одну зависимость:
pip3 install skyfieldИ подключить все необходимые пакеты следующим образом:
index.py
import datetime
import time
from skyfield.api import load, Topos, EarthSatellite
Далее несколько необходимых нам констант:
TLE_FILE = "https://celestrak.com/NORAD/elements/active.txt" # DB file to download
ISS_NAME = "ISS (ZARYA)"

# Coordinats
# 57°00'13.7"N 37°02'53.7"E
# Kimrsky District, Tver Oblast, Russia
LONGITUDE = 57.003810
LATITUDE = 37.048262
Основной класс:
class SatelliteObserver:

    def __init__(self, where: Topos, what: EarthSatellite):
        self.where = where
        self.sat = what
        self.sat_name = what.name
        self.ts = load.timescale(builtin=True)
# ...
В этом «конструкторе» мы принимаем координаты, название спутника (такое, как в данных), и EarthSatellite своего рода обертка которая нам позволяет работать с данными.

# ...
@classmethod
    def from_strings(cls, longitude: str or float, latitude: str or float, sat_name: str, tle_file: str) -> 'SatelliteObserver':
        place = Topos(latitude, longitude)
        satellites = load.tle(tle_file)
        print("loaded {} sats from {}".format(len(satellites), tle_file))
        _sats_by_name = {sat.name: sat for sat in satellites.values()}
        satellite = _sats_by_name[sat_name]
        return cls(place, satellite)
# ...
В данной функции используем векторную функцию Topos которая знает о месте на Земле (определение из этой функции).
Затем загружаем все спутники из файла, и находим интересующий нас _sats_by_name[sat_name].
def altAzDist_at(self, at: float) -> (float, float, float):
        """
        :param at: Unix time GMT (timestamp)
        :return: (altitude, azimuth, distance)
        """
        current_gmt = datetime.datetime.utcfromtimestamp(at)
        current_ts = self.ts.utc(current_gmt.year, current_gmt.month, current_gmt.day, current_gmt.hour,
                            current_gmt.minute, current_gmt.second + current_gmt.microsecond / 1000000.0)
        difference = self.sat - self.where
        observer_to_sat = difference.at(current_ts)
        altitude, azimuth, distance = observer_to_sat.altaz()
        return (altitude.degrees, azimuth.degrees, distance.km)
Данный кусок кода отвечает за нахождение высоты, азимута и расстояние на время переданное в at и относительно заданной позиции.
    def current_altAzDist(self) -> (float, float, float):
        return self.altAzDist_at(time.mktime(time.gmtime()))

    def above_horizon(self, at: float) -> bool:
        """
        :param at: Unix time GMT
        :return:
        """
        (alt, az, dist) = self.altAzDist_at(at)
        return alt > 0
current_altAzDist(self) — небольшая обертка для передачи времени на данный момент и функция определения, находится ли спутник выше горизонта.
И наконец main функция:
def main():
    iss = SatelliteObserver.from_strings(LONGITUDE, LATITUDE, ISS_NAME, TLE_FILE)
    elevation, azimuth, distance = iss.current_altAzDist()
    visible = "visible!" if elevation > 0 else "not visible =/"
    print("ISS from latitude {}, longitude {}: azimuth {}, elevation {} ({})".format(LATITUDE, LONGITUDE, azimuth, elevation, visible))

if __name__ == "__main__":
    main()
Полный код
import datetime
import time
from skyfield.api import load, Topos, EarthSatellite

TLE_FILE = "https://celestrak.com/NORAD/elements/active.txt" # DB file to download
ISS_NAME = "ISS (ZARYA)"

# Coordinats
# 57°00'13.7"N 37°02'53.7"E
# Kimrsky District, Tver Oblast, Russia
LONGITUDE = 57.003810
LATITUDE = 37.048262

class SatelliteObserver:

    def __init__(self, where: Topos, what: EarthSatellite):
        self.where = where
        self.sat = what
        self.sat_name = what.name
        self.ts = load.timescale(builtin=True)

    @classmethod
    def from_strings(cls, longitude: str or float, latitude: str or float, sat_name: str, tle_file: str) -> 'SatelliteObserver':
        place = Topos(latitude, longitude)
        satellites = load.tle(tle_file)
        print("loaded {} sats from {}".format(len(satellites), tle_file))
        _sats_by_name = {sat.name: sat for sat in satellites.values()}
        satellite = _sats_by_name[sat_name]
        return cls(place, satellite)

    def altAzDist_at(self, at: float) -> (float, float, float):
        """
        :param at: Unix time GMT (timestamp)
        :return: (altitude, azimuth, distance)
        """
        current_gmt = datetime.datetime.utcfromtimestamp(at)
        current_ts = self.ts.utc(current_gmt.year, current_gmt.month, current_gmt.day, current_gmt.hour,
                            current_gmt.minute, current_gmt.second + current_gmt.microsecond / 1000000.0)
        difference = self.sat - self.where
        observer_to_sat = difference.at(current_ts)
        altitude, azimuth, distance = observer_to_sat.altaz()
        return (altitude.degrees, azimuth.degrees, distance.km)

    def current_altAzDist(self) -> (float, float, float):
        return self.altAzDist_at(time.mktime(time.gmtime()))

    def above_horizon(self, at: float) -> bool:
        """
        :param at: Unix time GMT
        :return:
        """
        (alt, az, dist) = self.altAzDist_at(at)
        return alt > 0

def main():
    iss = SatelliteObserver.from_strings(LONGITUDE, LATITUDE, ISS_NAME, TLE_FILE)
    elevation, azimuth, distance = iss.current_altAzDist()
    visible = "visible!" if elevation > 0 else "not visible =/"
    print("ISS from latitude {}, longitude {}: azimuth {}, elevation {} ({})".format(LATITUDE, LONGITUDE, azimuth, elevation, visible))

if __name__ == "__main__":
    main()
Для запуска программы используем python3:
python3 index.pyРезультат выполнения —
[#################################] 100% active.txt
loaded 6351 sats from https://celestrak.com/NORAD/elements/active.txt
ISS from latitude 37.048262, longitude 57.00381: azimuth 55.695482310974974, elevation 6.232187065056109 (visible!)
В данном выводе мы получаем градус (как в компасе) в какую сторону смотреть и угол (elevation), как высоко над горизонтом.
(visible!) в данном случае — видно!.. Но 6 градусов в городе маловато. Как я писал выше, надо хотя бы 45.
Такие данные можно передавать на сервопривод и управлять направлением антенны в реальном времени. Но об этом в следующих статьях.
Данные которые мы скачиваем (https://celestrak.com/NORAD/elements/active.txt) могут устаревать, так как спутники постоянно корректируют свою орбиту по разным причинам, поэтому следует скачивать свежее как можно чаще.
Спасибо за внимание.
UPD
Немного почитав документацию, получилось упростить до такого:
import datetime
import time
from skyfield.api import load, Topos, EarthSatellite

# Путь к файлу с данными
TLE_FILE = "https://celestrak.com/NORAD/elements/active.txt" # DB file to download

SAT_NAME = "ISS (ZARYA)"

# Загружаем данные
satellites = load.tle(TLE_FILE)

# Находим наш спутник по имени в данных
print("loaded {} sats from {}".format(len(satellites), TLE_FILE))
_sats_by_name = {sat.name: sat for sat in satellites.values()}
satellite = _sats_by_name[SAT_NAME]

ts = load.timescale()
t = ts.now()

# Локация с которой мы наблюдаем
location = Topos('52.173141 N', '44.108612 E')

# Находим азимут и угол над горизонтом
difference = satellite - location
topocentric = difference.at(t)

alt, az, distance = topocentric.altaz()

if alt.degrees > 0:
    print('The ISS is above the horizon')

print(alt)
print(az)
print(int(distance.km), 'km')
Первый вариант я нашел на просторах интернета и похоже он слишком специфичен или устарел.
Так же удалось сделать поиск всех видимых спутников в конкретной части неба:
import datetime
import time
from skyfield.api import load, Topos, EarthSatellite

TLE_FILE = "https://celestrak.com/NORAD/elements/active.txt" # DB file to download

MIN_DEGREE = 45
MIN_AZ = 50
MAX_AZ = 140

satellites = load.tle(TLE_FILE)
ts = load.timescale()
t = ts.now()

location = Topos('52.173141 N', '44.108612 E')

for sat in satellites.values():
    difference = sat - location
    topocentric = difference.at(t)

    alt, az, distance = topocentric.altaz()

    azValue = int(str(az).replace('deg', '').split(" ")[0])

    if alt.degrees >= MIN_DEGREE and azValue >= MIN_AZ and azValue <= MAX_AZ:
        print(sat.name, alt, az)
upd: tvr спасибо за правки
upd: Fenja спасибо за правки
upd: sandroDan спасибо за дополнение в коментариях
upd: dpytaylo спасибо за правки
upd: extempl спасибо за правки
Литература
https://nyan-sat.com/chapter0.html
геосинхронная орбита
наклон орбиты
полярная орбита
Только зарегистрированные пользователи могут участвовать в опросе. Войдите, пожалуйста.
Был бы интересен урок по разработке UI на React под такой сервис слежения за орбитой? (В качестве практики фронтенда)
Проголосовали 35 пользователей.
Воздержались 12 пользователей.