Попробуйте наш инструмент устранения неполадок
Выберите операционную систему
Выберите язык програмирования (опционально)
Ошибки и проблемы довольно распространены в видеоиграх, и Halo 4 не застрахован от них. Недавно игроки получили сообщение об ошибке Неустранимая ошибка UE4 появляется во время игры. Это привело к тому, что игра полностью закрылась, и игроки вернулись на рабочий стол. Если вы тоже столкнулись с этой проблемой, не волнуйтесь. В этом руководстве мы поможем вам исправить фатальную ошибку Halo 4 UE4 на ПК.
Попробуйте эти исправления
Возможно, вам не придется пробовать их все; просто продвигайтесь вниз по списку, пока не найдете тот, который вам подходит.
- Установите последнюю версию Microsoft Visual C ++
- Попробуйте оконный режим
- Проверить целостность файлов игры
- Обновите свой графический драйвер
- Запускайте игру на выделенной видеокарте
- Отключить разгон и оверлеи
Исправление 1. Установите последнюю версию Microsoft Visual C ++.
Для правильной работы большинству новых игр требуется последняя версия Microsoft Visual C ++. И есть вероятность, что некоторые из ваших распространяемых файлов Visual C ++ отсутствуют, что вызывает сбой. Так что тебе следует скачать и установите самые свежие, как × 86, так и × 64.
Исправление 2: попробуйте оконный режим
Когда вы играете в игры на ПК, вы обычно можете выбирать между оконным, безрамочным и полноэкранным режимами отображения.
Когда ваша игра работает в полноэкранном режиме, она полностью контролирует вывод на экран, а это означает, что то, что она показывает, имеет наивысший приоритет. Но если игре выделено много ресурсов, она может вылететь. Поэтому, если вы играете в полноэкранном режиме, вы можете попробовать переключиться в оконный режим.
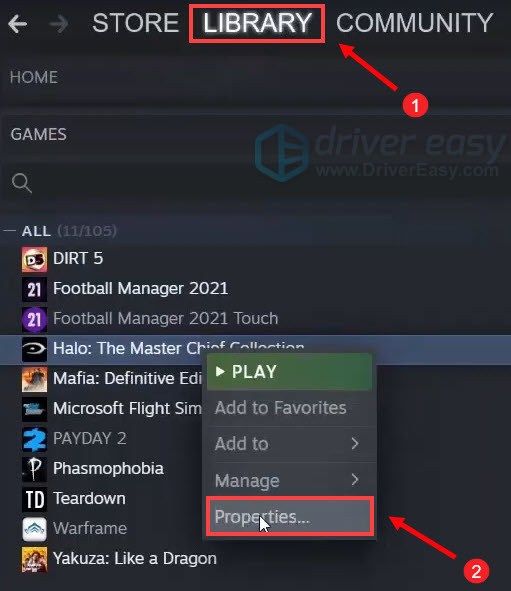
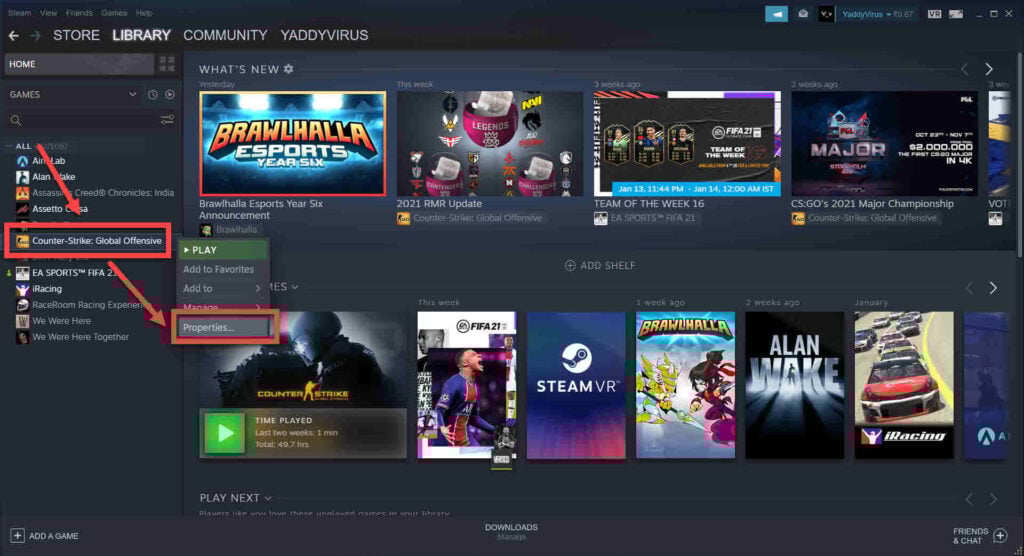
1) Откройте свой клиент Steam. Выберите БИБЛИОТЕКА таб. Перейдите к своей игре Halo: Коллекция Мастера Чифа . Щелкните его правой кнопкой мыши и выберите Характеристики .
2) Под ОБЩАЯ вкладку, нажмите на УСТАНОВИТЬ ОПЦИИ ЗАПУСКА… .

3) В поле введите -окна . (Помните дефис — .) Затем нажмите хорошо .

После применения изменений попробуйте запустить игру, чтобы проверить, появляется ли сообщение об ошибке. Если проблема не исчезла, попробуйте следующее решение.
Исправление 3: проверьте целостность файлов игры.
Если некоторые из ваших игровых файлов повреждены или отсутствуют, у вас могут возникнуть проблемы с запуском игры. Чтобы исправить это, вы можете проверить целостность файлов игры.
Перед проверкой целостности файлов игры необходимо удалить содержимое в папке MCC.
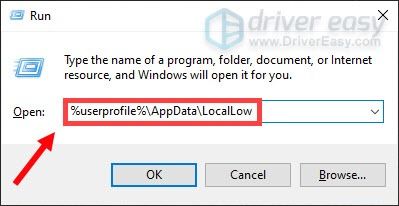
1) На клавиатуре нажмите Windows logo key и р в то же время, чтобы открыть диалоговое окно «Выполнить».
2) Тип % userprofile% AppData LocalLow , затем нажмите Войти на клавиатуре.
3) Затем откройте MCC папка. Перед удалением всех файлов в этой папке убедитесь, что у вас есть резервная копия на случай, если что-то случится. Вы можете просто выбрать все файлы (Ctrl + A), а затем скопировать их в новую папку.
4) После того, как вы сделали резервную копию, удалите все файлы внутри MCC папка.
5) Теперь откройте свой клиент Steam, выберите БИБЛИОТЕКА таб. Перейдите к своей игре Halo: Коллекция Мастера Чифа . Щелкните его правой кнопкой мыши и выберите Характеристики .
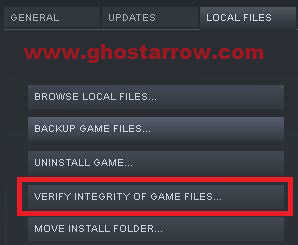
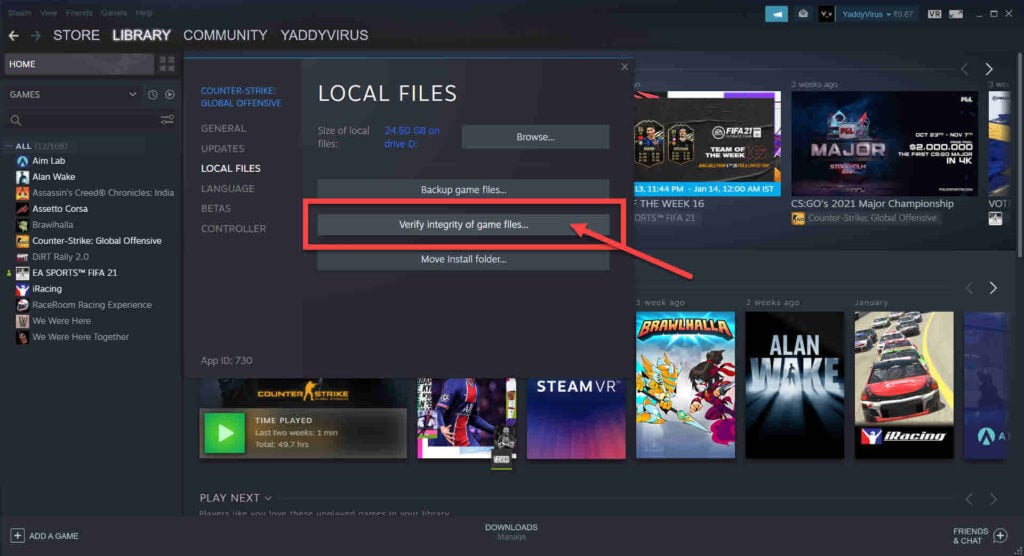
6) Когда игра Характеристики открывается окно, выберите ЛОКАЛЬНЫЕ ФАЙЛЫ вкладку и щелкните ПРОВЕРЬТЕ ЦЕЛОСТНОСТЬ ИГРОВЫХ ФАЙЛОВ .
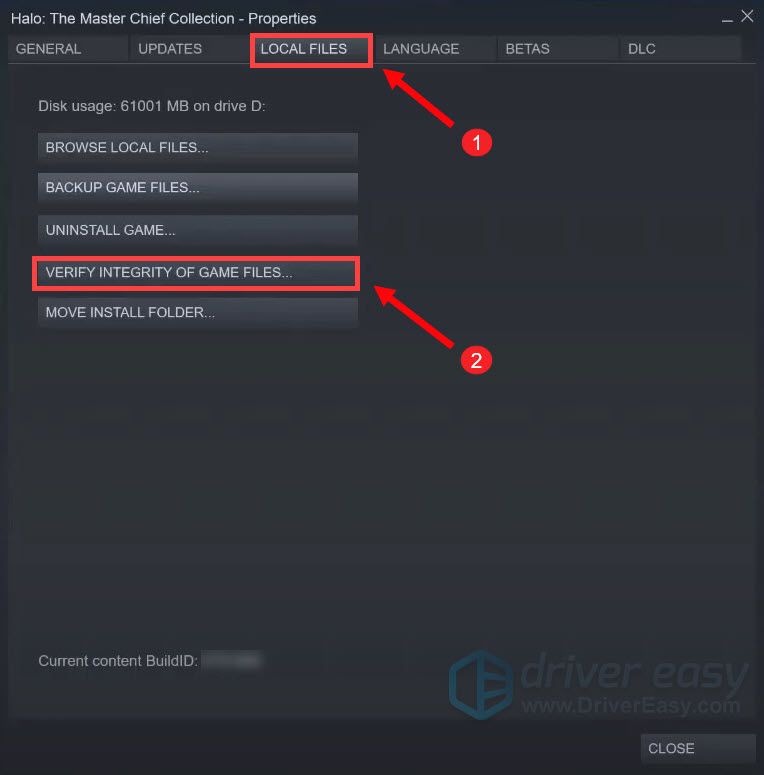
Steam проверит файлы игры — этот процесс может занять несколько минут. Когда все будет готово, попробуйте сыграть в свою игру, чтобы проверить, сохраняется ли проблема.
Ваш графический драйвер — это важная часть программного обеспечения, которое позволяет вашей системе взаимодействовать с видеокартой. Если он устарел, это вызовет заметные проблемы с производительностью. Поэтому, когда вы испытываете случайные сбои при игре в Halo, независимо от того, есть ли сообщения об ошибках или нет, вы должны убедиться, что ваша видеокарта обновлена. Скорее всего, вы не сможете исправить или предотвратить каждый сбой, но обновление графического драйвера может помочь вам их остановить. Более того, обновления драйверов включают в себя последние патчи для устранения недостатков безопасности, исправления проблем, а иногда даже предоставляют вам совершенно новые функции, причем все это бесплатно.
Чтобы обновить драйвер видеокарты, вы можете сделать это вручную через Диспетчер устройств или перейти на страницу загрузки драйвера производителя (NVIDIA / AMD ), чтобы загрузить и установить точный драйвер для вашей системы. Это требует определенного уровня компьютерных знаний и может стать головной болью, если вы не разбираетесь в технологиях. Поэтому мы хотели бы порекомендовать вам использовать автоматическое обновление драйверов, такое как Водитель Easy . С Driver Easy вам не нужно тратить время на поиски обновлений драйверов, поскольку он позаботится о загруженной работе за вас.
Вот как обновить драйверы с помощью Driver Easy:
1) Скачать и установите Driver Easy.
2) Запустите Driver Easy и нажмите Сканировать сейчас кнопка. Затем Driver Easy просканирует ваш компьютер и обнаружит все устройства с отсутствующими или устаревшими драйверами.

3) Щелкните Обновить все . Затем Driver Easy загрузит и обновит все устаревшие и отсутствующие драйверы устройств, предоставив вам последнюю версию каждого из них напрямую от производителя устройства.
(Для этого требуется Pro версия который идет с полная поддержка и 30-дневный возврат денег гарантия. Вам будет предложено выполнить обновление, когда вы нажмете «Обновить все». Если вы не хотите обновляться до версии Pro, вы также можете обновить драйверы с помощью БЕСПЛАТНОЙ версии. Все, что вам нужно сделать, это загрузить их по одному и установить вручную. )
 Профессиональная версия Driver Easy поставляется с полной технической поддержкой. Если вам нужна помощь, пожалуйста, свяжитесь с нами. Служба поддержки Driver Easy в support@letmeknow.ch .
После обновления драйверов перезагрузите компьютер, чтобы они вступили в силу. Затем запустите игру, чтобы проверить, сохраняется ли проблема.
Исправление 5: запускайте игру на выделенной видеокарте.
Интегрированный графический чипсет встроен в процессор и гарантирует, что ваш компьютер может использовать дисплей даже без выделенного графического процессора. Однако для более сложных задач, таких как игры, требуется более мощный графический процессор, который в большинстве случаев является выделенным.
Самым большим преимуществом выделенного графического процессора является производительность. Выделенная видеокарта не только имеет сложную оперативную память для обработки видео, но также имеет выделенную оперативную память для этой задачи, которая, как правило, быстрее и лучше оптимизирована для этой задачи, чем общая системная оперативная память.
Узнайте, есть ли на вашем компьютере более одного графического процессора
Если вы не знаете, сколько графических процессоров установлено на вашем компьютере, следуйте приведенным ниже инструкциям:
1) На клавиатуре нажмите Windows logo key и р в то же время, чтобы открыть диалоговое окно «Выполнить».
2) Тип devmgmt.msc и нажмите Войти .

3) Дважды щелкните Видеоадаптеры чтобы развернуть список. И вы можете увидеть, есть ли на вашем компьютере более одного графического процессора.
Запустите игру на выделенной видеокарте
Получив информацию о вашей видеокарте, вы можете вручную запустить игру на этой конкретной видеокарте. Для этого просто нажмите на ссылки ниже:
NVIDIA
AMD
Если вы пользователь NVIDIA
1) На рабочем столе щелкните правой кнопкой мыши пустое место и выберите Панель управления NVIDIA .
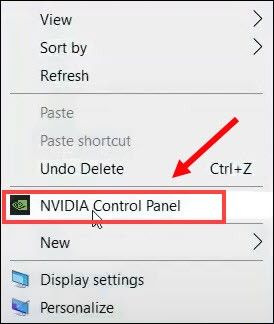
2) На левой панели щелкните Управление настройками 3D . Затем нажмите Настройки программы и Добавлять .

3) Перейдите к exe-файлу игры и нажмите Добавить выбранную программу .
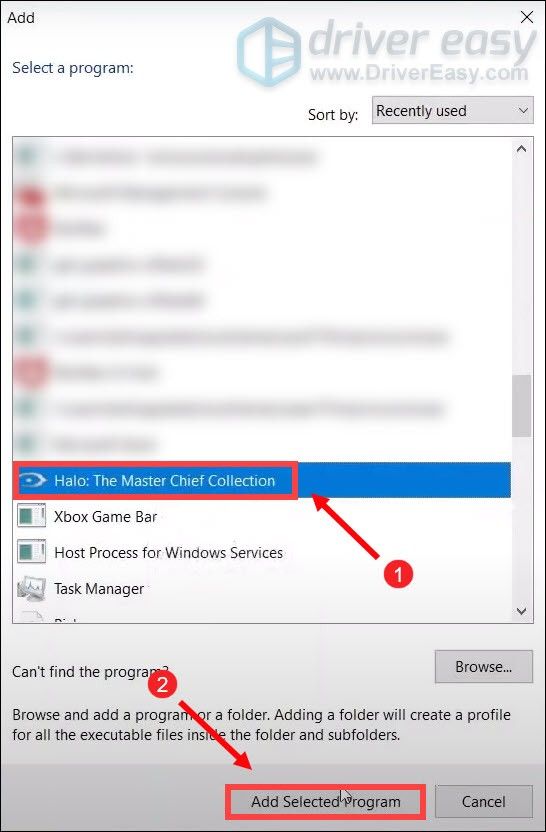
Если вашей игры нет в списке, нажмите Просматривать и перейдите в папку с установкой игры.
4) Щелкните раскрывающееся меню и выберите Высокопроизводительный процессор NVIDIA .

5) Нажмите Применять .
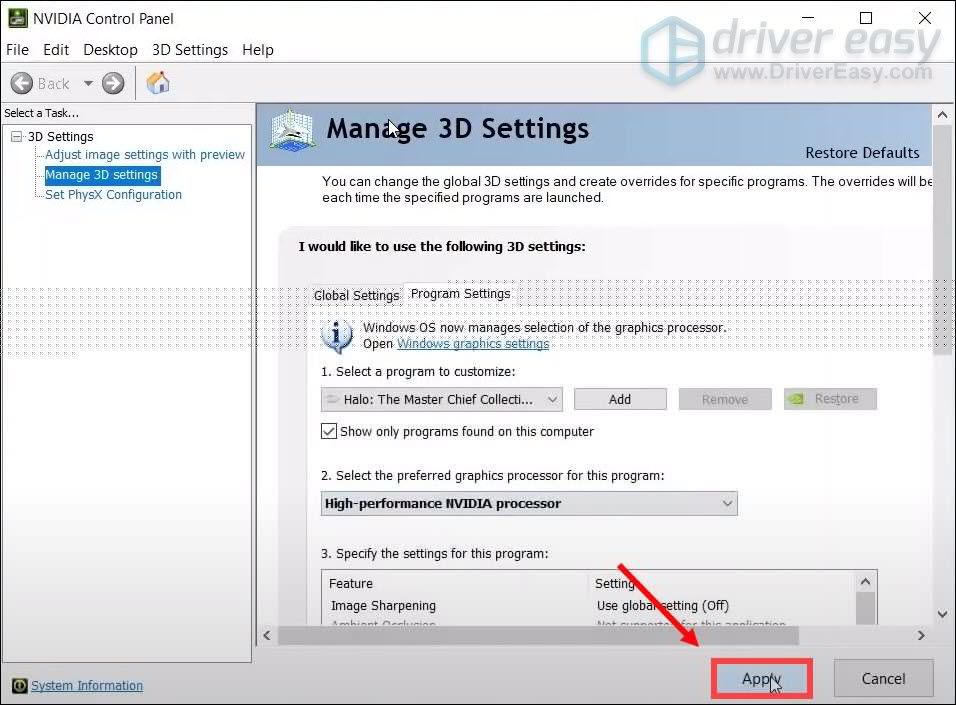
Теперь вы можете запускать свою игру.
Если вы пользователь AMD
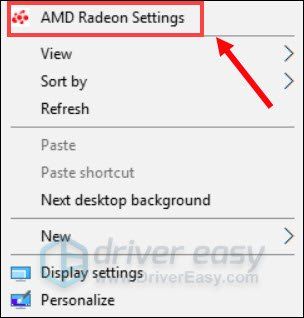
1) На рабочем столе щелкните правой кнопкой мыши пустое место и выберите Настройки AMD Radeon .
2) Перейдите к Предпочтения> Дополнительные настройки> Настройки графического приложения с переключением питания .
3) Выберите игру из списка приложений. Если его нет в списке, щелкните значок Добавить приложение и выберите EXE-файл игры в каталоге установки игры.
4) В колонке Настройки графики , назначьте Высокая производительность профиль к игре.
После того, как вы применили изменения, попробуйте запустить игру, чтобы проверить, появляется ли сообщение об ошибке.
Исправление 6. Отключите разгон и оверлеи.
Если вы используете MSI Afterburner или другие программы настройки графического процессора, вы не сможете играть в игру плавно. Движок игры на самом деле не поддерживает разогнанные карты. А разгон может вызвать нестабильность игры и, как следствие, вылет игры. Поэтому, чтобы исправить это, вы должны отключить его.
Кроме того, очень важно удалить все эти оверлеи, Steam, Discord или любые другие оверлеи, которые вы используете. Обычно это вызывает некоторые проблемы, такие как сбои, что влияет на вашу производительность.
Вы можете отключить оверлеи на Пар , Опыт Geforce и Раздор следуя приведенным ниже инструкциям:
Отключить оверлей Steam
1) Откройте свой клиент Steam, выберите БИБЛИОТЕКА таб. Перейдите к своей игре Halo: Коллекция Мастера Чифа . Щелкните его правой кнопкой мыши и выберите Характеристики .
2) Под ОБЩАЯ вкладка, снимите флажок Включите оверлей Steam во время игры .
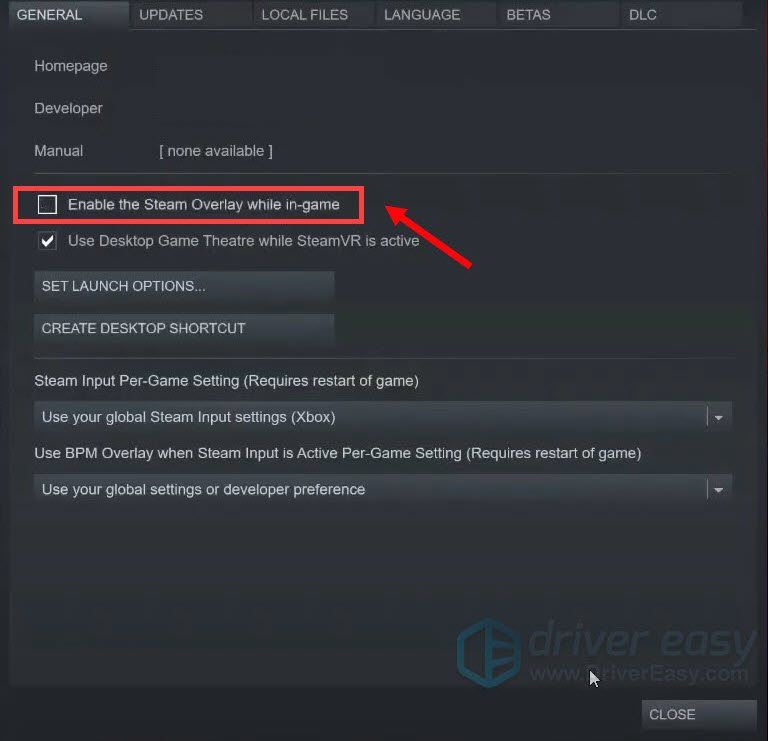
После применения изменений выйдите из Steam и запустите игру, чтобы проверить, устранило ли это проблему.
Отключить внутриигровой оверлей Geforce Experience
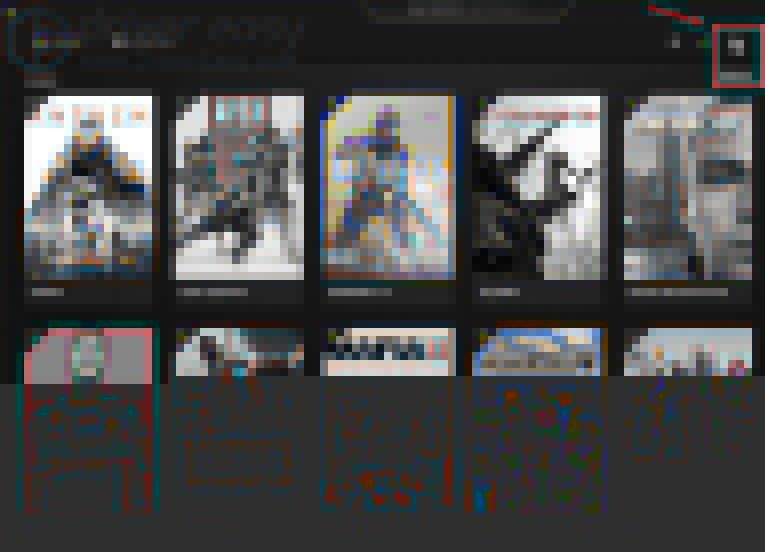
1) Нажмите на Настройки икона.
2) Под ОБЩАЯ вкладка, прокрутите вниз и переключитесь В ИГРЕ НАВЕРХ к ВЫКЛЮЧЕННЫЙ .
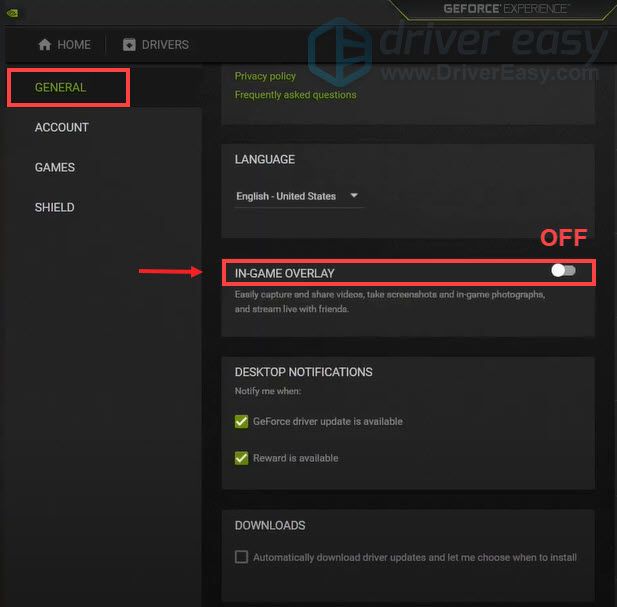
После того, как вы применили изменения, не забудьте выйти из приложения.
Отключить наложение Discord
Если у вас запущен Discord, вы можете отключить оверлей, выполнив следующие действия:
1) Нажмите на Настройки пользователей икона.
2) Нажмите на Оверлей и переключить Включить внутриигровой оверлей к ВЫКЛЮЧЕННЫЙ .
После применения изменений выйдите из Discord.
В заключение, есть ряд причин, вызвавших сбой Fatal Error, включая устаревшие драйверы, поврежденные или отсутствующие файлы игры и т. Д. Надеюсь, методы, описанные в этом посте, помогут вам вернуться в игру. Если у вас есть идеи или вопросы, оставьте нам комментарий ниже.
Halo MCC PC players are experiencing errors and issues like D3D Device Lost, fatal error, crash at launch, performance issues, missing .dll files, crackling audio, and more. Here I have compiled a list of errors and issues that players are experiencing along with their fixes and workarounds.
Last updated on November 18th, 2020 at 03:32 pm
Halo MCC Crash, Stuttering, And Fixes
Halo The Master Chief Collection is slowly rolling out its games to PC. Now 343 Industries have launched Halo Reach, Halo CE, Halo 2 Anniversary, Halo 3, Halo 3 ODST, and Halo 4 as part of the collection.
However, Halo MCC players are facing errors and issues like fatal error, D3D Device Lost, Easy Anti-Cheat errors, crash at startup, low FPS, and more.
The following are the errors and issues that players are experiencing with Halo The Master Chief Collection along with their fixes and workarounds.
Groundhog.dll Fix
Halo MCC players are experiencing the Groundhog.dll error as they launch the game. The error also mentions the path to the .dll file. Navigate to the path and delete the file.
Verify game files from Steam and it’ll automatically download the deleted file. Now launch the game and the Groundhog error will be fixes.
Halo Not Responding Fix
Some players are reporting that when they launch Halo 2, the game crashes with an error message, Halo not responding. Apparently, this issue is related to your audio device. Open Settings > System > Sound > App Volume & Device Preferences. Select the current audio output device for the game and the issue will be fixed.
Crash Fix
A lot of Halo MCC players are reporting that they are expreuncing in-game crash while playing Halo Reach, Halo CE, Halo 2 Anniversary, Halo 3, Halo 3 ODST, and Halo 4. Here are the fixes for Halo crashing while playing.
One reason for the Halo to crash might be the use of third-party tools and software like MSI Afterburner. Disable any third-party tools you are using along with Steam and GeForce experience. This should fix the game from crashing while playing.
Another reason for Halo Reach, Halo CE, Halo 2 Anniversary, Halo 3, Halo 3 ODST, Halo 4 to crash while playing might be the GPU. Either the GPU is overclocked or old. If the GPU is overclocked, revert it back to its default clock speed even if its factory overclocked. If the GPU is old then use MSI Afterburner to drop the game’s GPU clock by 100 MHz.
If you don’t want to mess with GPU clocks, then you can cap the game’s FPS to reduce GPU load. Open Nvidia Control Panel > Manage 3D Settings > Program Settings > select the game. Turn on “Max FPS Limit” and then set a value for it.
This is a bit of trial and error to find at which max FPS the game will be stable enough to not crash. This will fix the in-game crash issue with Halo MCC.
D3D Device Lost Fix
MCC players are reporting that when they launch Halo CE, Halo Reach, Halo 2, Halo 3, or Halo 4 they get one of the following Fatal errors.
Unreal Engine is exiting due to D3D device being lost
LowLevelFatalError – D3D device being lost
LowLevelFatalError [File:Unkown] [Line:200] Unreal Engine is exiting due to D3D device being lost. (Error: 0x887A0006- ‘HUNG’)
“D3D device being lost” error is related to the GPU in terms of the game putting too much load on the GPU to handle. First, I would recommend installing another driver version for the GPU. Some times the GPU driver can cause the “D3D device being lost” error.
If the driver update doesn’t fix it then either the GPU is overclocked, old, or simply the game is unoptimized and putting an unreasonable load on the GPU.
In case the GPU is overclocked, even if it’s factory overclocked, then revert it back to its default clock speed. If the GPU is old, then players can use MSI Afterburner to drop the GPU clock speed by 100 MHz. Ideally, players won’t have to drop it more than 200 MHz.
If players don’t want to mess with the GPU clock speed, then they can fix this error by locking the game’s FPS. Open Nvidia Control Panel > Manage 3D Settings > Program Settings > Select the game. Enable “Max FPS Limit” and this is a bit of trial and error to find at which FPS limited the “D3D device being lost” error will be fixed.
There is another fix for the LowLevelFatalError. Go to your Steam library > right-click the game > properties > set launch options. Paste the following and press OK.
-autoconfig -heapsize 2097152 -windowed -refresh 60
This will fix the LowLevelFatalError with Halo: The Master Chief Collection.
Fatal Error Fix
Players are reporting that when they launch Halo MCC, the game crashes with Fatal error and “The UE4-MCC Game has crashed and will close” error message. This error is occurring for Windows 7 players.
Your OS is probably not updated, Download and install this update and the error will be fixed. If the error persists, installing the update KB3080149 will fix it.
Easy Anti-Cheat Fix
Players are also reporting issues with Easy Anti-cheat while trying to play Halo MCC. According to players, they get one of the following errors.
Unknown file version (D:/Program Files (x86)SteamsteamappscommonHalo The Master Chief Collectionhalo1halo1.dll)
or
Easy Anti-Cheat: Untrusted system file (C:WindowsSystem32normaliz.dll)
This error is related to Microsoft Visual C++ Redistributable. Uninstall all versions of Microsoft Visual C++ Redistributable from your PC and download and install the latest Microsoft Visual C++ Redistributable both x86 and x64. This will fix the Easy Anti-Cheat errors.
In case the error persists, disable discord if you are using it. If that doesn’t work, then exclude the game’s folder from your anti-virus/Windows Defender. This will fix the errors.
Crash At Startup, Game Not Launching Fix
Halo The Master Chief Collection crashing at launch or not launching at all it another issue PC players are experiencing. Here are a few fixes and workarounds that will help fix this issue.
Lack of admin rights can cause the game to crash at startup. Right-click on the game’s exe > Properties > Compatibility tab > check “Run this program as administrator”. Apply the change and start the game, it should be working fine.
Another reason for the game to crash at startup could be the anti-virus/Windows Defender. Either disable the anti-virus or exclude the game’s install folder from it. This should get the game working again.
Third-party monitoring tools like MSI Afterburn is another reason why Halo MCC can crash at launch. Disable any third-party utility you are using and the issue will be fixed. If you are using MSI Afterburner and disabling it hasn’t resolved the issue then follow the steps below.
- Open RivaTuner Statistics Server(RTSS).
- Click the Add button and navigate to the game’s folder.
- Add the game’s exe under Application profile properties.
- Set Application detection level to None for the game application.
- Close RivaTuner Statistics Server.
X3DAudio1_7.dll, XINPUT1_3.dll, XAPOFX1_5.dll Not Found Fix
Halo MCC PC players are experiencing errors telling them that they are missing certain DirectX 11 related .dll files. These missing .dll include:
X3DAudio1_7.dll
XINPUT1_3.dll
XAPOFX1_5.dll
THee fix for these missing .dll files is simple. Just download the latest DirectX files and install them.
No Audio Depth, Missing Center Audio Channel Fix
This audio issue is occurring for Halo Reach players. There is a workaround that might fix the audio, however, it won’t work for everyone.
Navigate to the game’s install folder > data> audio > soundbanks.xml. Open the file in notepad and change the priorities to below 9. Set the priority to 7 for init and 5 for the other. Save the changes you just made and the Halo Rach will start outputting audio with proper audio depth.
As for the no audio issue, open Settings > System > Sound > Sound Control Panel. A new window will open, select your correct audio output device and set it as default.
If the game’s audio is still not working, then open Settings > System > Sound > App Volume & Device Preferences. Here select the correct audio output for the game. This will fix the no audio issue.
Buzzing/Crackling Audio Fix
Players are reporting that they are not getting any sound or the audio is cracking. These audio issues are mostly occurring with Halo Reach and Halo 2 anniversary. There are fixes for these audio issues.
For the cracking or buzzing audio, open Settings > System > Sound > click “Sound Control Panel”. Select your active audio device > Properties > Advanced tab. Select the 32000Hz audio range and apply the change. This will fix the audio buzzing and crackling issue.
UE4 Crash Fix
This is another error that Halo MCC players are experiencing. To fix this error players need to limit the game’s FPS 60 and change the display mode to Windowed. Look under “D3D Device Lost Fix” to see how to lock the game’s FPS.
Error 0xc000007b, KERNEL32.DLL Error Fix
Error 0xc000007b and KERNEL32.DLL “AddDLLDirectory could not be located” errors are occurring for Halo Reach players. These can be easily fixed by installing the latest Microsoft Visual C++ Redistributable files both x86 and x64.
Missing .dll Files Fix
A lot of Halo MCC players are reporting that they getting missing .dll files error as they launch the game. These errors include:
Missing CONCRT140.dll
Missing MSVCP140.dll
Missing CONCRT140.dll
Missing VCRUNTIME140.dll
To fix these missing .dll file errors, just install the latest Microsoft Visual C+++ Redistributables.
100% CPU Usage Fix
Players are reporting that the CPU usage hits 100% when they launch Halo The Master Chief Collection. This issue is actually being caused by mouse/keyboard profiling software. If you are using any such software, it causes Easy Anti-cheat to use CPU which leads to high CPU usage. Disable any profiling or RGB software you are using the issue will be fixed.
Low FPS, Stuttering Fix
Performance is a common issue with PC video games. It’s either because of the bad optimization or the system is not up to par. Halo MCC players are reporting performance issues with Halo Reach, Halo CE, Halo 2, Halo 3, and Halo 3 ODST like stuttering, low FPS, or random FPS drops.
First, install the latest GPU drivers and check if there is any background process using too much CPU, GPU, or HDD.
If you are playing the Halo MCC on a laptop with a dedicated GPU, then chances are the game isn’t switching and hence causing performance issues. Players need to make sure that the game switched to the dedicated GPU and here is how to do it.
For Nvidia GPUs, open Nvidia Control Panel > Manage 3D Settings > Program Settings > select the game > select “High-performance Nvidia processor” under preferred preferred graphics option.
As for AMD GPU users, open Radeon Settings > Preferences > Additional Settings > Power > Switchable Graphics Application Settings. Select the game and select the “High-Performance profile” to the game under Graphics Settings.
If the above scenario doesn’t apply to you, then start the game and disable in-game v.sync. Close the game and open Nvidia Control Panel > Manage 3D Settings > Program Settings > select the game. Make the following changes.
Anti-aliasing-FXAA – “Off”
Anti-aliasing-Gamma Correction – “Off”
CUDA GPUs – “All”
Low Latency Mode – Ultra.
Set Power Management to “Prefer Maximum Performance”
Shader Cache – “On” only if you are using an HDD. Don’t need to enable it for an SSD.
Set Texture filtering – Quality to “High Performance”
Triple Buffering – “Off”
Set Vertical Syn to “On”
This will fix the performance issue such as stuttering and low FPS. In case the performance issues are still persisting. Then just follow the steps I mentioned above but set Vertical Syn to “Fast”. This will not only fix stuttering but, will also provide a potential PFS boost is you have decent enough CPU and GPU.
That is all for your Halo MCC fixes for errors like Fatal error, D3D Device Lost Fix, missing .dll files, stuttering, and more. If you are facing errors and issues with other PC games or your PC then also see our hub for commonly occurring PC errors and their fixes.
How to fix the fatal error in Halo The Master Chief Collection — «The UE4-MCC Game has crashed and will close. Fatal error!»
That error message pops up for some Halo The Master Chief Collection players when they try to launch the game. Here are a few things that will help you to fix the fatal error in Halo MCC.
1. Windowed mode
If you are trying to play the game on Steam, you can try running the game in windowed screen mode. Please follow the instructions below and see if it resolves the issue for you.
- Go to your Steam library page
- Right-click on Halo: The Master Chief Collection
- Select «Properties…«
- Click the «Set Launch Options…» button in the General tab.
- Enter -windowed into box.
-windowed- Click OK and play the game.
2. Graphics drivers
Uninstall your graphics drivers using DDU. Then download and install the latest drivers.
If latest driver version already installed on your PC, perhaps the current driver may be causing the problem. So downgrading your GPU driver might work.
3. Verify game files
In some cases, the fatal error will appear when there is an issue with the installation of Halo MCC.
- Go to the Library page on Steam.
- Right-click on Halo: The Master Chief Collection
- Select Properties
- Go to the Local Files tab.
- Click the «Verify Integrity of Game Files«
Solution for Linux users
In addition, I will share LukasRuppert’s solution for Linux users.
- Run in gdb (use
PROTON_DUMP_DEBUG_COMMANDS=1and/tmp/proton_.../gdb_run)
PROTON_DUMP_DEBUG_COMMANDS=1/tmp/proton_.../gdb_run- Enter the following
b *0x141188676
c
set $rax=1
si
si
set $rax=0
c
and a few more continues (c) whenever the screen hangs
- Download this: https://github.com/ValveSoftware/Proton/files/5556338/mcc_patch.zip
- Unzip it in «
.../steamapps/common/Halo The Master Chief Collection/MCC/Binaries/Win64/« - Run «
sh apply_patch.sh«
sh apply_patch.shHalo is one of the most popular FPS games ever released. The game has been widely popularised on Windows and Xbox and can be a joy to play. That said, as made as it is, it isn’t immune to random bugs and glitches from time to time.
In this article, we’re talking about the Halo MCC fatal error, its causes, and how you can fix the problem.
What causes this error?
Several different issues can trigger the error. Common causes include:
- CPU or GPU is overloaded.
- Internet connectivity issues.
- Halo MCC servers are down.
- PC specs don’t match the game’s minimum requirements.
- Memory issues.
- Missing or corrupt game files.
Also read: How to fix WoW error 134 fatal condition?
How to fix this?
Here are seven fixes you can try out.
Restart your router
Restarting your router can help eliminate any unseen network or connectivity issues you may face. You have to turn off your router, wait a bit, and then turn it back on again.
Check your PC Specs
Another reason many games might crash is that your CPU and GPU cannot handle the game. If your computer doesn’t meet the minimum required specifications to run the game, you can run into crashes, glitches, frame drops and all sorts of different problems.
If you meet the minimum requirements, ensure there’s enough headroom for the game to run. Try closing some background programs, such as any music players or web browsers to free up some resources for the game.
Restart your game
One of the easiest ways to fix the problem is to restart the game. Restarting games and programs often resolves temporary bugs that can cause crashes or connectivity issues. Once the game is stopped completely (you can verify this using the Task Manager), relaunch it using the Steam launcher, and it should work just fine.
Check Halo MCC server status
A brief outage affecting #HaloMCC has been resolved. If you’re currently in-game and you’re unable to join a matchmaking session, close and then restart the game. If you experience any other issues in-game, please file a ticket at https://t.co/Ya2f8ZXD20.
— Halo Support (@HaloSupport) February 14, 2023
Another thing that you should do is check to see if Halo’s game servers are online and functioning as they should. You can refer to the official Halo Twitter account for any updates on outages or check third-party sites like Downdetector to see if there are any issues with the game.
Also read: Why is Netflix not working on Roku? 7 Fixes
Verify Game Files
Corrupted game files can often lead to issues like this, not just in Halo but in other games as well. Luckily, Steam has a built-in feature that verifies your game files and reinstalls any files that might be damaged. Follow these steps.
Step 1: Head over to your Steam Library, right-click on Halo MCC and select Properties.
Step 2: Head over to the Local Files tab.
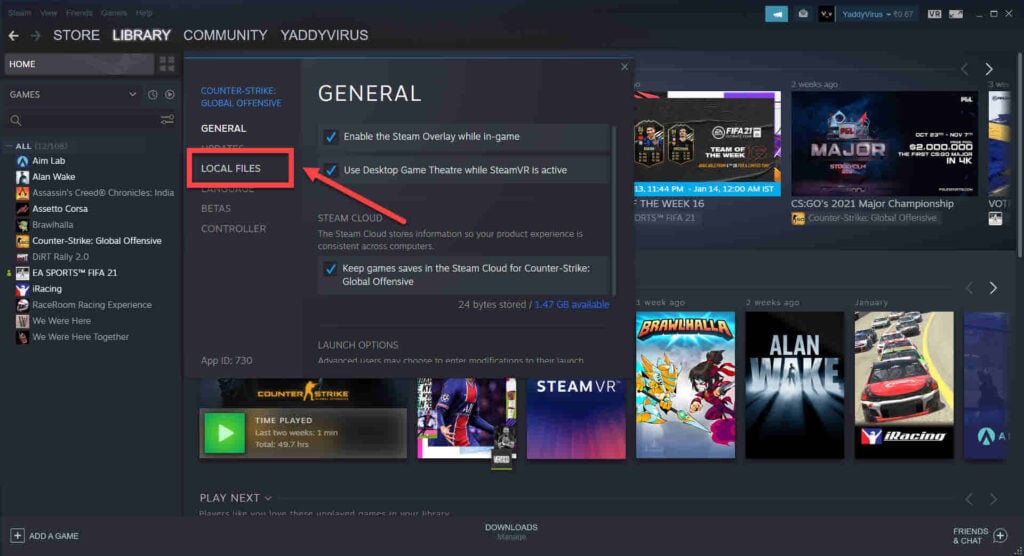
Step 3: Click on Verify integrity of local files… and let Steam do its thing.
Now try relaunching the game.
Update your GPU drivers
Outdated GPU drivers can also cause this issue in particular. While you should update all your drivers, take special care of your display drivers if you run into an error like this.
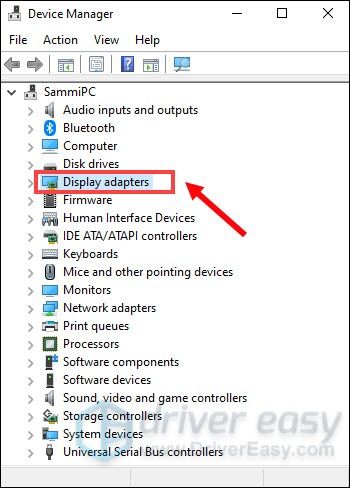
Step 1: Right-click Start and select Device Manager from the menu.
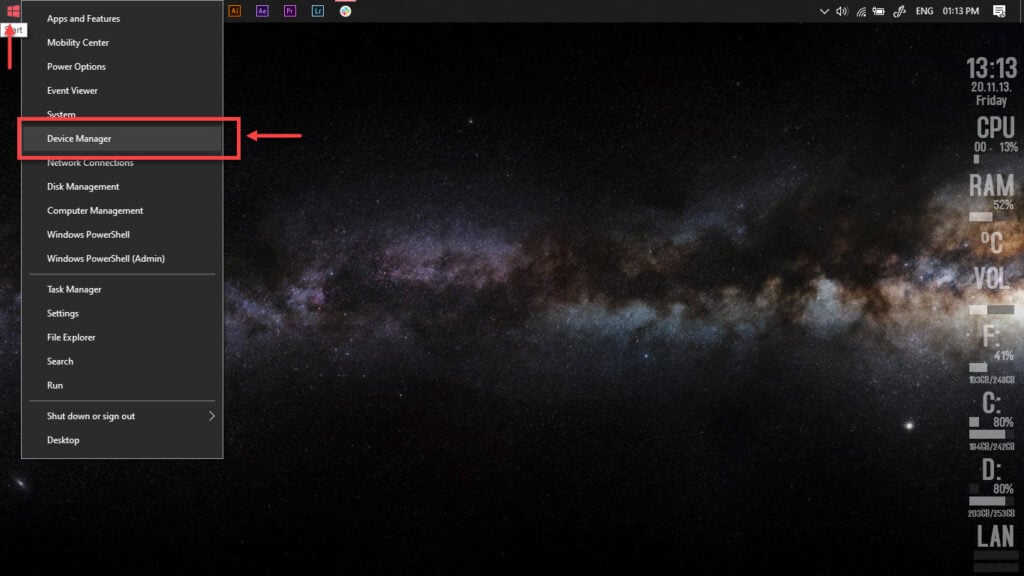
Step 2: Under Display Adaptors, find your graphics card’s name, right-click it, and click on Update Drivers.

Step 3: Click on Search automatically for drivers. Windows will then automatically look for and download the latest drivers for your particular GPU.
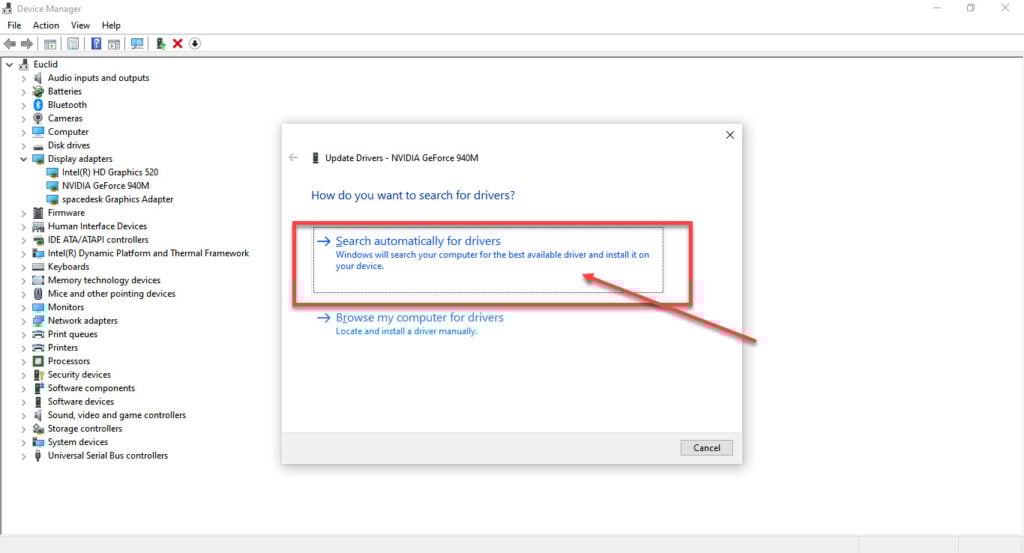
While this should help resolve the error, if it doesn’t, click Uninstall device and restart your PC to force Windows to install the required drivers. You can then update them later.
Reinstall
If checking the game files didn’t work out, your best bet is to delete the game from Steam and reinstall it from scratch. Ensure to overwrite your game save with the new installation, as corrupt files can cause this issue.
Also read: How to fix Darktide backend error: Error signing in?
Неустранимая ошибка Halo CE DX возникает, когда пользователи Windows 10 пытаются воспроизвести устаревшую версию Halo: Combat Evolved. Дополнительная ошибка предполагает, что проблема возникает из-за отсутствия установки DirectX 9, но в большинстве случаев это не является источником ошибки.
Фатальная ошибка Halo CE DX в Windows 10
Если Direct X 9.0b не установлен, вы столкнетесь с этой проблемой из-за отсутствия некоторых файлов DLL (Dynamic Link Library). В этом случае проще всего решить проблему — запустить установщик среды выполнения DirectX web.
Но в подавляющем большинстве случаев проблема возникает из-за несовместимости игры с Windows 10. Чтобы обойти это, вы можете установить патч Bungie, запустить исполняемый файл в режиме совместимости или установить пользовательскую версию Halo Combat Evolved (Halo CE). CE).
Способ 1: установить Direct X 9.0b
Несмотря на то, что это, вероятно, не является причиной проблемы, рекомендуется запустить это руководство по устранению неполадок, убедившись, что на вашем компьютере есть все файлы DLL (Dynamic Link Library), необходимые для запуска этой игры.
Есть несколько способов, которые позволят вам это сделать, но самый простой способ — просто запустить веб-установщик DirectX и установить все, что он рекомендует. Эта веб-утилита просканирует вашу систему и автоматически установит пакеты DirectX, которые отсутствуют в вашей установке.
Вот краткое руководство по обновлению версий DirectX до последних:
Примечание. Имейте в виду, что это кумулятивная установка, то есть она будет устанавливать все предыдущие версии DirectX, а не только последнюю.
- Посетите эту ссылку (Вот), выберите соответствующий язык и нажмите кнопку «Загрузить».
Загрузка веб-установщика среды выполнения DirectX для конечного пользователя
- После перехода к следующему экрану обязательно снимите флажки с рекомендациями Microsoft по распространению вредоносного ПО, нажав кнопку «Нет, спасибо» и перейдите к кнопке установщика среды выполнения DirectX для конечного пользователя.
- Дождитесь загрузки установщика dxwebsetup.exe, затем дважды щелкните по нему и при необходимости примите приглашение UAC (Контроль учетных записей). Далее следуйте инструкциям на экране для завершения установки.
Установка DirectX для конечного пользователя
- После завершения установки перезагрузите компьютер и запустите игру после следующего запуска, чтобы увидеть, была ли проблема решена.
Если вы все еще сталкиваетесь с той же фатальной ошибкой Halo CE DX, перейдите к следующему потенциальному исправлению ниже.
Способ 2: установить патч Bungie для Windows 10
Поскольку Halo Combat Evolved является устаревшей игрой, которая изначально не была построена для новой инфраструктуры Windows, присутствующей в Windows 8.1 в Windows 10, вы можете столкнуться с рядом проблем, вызванных несовместимостью (включая фатальную ошибку Halo CE DX).
К счастью, студия, создавшая эту игру (Bungie), выпустила патч, тесно сотрудничая с некоторыми членами сообщества, что позволяет устаревшей игре нормально работать на Windows 10.
Патч очень легкий и автоматически устанавливается поверх существующих файлов игры.
Вот краткое руководство о том, как загрузить и установить его, чтобы исправить проблемы Halo CE DX Fatal Error:
- Откройте браузер по умолчанию и перейдите по этой ссылке (Вот) скачать патч.
- После завершения загрузки дважды щелкните исполняемый файл и щелкните запрос UAC (контроль учетных записей), чтобы предоставить доступ администратора.
- Затем установщик должен автоматически найти ваши игровые файлы Halo CE и переопределить их новым патчем, сделав его совместимым с Windows 10.
- После завершения операции перезагрузите компьютер и посмотрите, будет ли проблема решена после следующего запуска компьютера.
Если вы по-прежнему сталкиваетесь с фатальной ошибкой Halo CE DX при попытке запустить Halo Combat Evolved, перейдите к следующему потенциальному исправлению ниже.
Один быстрый способ, который может помочь вам, если вы столкнулись с проблемой в Windows 10, — заставить исполняемый файл запуска работать в режиме совместимости с Windows XP.
Хотя некоторые пользователи сочли этот обходной путь эффективным, позволив им запустить игру, он не решает проблему полностью. Как сообщают несколько затронутых пользователей, эта проблема может вызвать сбой определенных карт в течение периода загрузки.
Но если вы хотите попробовать это, вот краткое руководство по запуску исполняемого файла Halo CE в режиме совместимости:
- Щелкните правой кнопкой мыши ярлык запуска HALO CE и выберите «Свойства» в контекстном меню.
Доступ к экрану свойств Halo
- На экране «Свойства» исполняемого файла Halo CE выберите вкладку «Совместимость» на ленточной панели вверху.
- Затем установите флажок «Запустить эту программу в режиме совместимости» и выберите «Windows 7» в раскрывающемся меню.
Использование режима совместимости с Windows 7
- Сохраните модификацию, затем запустите игру, чтобы увидеть, была ли проблема решена.
Если та же фатальная ошибка Halo CE DX все еще происходит, перейдите к следующему потенциальному исправлению ниже.
Способ 4: установка Halo CE Custom Edition
Имейте в виду, что стандартная версия Halo CE не предназначена для работы в Windows 10 или Windows 8.1. Это происходит главным образом потому, что эти новые операционные системы заменили части Direct Draw и Direct 3d на более новую, улучшенную производительность программную эмуляцию процессора.
Некоторые игроки Halo говорят, что в новых сборках Windows 10 это единственный способ запустить Halo CE для Windows 10, поскольку это единственная версия игры, оснащенная переходным слоем, который преобразует вызовы Direct Draw и Direct 3D в Open GL.
Вот краткое руководство о том, как установить эту версию и настроить ее для работы на компьютере с Windows 10:
- Посетите эту ссылку (Вот) начать установку Halo CE CE (Custom Edition).
- Дождитесь завершения загрузки, затем дважды щелкните исполняемый файл установки и нажмите «Да» в окне «Контроль учетных записей», чтобы предоставить доступ администратора.
- Далее согласитесь с лицензионным соглашением и выберите место, чтобы начать установку Halo CE CE (Custom Edition).
Установка Halo CE CE
- Нажмите «Установить», чтобы начать установку, затем дождитесь завершения процесса.
Установка Halo Combat Evolved (Custom Edition)
- Введите лицензионный ключ и завершите установку, затем перезагрузите компьютер.
- После завершения следующей последовательности запуска запустите игру и установите все доступные с тех пор обновления.