Issue
The message <41 CHK PAPER SZE> appears in the display on the control panel.
The message <41 CHK PAPER SZE> appears in the display on the control panel.
Cause and Solution
The size of the paper loaded in the multi-purpose tray or paper cassette is different from the setting for TRAY PAPER SIZE, CASSETTE2 SIZE, CASSETTE3 SIZE, or CASSETTE4 SIZE specified from the computer or control panel.
You are using UFR II Printer Driver, and you loaded custom paper of its long edges 297.0 mm or less and printed when TRAY PAPER SIZE, CASSETTE2 SIZE, CASSETTE3 SIZE, or CASSETTE4 SIZE in the FEEDER MENU options in the SETUP menu was set to MIXED SIZE.
Load the paper in landscape orientation, then print again.
When the UFR II printer driver was not used, custom size paper was loaded in landscape orientation to be printed.
Load the paper in portrait orientation, then print again.
CHK PAPER SIZE in the USER MAIN. options in the SETUP is set to ON.
Solution
CHK PAPER SIZE specifies whether the printer should stop printing, displaying the message <41 CHK PAPER SZE> or continue printing when TRAY PAPER SIZE, CASSETTE2 SIZE, CASSETTE3 SIZE, or CASSETTE4 SIZE is set to MIXED SIZES.
IMPORTANT
For automatic 2-sided printing, <41 CHK PAPER SZE> always appears and the printer stops printing regardless of the setting for this item.
1. Move to the printer, then press [Online] on the control panel.
The Online indicator goes off, allowing you to specify the settings on the control panel.
2. Press [Settings].
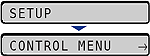
3. Select USER MAIN. using [  ] and [
  ], then press [OK].
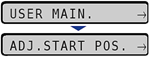
The item for USER MAIN. is displayed.
4. Select CHK PAPER SIZE using [ ] and [ ], then press [OK].
5. Select ON or OFF using [ ] and [ ], then press [OK].
If OFF is specified, the printer prints without performing a print check even when the paper size specified in the application is different from the size of the paper loaded in the multi-purpose tray or paper cassette. However, the printing speed may drop. Also, because the paper is printed at the paper size specified in the application, blank areas may appear on the printed paper or part of the images may be missing when the size of the paper loaded in the multi-purpose tray or paper cassette is different from the paper size specified in the application.
If ON is specified, the printer may stop printing, displaying <41 CHK PAPER SZE>, when the paper size specified in the application is different from the size of the paper loaded in the multi-purpose tray or paper cassette. The paper on which the error occurred is output automatically. You can also continue printing by pressing [Online]. However, the data may not be printed properly, or a paper jam may occur.
IMPORTANT
For automatic 2-sided printing, <41 CHK PAPER SZE> always appears and the printer stops printing regardless of the setting for this item.
Модератор: vetal


 Привет уважаемое сообщество!
Сабж: lbp canon 6650 dn
Проблема: При отправке на печать 50 страниц, принтер 3 раза стает в ошибку «41 chk paper size». Нужно подойти к нему и нажать зелёненькую кнопку кнопку и печать возобновиться. при печати 5 пачек бумаги в день со слов клиента это очень … мешает ему. page count 590 800 (!)
кто то сталкивался с такой проблемой? я так понимаю лист проходит слишком быстро или медленно и датчики регистрации и печной «думают» что формат бумаги не соответствует…
Поиск:
http://www.startcopy.su/forum/m/10356.html
картриджа у меня такого нету, и на заправку оч редко приносят…
ролик подачи сейчас поставлю, сейчас разберу гляну печку…
Если у одного человека есть воображаемый друг, то он — ненормальный. Если же у кучи людей есть воображаемый друг, то это религия.
с 01.03.2017 свалил в Польшу до ~~~
-

svzhuk
- Засыпщик
-

- Персональный альбом

![]()
![]() svzhuk » Пт май 16, 2014 11:51 am
svzhuk » Пт май 16, 2014 11:51 am
всем привет) не отписал — с ошибкой тогда разобрался, была проблема с резиновым валом и бушингами.
сегодня опять принесли его. подскажите, 719 картридж. вот такой дефект:
http://goo.gl/5vnfwA
и увеличение
http://goo.gl/iN0Cw7
стоп тест делал, после картриджа. идет 8 полосок с точками… PCR?
Добавлено спустя 38 минут 29 секунд:
PCR поменял, не он…
Последний раз редактировалось svzhuk Вт май 20, 2014 9:58 am, всего редактировалось 1 раз.
Если у одного человека есть воображаемый друг, то он — ненормальный. Если же у кучи людей есть воображаемый друг, то это религия.
с 01.03.2017 свалил в Польшу до ~~~
-
svzhuk
- Засыпщик
-
- Персональный альбом
![]()
![]() svzhuk » Пт май 16, 2014 1:10 pm
svzhuk » Пт май 16, 2014 1:10 pm
kvg писал(а):Это полоски такие или подчеркнули дефект?
это я карандашом  полоски идут фоном с точками, с начало я думал что по всему листу фон, а потом разглядел что даже есть интервал и их на листу 8 штук. на увеличенном скане видно эти точки.
п.с. сори за качество скана, на оригинале заметно очень
Добавлено спустя 2 минуты 9 секунд:
canon lbp 6650 dn ошибка
уточню — полоса ровно 2.5 см заполненная фоном с мелкими точками. потом 1.5 см чистая печать, и опять по кругу
Если у одного человека есть воображаемый друг, то он — ненормальный. Если же у кучи людей есть воображаемый друг, то это религия.
с 01.03.2017 свалил в Польшу до ~~~
-
svzhuk
- Засыпщик
-
- Персональный альбом
![]()
![]() svzhuk » Вт май 20, 2014 9:59 am
svzhuk » Вт май 20, 2014 9:59 am
svzhuk писал(а):PCR поменял, не он…
оказалась втулка на PCR, в тонере была. сразу не посмотрел 
Если у одного человека есть воображаемый друг, то он — ненормальный. Если же у кучи людей есть воображаемый друг, то это религия.
с 01.03.2017 свалил в Польшу до ~~~
-
svzhuk
- Засыпщик
-
- Персональный альбом
![]()
-
-
Canon G1010 series, G2010 series, G3010 series, G4010 series
Verter в форуме Файлообменник
- 0
- 3564
Verter

Ср авг 19, 2020 12:00 pm
-
Canon G1010 series, G2010 series, G3010 series, G4010 series
-
-
Canon IR 2018 выдает ошибку «out of toner change toner»
Sveterkom в форуме Принтеры, МФУ, копиры формата A3
- 11
- 9985
Goldwater
Чт окт 08, 2020 11:29 pm
-
Canon IR 2018 выдает ошибку «out of toner change toner»
-
-
Canon G1000 series, G2000 series, G3000 series Service Manua
Verter в форуме Файлообменник
- 10
- 5860
Azelus
Пт июн 12, 2020 4:46 am
-
Canon G1000 series, G2000 series, G3000 series Service Manua
-
-
Canon IR 3225 «засыпает»
johnnybravo в форуме Принтеры, МФУ, копиры формата A3
- 4
- 7155
johnnybravo
Пн июл 23, 2012 1:32 pm
-
Canon IR 3225 «засыпает»
-
-
Canon mf3010 сразу мигает «о»
Sveterkom в форуме Принтеры, МФУ, факсы, копиры формата A4
- 2
- 2013
Сергей Владимиров
Пт янв 21, 2022 2:04 pm
-
Canon mf3010 сразу мигает «о»
Вернуться в Принтеры, МФУ, факсы, копиры формата A4
Кто сейчас на форуме
Сейчас этот форум просматривают: нет зарегистрированных пользователей и гости: 85
Коды ошибок, актуальные для Canon imagePROGRAF iPF670, iPF605, iPF770, iPF750, iPF710, iPF650, iPF700, iPF785, iPF610, iPF765, iPF680, iPF760, iPF510, iPF780, iPF600, iPF500, iPF685, iPF720, iPF670e, iPF671, iPF671e (для картриджей PFI-102, PFI-104, PFI-107).
Check printing results
Call for service.
Call for service.
После проверки датчика деталей в сервисном меню, замените деталь, указанную в ошибке.
Проверьте загруженные данные перед повтором печати.
Проверьте количество бумаги.
Exchange for the compatible paper to HP-GL/2.
The memory is full.
Check if there is the non-image area of the print. Verify the transmitted data before reprinting.
The memory is full.
The memory is full.
The parameter is out of range.
Verify the transmitted data before reprinting.
This command is not supported.
Delete unwanted data
Delete unneeded jobs stored in Personal Boxes.
Now printing without saving data.
Delete unneeded jobs stored in Personal Boxs.
Prepare to replace the ink.
Renew the C ink tank
Prepare to replace the ink.
Renew the M ink tank.
Prepare to replace the ink.
Renew the Y ink tank.
Prepare to replace the ink.
Renew the MBK ink tank.
Prepare to replace the ink.
Renew the BK ink tank.
Replace the ink tank.
Renew the C ink tank.
Replace the ink tank.
Renew the M ink tank.
Replace the ink tank.
Renew the Y ink tank.
Replace the ink tank.
Renew the MBK ink tank.
Replace the ink tank.
Renew the BK ink tank.
Check ink tank.
Attach the C ink tank.
Check ink tank.
Attach the M ink tank.
Check ink tank.
Attach the Y ink tank.
Check ink tank.
Attach the MBK ink tank.
Check ink tank.
Attach the BK ink tank.
Check the media size check. Change the media size.
Delete unwanted data.
Press the stop button to cancel the print job. Delete print jobs from the queue.
Delete unneeded jobs stored on the hard disk.
Press Online to clear error.
Clean the printhead. Identify the nozzles in a nozzle check pattern. Replace the printhead.
Lift the release lever and reload the paper.
Check the leading end of paper. Reload the paper.
Lift the release lever and align leading edge with orange line.
Check the sheet length. Check to see if paper has not jammed.
Lift the release lever and reload the paper.
Check the right edge of paper. Check the paper type.
Lift the release lever and reload the paper.
Check the left edge of paper.
Check the paper type.
Press Online to clear the error and readjust printhead.
Check the paper on which a pattern is printed for smears. Check the environment for interferences from outside light.
Clean the printhead.
Press Online to clear the error and readjust printhead.
Check the paper on which a pattern is printed for smears. Check the environment for interferences from outside light.
Clean the printhead.
Lift the release lever and replace paper with A4/ LTR (vertical) or larger.
Replace with A4/Letter or any larger-sized paper.
Lift the release lever and replace paper with A3/ Ledger (vertical) or larger.
Replace with A3/11″x17″ or any larger-sized paper.
Lift the release lever and replace roll with 10 in. wide or larger roll.
Replace with roll media at least 10 inches in width.
Remove paper and press Load/Eject.
Remove the paper jam and reload the paper.
Lift the release lever and reload paper.
Reload the paper.
Check supported paper sizes.
Replace with larger-sized paper.
Check supported paper sizes.
Replace with smaller-sized paper.
Press Online to clear the error.
Replace with adjustable media.
Lift the release lever.
Correct the skew in the paper and reload it.
Reload paper.
Reload the paper
Press Load/Eject and reload the paper.
Reload the paper
Lift the release lever and reload the paper.
Reload the roll media.
Press Online to clear the error.
Check to see if paper has not jammed.
Press Load/Eject and load sheets.
Load cut sheets at the paper tray port.
Press OK, remove the sheets, and load a roll.
Replace with roll media.
Press Load/Eject and load a roll.
Load roll media.
Turn printer off and install roll feed unit.
Install the roll media unit.
Lift the release lever and replace the roll.
Renew the supply of roll media.
Press Load/Eject and reload the paper.
Check the type of paper that can be fed and reload the paper.
Press Load/Eject and remove the roll.
Load cut sheets at the paper tray port.
03130031-2E23
Turn off printer, wait, then turn on again.
Check the cutter unit.
03130031-2E14
Turn off printer, wait, then turn on again.
Replace the main controller PCB
03130031-2E16
Turn off printer, wait, then turn on again.
Check the mist fan.
03130031-2E17
Turn off printer, wait, then turn on again.
Check the suction fan.
03130031-2E20
Turn off printer, wait, then turn on again.
Check the purge unit.
03130031-2E22
Turn off printer, wait, then turn on again.
Check the purge unit.
03130031-2E23
Turn off printer, wait, then turn on again.
Check the purge unit.
03130031-2E25
Turn off printer, wait, then turn on again.
Check the carriage unit. Check the linear encoder for smears.
03130031-2E26
Turn off printer, wait, then turn on again.
Check the carriage unit and surrounding parts.
03130031-2E27
Turn off printer, wait, then turn on again.
Check the carriage unit and surrounding parts.
03130031-2E1F
Turn off printer, wait, then turn on again.
Check the purge unit.
03130031-2E2A
Turn off printer, wait, then turn on again.
Check the feed roller encoder and surrounding part. Check to see if paper has not jammed.
03130031-2E29
Turn off printer, wait, then turn on again.
Check the roll feed unit. Check roll media. Check to see if paper has not jammed in the printer.
03130031-2E2E
Turn off printer, wait, then turn on again.
Check the roll feed unit.
03130031-4027
Turn off printer, wait, then turn on again.
Check the carriage unit and surrounding parts.
03130031-2E13
Turn off printer, wait, then turn on again.
03130031-2F32
Turn off printer, wait, then turn on again.
Replace the multi sensor unit.
03130031-2F3A
Turn off printer, wait, then turn on again.
Check the ink supply unit.
03130031-2F3B
Turn off printer, wait, then turn on again.
Remove the ink tanks and then reload them. Check the main controller PCB.
03130031-2F70
Turn off printer, wait, then turn on again.
03130031-2F71
Turn off printer, wait, then turn on again.
03130031-2F72
Turn off printer, wait, then turn on again.
03130031-260E
Turn off printer, wait, then turn on again.
Check the carriage unit and surrounding parts. Replace the main controller PCB.
03130031-2618
Turn off printer, wait, then turn on again.
Check the power supply unit.
03130031-260F
Turn off printer, wait, then turn on again.
Turn off printer and check roll feed unit
Replace the roll feed unit.
Turn off printer, wait a while, then turn it on again.
Transmit valid ROM data.
Turn off printer, wait a while, then turn it on again.
Verify the validity of MID data before transferring it.
03130031-2F2B
Turn off printer, wait, then turn on again.
Open top cover and replace the printhead.
Replace printhead
Open top cover and replace the right printhead.
Replace printhead
Open top cover and replace the right printhead.
Replace printhead
03800500-2F40
Turn off printer, wait, then turn on again.
Проверьте блок очистки печатающей головки и окружающие детали.
Проверьте датчик управления головкой и окружающие детали.
Убедитесь, что печатающая головка установлена правильно.
Если визуально все чисто и корректно подключено, нужно пробовать:
Заменить датчик управления головкой.
Заменить главную плату контроллера.
Замените печатающую головку.
Замените каретку.
03800500-2F2F
Turn off printer, wait, then turn on again.
Замените датчик управления печатающей головкой.
Замените печатающую головку.
Identify the head management sensor unit
Replace the head management sensor unit
Replace the printhead
03800500-2F30
Turn off printer, wait, then turn on again.
Замените датчик управления печатающей головкой.
Замените печатающую головку.
Identify the head management sensor unit
Replace the head management sensor unit
Replace the printhead
Press OK and replace ink tank.
Renew the Bk ink tank
Press OK and replace ink tank.
Renew the Y ink tank
Press OK and replace ink tank.
Renew the M ink tank
Press OK and replace ink tank.
Renew the C ink tank
Press OK and replace ink tank.
Renew the MBk ink tank
Press OK and replace ink tank.
Renew the MBk ink tank
Press OK and replace ink tank.
Replace with a fully replenished Bk ink tank
Press OK and replace ink tank.
Replace with a fully replenished Y ink tank
Press OK and replace ink tank.
Replace with a fully replenished M ink tank
Press OK and replace ink tank.
Replace with a fully replenished C ink tank
Press OK and replace ink tank.
Replace with a fully replenished MBk ink tank
Press OK and replace ink tank.
Replace with a valid Bk ink tank
Press OK and replace ink tank.
Replace with a valid Y ink tank
Press OK and replace ink tank.
Replace with a valid M ink tank
Press OK and replace ink tank.
Replace with a valid C ink tank
Press OK and replace ink tank.
Replace with a valid MBk ink tank
Press OK and replace ink tank.
Replace with a valid MBk ink tank
Press OK and check ink tank.
Install a Bk ink tank
Press OK and check ink tank.
Install a Y ink tank
Press OK and check ink tank.
Install a M ink tank
Press OK and check ink tank.
Install a C ink tank
Press OK and check ink tank.
Install a MBk ink tank
Press OK and check ink tank.
Install a MBk ink tank
Turn off printer, wait a while, and turn it on again.
Close the top cover and turn on the printer again.
Turn off printer, wait a while, and turn it on again.
Close the ink tank cover and turn on the printer again.
Replace the maintenance cartridge.
Renew the maintenance cartridge.
Cartridge capacity.
Replace the maintenance cartridge.
Replace the maintenance cartridge.
Replace the maintenance cartridge.
Renew the maintenance cartridge.
Replace the maintenance cartridge.
Renew the maintenance cartridge.
Check roll position.
Online: Print Load/Eject:
Change Paper
Check to see if a borderless printing spacer is installed. Reload the paper.
Check paper size setting.
Online: Print
Load/Eject: Change Paper
Check the paper size. Change the paper size.
Online: Print
Stop: Stop Printing
Load/Eject: Change Paper
Renew the supply of roll media.
Lift the release lever and reload the paper.
Cut paper manually. Check the cutter.
Press Online to clear the error.
Check the multi sensor.
Check the head management sensor.
Online: Print
Stop: Stop Printing
Load/Eject: Change Paper
Exchange for the compatible paper to HP-GL/2 before reprinting.
Delete unwanted data on your computer to resume printing.
Press Stop to cancel printing.
Delete unneeded jobs stored in Personal Boxes.
Cannot save. Delete unwanted data on your computer to resume printing.
Press Stop to cancel printing.
Press OK to reformat
Press the [OK] button to start reformatting the hard disk. When formatting is finished, the printer automatically restarts.
Turn off printer, wait a while, and turn it on again.
Invalid files will be deleted.
Restart the printer. Only the corrupted files will be deleted, and the printer will restart.
Turn off printer, wait, then turn on again.
Check the head management sensor. Replace the head management sensor. Replace the printhead.
Turn off printer, wait, then turn on again.
Check the pinch roller and surrounding part. Replace the pinch roller pressure drive unit.
Install printhead.
Install the printhead.
Replace the printhead.
Check the maintenance cartridge.
Install the maintenance cartridge.
Lift the release lever and reload the paper.
Check the cutter unit and surrounding part. Replace the cutter.
Renew the supply of roll media.
Manually rewind roll all the way and press OK.
Check the pick-up unit and roll media. Check to see if paper has not jammed.
Load cut sheets at the paper tray port.
Check the media size. Change the media size.
Confirm usage cond. of the paper.
Reload the paper.
Reload the roll media.
Canon Printer Wrong Paper Size

Canon Printers are high-quality printers that provide reliable printing solutions with minimum possibility of errors. You can use Canon printers for printing, scanning, and copying the files. You can print the documents by aligning the papers that match the requirements of the model you are using. Each canon printer demands different specifications of the paper according to the design of the machine. In case the input tray does not contain the specific paper size, then you may face the printing error “Canon Printer Wrong Paper Size”. There are also certain other reasons for the problem which you need to take care of.
Why does My Canon Printer Says Wrong Paper Size?
The canon Printer Wrong Paper Size issue can be due to the use of different paper sizes or type for the printer. You need t make sure that the paper you are aligning in the input tray matches the requirements of the Canon printer. It can also be due to any changes in the regional settings of the paper. If the user changes the paper settings to the default one and mentions the different paper sizes, then you may likely face an issue while printing. So, you need to make sure to use the correct paper for your printer.
Not only has the paper size a matter, but also the user has to take into account the type of paper it is using. If the paper type does not match the requirements of the printer, then also you may face the error. Also, in case of the wrong alignment of the papers in the input tray, the user may face the same issue. So, it is recommended to align the papers correctly and adjust them using the guides on the tray to avoid such issues with the Canon printer.
Also check: Fix canon support code 6000
Troubleshoot and Resolve – Canon Printer Wrong Paper Size
There is a quick and easy process to fix the “Wrong paper Size” issue for your Canon Printer. The user has to change the default paper size on the printer the solution the problem. So, follow the steps below:
Remove and reload the paper to the Input Tray
Firstly, you can start to resolve the problem by removing the paper from the input tray and then reloading it again. Sometimes, you may face the wrong paper size error due to improper alignment of the paper in the tray. So, follow the steps below to fix the issue.
- Remove all the papers in the input tray.
- Then, align the papers by tapping their sides properly.
- Again place the paper in the tray, and adjust the guides so that the papers stack properly in the tray.
- Finally, perform the print and check for the solution of the problem Canon Printer Wrong Paper Size.
Change Default Paper Settings
- Firstly, click on the ‘Start’ button.
- After that, go to the Settings option.
- Then, click on ‘Printers’.
- Now, right-click on the specific name of the printer.
- Select the properties.
- Navigate to the ‘paper’ tab and click on it.
- Finally, choose the paper size that you wish to use.
- Now, send the print command and check for the solution to the error Canon Printer Wrong Paper Size. If the error persists then follow the next step.
Specify the Height and Width of the Paper
The user can go to the quick setup tab and make the changes in the custom size of the paper. Custom paper settings allow you to specifically mention the width and the height of the paper. So, follow the steps below to resolve Canon Printer Wrong Paper Size
- Firstly, open the “Printer Driver Setup Window”.
- After that, click on “Paper Size”.
- Go to the Page Setup tab and click on “Page Size”.
- A dialog box will appear on the screen. You can set the Custom Paper Size in this window.
- Select the height and width of the paper.
- Click on the OK button.
- Again click the OK button in the next window.
- Finally, check for the solution to the problem.
Also check: Fix canon printer won’t turn on
Reset the Canon Printer
There can be any hardware problems and error states of the printer due to which it may show an error while printing. You can fix the Canon Printer Wrong Paper Size error by resetting the printer. So, follow the steps below to reset:
- Turn ON the printer.
- Now, disconnect it from the main power source directly. You can check the rear of the printer to access the power cord.
- After that, wait for one minute.
- Again connect the printer to the main power source.
- Turn the printer ON.
- Connect it with the internet and then proceed with the printing task.
- Check for the solution to the problem,
If still, you do not get the solution to the Canon Printer Wrong Paper Size problem, then you can contact the Canon customer care executive to fix the issue. The expert representative will provide you with the best solution within minutes.
You can call the executive on the official toll-free phone number 1860 180 3366. The expert agent is present 24 hours a day, seven days a week. You can call anytime for resolving your concern and demanding the professional help of the executive.
Apart from calling the customer care executive, the users facing the [problem can also approach the Canon expert online and demand help and support for their issues. Canon also has an online help center where there is a direct listing of the solutions to major problems that the users may face in their daily lives with the Canon printers. You can directly access or search the list for the issue Canon Printer Wrong Paper Size, and get the listed solution within seconds. This way you can resolve the problem quickly and professionally.